Photoshop for the Curious
Creating Seamless Tiles
In the past eight or nine months, we’ve touched a great deal on the engine of Photoshop. We’ve taken a tour of the palettes and menus, explored some of the staple functions with which most every Photoshop user should be familiar, and even tackled the complexities of image resolution in an effort to reduce the complexity.
Unless specifically queried about a topic, I’ve essentially reached the end of my planned series of Photoshop functionality. It’s now finally time to roll with various tutorials of practical tasks you may wish to do with Photoshop. We’ve already started with June’s tutorial on creating speech and thought bubbles. This month, we’ll learn how you can adjust any pattern or texture image so that it seamlessly tiles together to make up a larger pattern.
One caveat: I implore you to not go around filling your Web pages with your latest tiled background creations, making text on those pages nearly impossible to read. Actually, if not for Web backgrounds, I am not sure what other reasons you may have for wanting a tiled background, but I know there are people who are visually more creative than I am.
Preparing the Image To Be Tiled
The first task is to decide how large the individual piece of the tile should be. Too small, and the pattern repetition might be too noticeable (unless that’s what you’re going for). Too large, and you defeat the purpose of a tiled image and may as well just create a full-size background.
I’m going to go with a 300×300 pixel size for this tutorial. But there is no reason you can’t go smaller if the smaller size works for what you’re doing. There’s also no rule that the tile piece has to be a perfect square. The dimensions can be whatever works for you. It may be that you already have some sort of image that you want to tile seamlessly, and its size may dictate the dimensions of your individual tile piece.
Starting With the Texture
If you don’t already have an image you want to use for this tutorial, let’s make one. I’ve opened a new 300×300 pixel document and am looking at the Textures folder of Actions. If you don’t already have access to these Actions, you must first access the Actions palette from the Window menu. If the Textures folder is not present, click the pop-up menu in the upper right corner of the Actions palette, and choose Textures near the bottom of the menu. If you do not see Textures in this pop-up menu, instead select Load Actions, navigate to your Photoshop application folder ‣ Presets ‣ Actions, and select the Textures.atn file.
Now that the default Photoshop Texture Actions are available to you, spend a while trying them out and find one you like. You can use any of them, but choosing one that has a seemingly randomized pattern around all four edges will be easier to tile. I’m going to go with the Parchment Paper Texture.
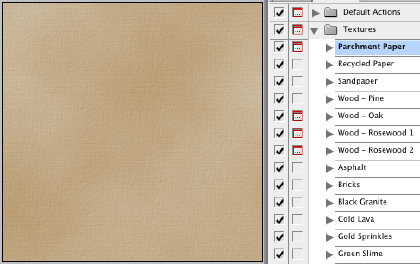
The Parchment Paper Texture from Photoshop’s included Actions.
Visualizing the Edges Tiled Together
An image will tile seamlessly when pixels at any edge blend perfectly with matching pixels on the opposite, 180-degree edge—be they top-to-bottom or left-to-right.
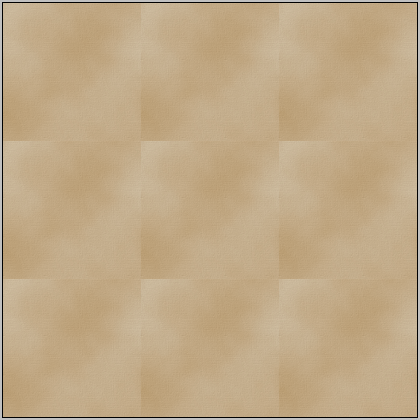
Tiled version of our texture before making it seamless.
In order to make the edges blend with repeated copies of the texture, we’d ideally be able to see all four edges adjacent to their opposite edges, simultaneously.
To accomplish this, head to Filter ‣ Distort ‣ Shear…. If the grid in the upper left shows anything other than a dark vertical line down the center, click the Defaults button.
Now, drag the black anchor points at the top and bottom of this vertical line all the way to the right corners. Also make sure that the Wrap Around option is chosen.
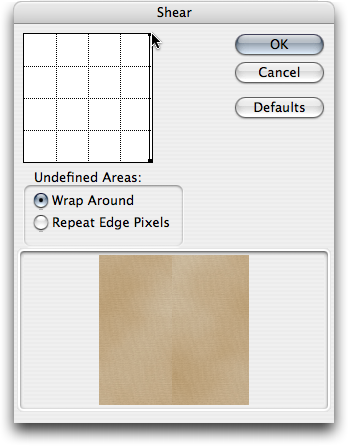
Shearing the image will offer the ability to edit the texture so the edges will blend.
This takes care of the left and right edges. We need to do the same for the top and bottom. Unfortunately, the Shear function only works on a side-to-side motion. But it’s simple enough to get around that. Simply rotate your image 90 degrees from the Image ‣ Rotate Canvas command, and run the Shear function again.
A shortcut is that you can repeat any Filter you just applied by selecting it from the top of the Filter menu, or pressing Command-F.
Depending on your texture, you may wish to rotate it 90 degrees back to its original orientation.
So, what have we accomplished so far? Look above at the tiled sample with edges that do not blend together. The Shear function has essentially moved all four edges into the middle.
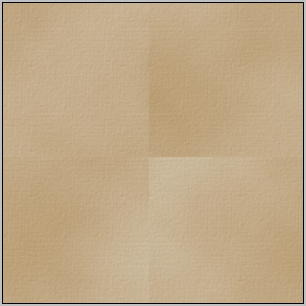
Our texture is now ready for editing to make it tile seamlessly.
The center of the image now shows what used to be all four corners. Since we set the Shear function to wrap pixels (to the opposite side), the edges of this image will tile seamlessly. Only now, we have the visible seam going through the middle of our image. So let’s fix that.
Hiding the Seams
There’s no set rule for how you choose to blend the edges. I’m going to use the Healing Brush tool. For this particular texture, it should produce adequate results. I’m using a brush size of 50 pixels and 0% hardness.
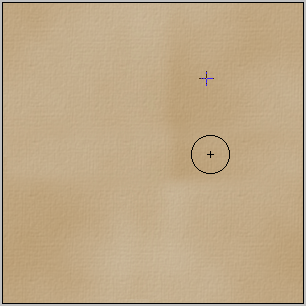
Using the Healing Brush tool to blend the edges.
As you can see, you don’t want to limit your editing to just brushing across the horizontal and vertical boundaries of the original edges. If you only do that much, you’ll still detect a grid pattern when the image tiles. In the image above, you can see the cross pattern of where the original seam was. So, continue to do some more blending until your eye no longer sees the edges, even if that means moving away from those original edges to blend in lighter or darker splotches that are nearby, such as the dark region in my above sample, located a little above and right of center.

Touching up neighboring areas to hide ghosty, telltale traces of blending.
A completely optional step would be to perform the Shear functions again and double-check your blending. It could be that where you blended at the top, bottom, left, and right centers might not blend well with their opposites. Re-shearing the image will bring those points to the center where you can check them and easily hit them with the Healing Brush tool.
Reaping the Results
Save your image and define it as a tiling background for the desired portion of your Web design, and you’ll see that it will appear like an endless texture. You may wish to load a large page of the tiled image on your screen and step back to look at it. This is where you might start to perceive repeating patterns of splotchy shades. If they bug you, you can either go back to the individual tile piece and try to soften it, or you can decide that your tile piece will need to be a bit larger. Of course, the latter choice means you’ll essentially have to start over.
Feel free to send me your results. I’ll sort out what I think are the best ten (if I receive that many) and present them next month. Please only send the individual tile piece and not a large screen capture of multiple pieces.
Topics For Upcoming Months
- Mask-erades
- Fun With the Automate Menu
- Photomerge
- Fun With Filters
- File Format Fever
The running list that I began with is starting to dwindle, but never fear, I have more ideas for future columns. If you have a topic suggestion, please share it. I’m definitely interested in expanding this list with topics that are of interest to you.
![]() Copyright © 2007 Lee Bennett, lbennett@atpm.com.
Copyright © 2007 Lee Bennett, lbennett@atpm.com.
Also in This Series
- File Format Fever · November 2008
- Don’t Reset—Preset! · October 2008
- Don’t Yield—Merge! · September 2008
- What If I Just Left It Alone? · August 2008
- Screen Replacements—When Reality Isn’t Real Enough · July 2008
- No Smoking Gun: Re-tooling Dodge and Burn · May 2008
- Mask-erades · February 2008
- Back in February · November 2007
- I Love Layers · October 2007
- Complete Archive
Reader Comments (5)
I have really enjoyed and followed each lesson and learned a great deal. One area I feel weak in is layers. Somehow I just don't get it and its so important. Reviewing your past lessons ,I don't see one on that topic....do you intend to do one ? I know you have done the layer effects but that didn't seem to make it for me. Many thanks for your fine articles.
Thank-you for your great information on patterns!
I am looking for a pattern or texture (I've been trying to make one...sigh)(a glitter, and a die-struck pattern) that has no color, so I can apply the texture only to the art.
Am I trying the impossible?
many thanks for any advice,
(this is for a client, so I can pay for professional help)
Francine
Add A Comment