Photoshop for the Curious
Mask-erades
Welcome back to Photoshop for the Curious. Last November, when we briefly parted ways to celebrate our various holidays, I shared the outcome of a splendid feature in Photoshop that would be covered this month—image masks. This month’s tutorial will explore the basic steps of image masking. To the beginner, creating image masks can seem to be a tedious and time-consuming task.
Admittedly, even to an expert, masking some images is laborious, depending on the shape of the object to be isolated and how cluttered the background is. However, there are some ways that can make parts of the process faster. I’ll share some of these time-savers in this tutorial, and show that the results of a good image mask are worth the effort.
So what, exactly, is an image mask? Examining the same graphic from last November’s column reveals five elements composited into a single image.

A sample image that uses Photoshop’s image masking feature. (Artwork reproduced by permission of the Forest Lake Seventh-day Adventist Church.)
Each element began as a large, physical piece of artwork drawn by an artist. One by one, I placed each piece against a white screen (the reason for the white screen will be explained shortly) and photographed them.

Each individual piece of artwork was positioned on a pedestal against a large white screen to be photographed.
This artwork was originally arranged on the stage at a church to illustrate a sermon series. My task was to create a graphic image of the illustration that could be used in various media, including being printed onto CDs, DVDs, and promotional flyers, as well as being animated for video openers. When the art was arranged on the church stage, observers could see the individual pieces in front of the chosen background. By photographing each piece separately, I retained the ability to easily fine-tune the exact sizes and positions in relation to each other.
At this point, in order to isolate the artwork and remove the unwanted background, someone not familiar with image masks might say that I would just need to use the Eraser tool to start removing everything that surrounded the art. This technique would work, but is dangerous. If I erased a small portion and didn’t realize it, then came back at a later time, the erased portion would be gone. But, with image masks, Photoshop always retains the complete, original image. As the name suggests, unwanted parts of the image are simply being masked, or hidden, from view.
There are probably countless ways the actual shape of a mask can be defined. However, before masking can begin, the image must be on a non-background layer. For example, if a plain JPEG image from a digital camera is opened in Photoshop, the Layers palette will show it on a layer named “Background” in italics with a padlock icon to the right. The default background layer does not support any type of transparency, so it must be converted to an editable layer before it can be masked. This is most easily accomplished by simply double-clicking that background layer. A New Layer setup window will appear with several options that can be ignored for now. If a name for this layer other than “Layer 0” is desired, the name can be typed in here.
From this point, the techniques are wide and varied. I will only be covering a very small number of the possible techniques for creating a mask. All of the techniques are based on two primary types of masks: Layer Masks and Vector Masks.
Vector Masks
Anyone not familiar with vector-based artwork can safely skip this Vector Masks section. Those who use or create vector artwork will appreciate the ease with which a vector shape can be used as a mask. To create a vector mask on the current layer, head to the Layer ‣ Vector Mask menu and choose Reveal All. Then use the Pen tool to create the vector shape you want to use as the mask.

Just like any other vector shape used in artwork, the control points can be relocated using the white Direct Selection tool. Bezier handles can also be added to create curved lines.
Pixel-based Layer Masks
For my task of masking out the church artwork, a standard Layer Mask that does not use vector shapes is more appropriate. I’m not looking to mask out hard lines. Rather, I want the mask to reveal only the artwork, following its edges to eliminate the background, including the pedestal, and to even have soft anti-aliasing that will blend the edges into any background.
Some designers will start by using the Pen tool, creating vector lines and curves to trace around the artwork to be masked, and then converting the trace into an anti-aliased selection which can then be made into a mask. Personally, I find this difficult and inaccurate, especially in very small and tight portions of an image. So, I am going to show the method of creating an image mask that I use most often, and ask that you remember that my way is not the only way to do it. If you have skill in creating reasonably accurate traces using vector drawing tools, there is nothing wrong with that method.
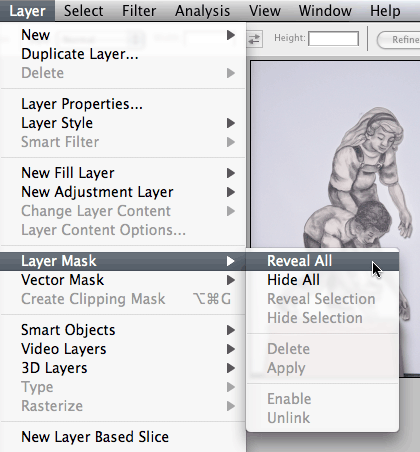
My first step is to go to the Layer ‣ Layer Mask menu while the layer I want to work on is active, then select Reveal All.
Adding a Layer Mask to my image.
It may seem that nothing has happened, but looking at the Layers palette will reveal that a white thumbnail has appeared on the artwork’s layer, next to its thumbnail. The white thumbnail represents the mask layer and is the one I’ll be working on from this point forward.
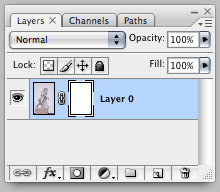
The newly created mask’s thumbnail appears on the same layer as the artwork to which the mask was applied. Currently, it is white, meaning that all of the original image is still visible. Black portions indicate areas that are masked, or hidden.
While I’m talking about the Layers palette, look at the third button from the left along the bottom—the one that looks like a gray square with a white circle. That’s a shortcut to the Layer ‣ Layer Mask ‣ Reveal All command.
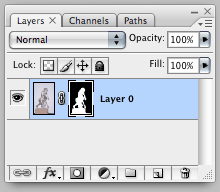
Also notice how the thumbnail for the mask has thin black lines on each corner. The purpose of these lines is to indicate whether the image itself or its mask layer is targeted for editing. It is easy to switch between editing the image and editing the mask simply by clicking on the corresponding thumbnail.
With the mask layer active, I can now start hiding the parts of the image that I don’t want to be visible. I said earlier that there was a good reason I placed the image in front of a white screen. Having done so allows me to more easily select the background area with the Magic Wand tool. A background of a single, flat color might have worked even better, but the white projection screen was, at the time, the most readily available backdrop. Plus, using white minimizes the risk of a thin halo of color appearing around the edge of the completed mask.
In order to use the Magic Wand tool, I temporarily click on the image’s thumbnail so that it is targeted and the Magic Wand “sees” the image’s pixels and not the pixels that make up the mask. When I’m finished, I click on the mask’s thumbnail to continue editing the mask.

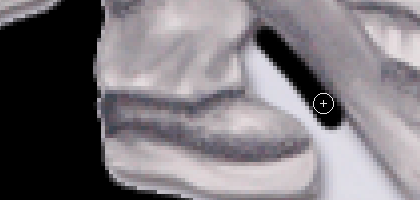
Using the Magic Wand tool with a tolerance of 10 and anti-aliasing enabled, I clicked to select the outer area of the background, then Shift-clicked to select additional areas closer to the art, as well as isolated areas such as between the boy’s feet.
The dashed line (known as Marching Ants) visible in the above screenshot indicates the area I have selected. Obviously, this wasn’t a perfect selection. An area on the girl’s arm wasn’t tight enough, and, because the Magic Wand tool was only selecting white areas, it missed the pedestal and the thin black frame at the bottom of the screen. Fortunately, these are all easy to fix once the mask has been established.
Remember, I’m going to be working on the mask layer and not the image itself. I confirm this by noting the indicators on the corners of the mask’s thumbnail. Also remember that white on a layer mask means that the image beneath is visible, and the entire mask layer is currently white. Since black hides the image, I simply go to the Image ‣ Adjustments menu and select Invert. This command will only apply the inversion from white to black in the areas defined by the selection I created.

Having inverted portions of the mask layer from white to black, all areas of the mask that are black will make the corresponding portions of the image transparent, as if I had erased those areas.
Looking at the Layers palette, I see that part of the mask layer’s thumbnail is black. The white area continues to show the image of the boy and girl through the mask.
In the interest of completeness, I have described my technique of using the Magic Wand tool for the benefit of anyone using older versions of Photoshop. In Photoshop CS3, there is a new tool called Quick Selection (click and hold the Magic Wand tool to access it). This tool accomplishes similar results somewhat more quickly and easily. With this tool’s Auto-Enhance function enabled, the results might even be a little better. Some trial and error may be required.
For images with surrounding backgrounds that are not as clean and solid as the white screen I used for these pieces of artwork, the Magic Wand and Quick Selection tools may prove to be ineffective. In such situations, the aforementioned practice of using the Pen tool to trace the edges for a desired mask might be desirable. Alternatively, the Lasso tool can be used to draw a selection fairly close to the desired edges, then cleaned up on the mask layer. The same type of cleanup, albeit much less, is my next step on this sample image of a boy and girl.
Fine-tuning the Mask
As previously noted, in addition to the pedestal, there are still a few small areas of the background that need to be removed by expanding the mask to include those areas. In order to more easily see where cleanup is needed, I generally create a new layer below this masked layer, fill the new layer with either black or white, and periodically switch between black and white to be certain I catch all areas that need cleaning up.

With a black-filled layer behind my art, I can more easily see the areas that need to be cleaned up. At this stage, always examine the image carefully. I found a tiny dot above/behind the girl’s head, and I also noticed some areas showing a thin white halo left over from the white screen that I had masked, such as along the back edge of the boy’s leg.
To finish masking my image, I check again to be sure the mask layer is targeted by clicking on its thumbnail, then use the Brush tool to paint in additional areas I want to mask. I set the Brush size to only a few pixels, and normally use 90–100% hardness unless I intentionally want to create a softer edge. I also make sure my foreground color is set to black since black is the color that fully masks whatever is below. Likewise, the color can be changed to white, causing the Brush tool to instead remove portions of the mask. This becomes convenient if the original Magic Wand selection happened to include a portion of the image that wasn’t supposed to be masked.
Filling in areas to be masked that were missed by my original selection. It may seem like I’m painting black on top of my image, but I would need only to change that temporary black background layer to another color to see that I’m really just hiding any area that I paint.
A larger brush allowed me to quickly wipe out the pedestal and the black screen border at the bottom of the image. After I clean up all the edges, I can hide (or remove) the black layer underneath the image, and my mask is completed.

The completed mask.
Take note of the small chain link icon between the thumbnails of the image and the mask in the Layers palette. That icon indicates that the mask layer is linked to the image layer. When this link is enabled, any transformation I perform, such as moving or scaling, will treat the image and its mask as a single object. Suppose, instead, I had a mask that was just a simple shape, like an oval, with a portrait inside. Then suppose I realized I’d like to make the person’s portrait a bit larger in the space of the mask, but keep the mask exactly the size it is. I simply click that little chain link icon to disable the link, target the image by clicking on its thumbnail, then use the Transform tools in the Edit menu to enlarge the image. Likewise, by enabling the mask’s thumbnail instead, the mask can be moved or transformed while leaving the image in place.

Adjustment Layers and Layer Styles also respect masks. Notice how the drop shadow is applied to the children, ignoring the background which is still present, only hidden by the mask.
To finish my composite image, seen at the beginning of this tutorial, I repeated this process for all the remaining pieces. Clearly, I had quite a lot more work to do on the field of hands across the bottom and with the spokes of the wheelchair.
Using the Refine Edge Feature
A new function in Photoshop CS3, combined with the Magnetic Lasso tool, may help in creating a selection just prior to turning that selection into a mask.
Starting back at the original, unmasked image, I’ll use the Magnetic Lasso to create a selection. Note that I had originally used the Magic Wand to select the background, and then inverted the color to black to mask it off. This time, I’m using the Magnetic Lasso to create a selection around the children. The reason will be apparent in just a moment.

Creating a selection around the children using the Magnetic Lasso tool.
Once I have my selection around the children, I went to the Refine Edge command under the Select menu.

Using Refine Edge to improve the selection.
CS3’s Refine Edge window provides adjustments to tweak the selection and compensate for less-than-perfect edges. As I adjust values such as the contrast between light and dark, smoothness, and how much to feather (soften) the selection edges, I can toggle among five different modes in order to preview exactly what the results will be.
The first mode shows the selection in the usual Marching Ants display. The second mode, which is being used for the above screenshot, uses a translucent red color to show what areas will be masked. The third and fourth modes place the masked portion above a black background and white background, respectively. The fifth mode shows the mask itself.
Once I’m happy with the adjustments, I click the OK button and return to my image with the Marching Ants having been adjusted per the Refine Edge changes. When I click the Add Layer Mask button at the bottom of the Layers palette, all areas outside the selection are hidden by the mask. Finally, I can target the mask by clicking its thumbnail and perform further fine-tuning, as I described above.
Homework Assignment
Try creating a crowd of clones! Take several digital shots of yourself (or of a willing volunteer) standing in various poses. Open all the images in Photoshop and combine them into a single Photoshop document with each image on its own layer. Hide all the layers except one. Mask out the background so you’re left with just the person. Hide this layer, turn on another, and repeat until all the “clones” have been masked. Find a photo of an environment in which the clones can stand. Place that photo behind all the other layers. Unhide all the layers and use the Move tool to arrange each clone to the desired position. Bonus points if one or more of the clones were sitting on something in the original shot that is removed by the mask, leaving the clone to be sitting on something else that is visible in the new background photo. Maybe you can even make one clone appear to be sitting on another, who is on the ground on hands and knees.

I created this image for the back of a CD case. Singers were photographed by themselves in a studio using a plain background, which was hidden with a mask. The new background came from a stock photography library and was placed behind the singers, whose positions were arranged to best blend with the alley. Finally, a shadow of each singer was made to appear on the ground to approximate a light from overhead.
![]() Copyright © 2008 Lee Bennett, lbennett@atpm.com.
Copyright © 2008 Lee Bennett, lbennett@atpm.com.
Also in This Series
- File Format Fever · November 2008
- Don’t Reset—Preset! · October 2008
- Don’t Yield—Merge! · September 2008
- What If I Just Left It Alone? · August 2008
- Screen Replacements—When Reality Isn’t Real Enough · July 2008
- No Smoking Gun: Re-tooling Dodge and Burn · May 2008
- Mask-erades · February 2008
- Back in February · November 2007
- I Love Layers · October 2007
- Complete Archive
Reader Comments (2)
I meant to be clear that the instructions above for using the Magnetic Lasso tool first, then clicking the Mask button at the bottom of the Layers palette isn't limited to only using the magnetic Lasso tool.
My first rundown of creating a mask had you enabling a the mask first, then selecting an area to be masked, and filling it with black. If it makes more sense to you, it is perfectly fine to first use the Magic Wand to select the surrounding area if it's a flat color. Then, instead of filling that region with black, you can invert the selection so the art you want to still be showing is now selected instead, then just click the Layer palette's Mask button. Voila!
Add A Comment