Photoshop for the Curious
No Smoking Gun: Re-tooling Dodge and Burn
In my article from October 2007, I described how Adjustment Layers could be used to perform visible changes on an image while leaving the original image untouched. Making apparent changes to an image in this manner, without actually changing the image, is known as nondestructive editing.
Photoshop’s Dodge and Burn tools, however, have largely been known as destructive tools. Destructive editing may sound like a harsh term, but all it really means is that pixels which comprise the original image have been changed. Barring a few levels of the Undo command and/or saving a separate copy of the image, a destructive edit permanently changes the pixels.
In this month’s tutorial, I’ll show how using tools other than the original Dodge and Burn tools can perform nondestructive dodge and burn edits, and finish by showing how almost nothing—possibly absolutely nothing—in Photoshop is locked to just one task.
The History of Dodging and Burning
Those unfamiliar with the process of dodging and burning may be surprised to realize that these tools originate from an extremely low-tech trick used in the days of photo darkrooms and enlargers. Many moons ago, to make a photo, a film negative was placed into a device called an enlarger. The enlarger was akin to a slide projector with the image from the negative being projected onto a piece of photo-sensitive paper. The longer the light remained on, the darker the photo became.
In many situations, photographers would want a photo to be a little bit lighter in one spot or a little bit darker in another spot. To darken a particular spot, the darkroom technician would use either a large opaque sheet with a hole cut into it or, far more often, his own hands to block the light coming out of the enlarger. When using hands, he would cup them in a way to only allow a small spot of light through. By moving the respective devices around, the spot of light could be made to “burn” more light at any point of the photograph.
On the opposite end, various shapes, such as the hole cut from the above-mentioned burn tool, would be attached to very thin wire and held above portions of the photo. This process would “dodge” the light from exposing the photo paper during that time, making the area a bit lighter.
In both cases, the technician would typically keep the respective dodge and burn devices in constant slight motion so the area dodged or burned would not create a hard edge around the perimeter. Also, in both cases, the process was a very inexact science. The results could never been seen until after the photo had been developed and could be taken into viewing light. I can speak from personal experience in darkrooms that I would often attempt to dodge or burn portions of an image up to a dozen times before getting it exactly the way I wanted.
Today—at least in my world—darkrooms are an ancient memory, and I now perform dodging and burning with tools in Photoshop specifically created to approximate the effect of doing so.
Each new major version of Photoshop has improved the ability to perform image adjustments in a nondestructive manner. Though the Dodge and Burn tools aren’t currently nondestructive by default, they can be—with a minimal amount of advance preparation.
Preparing a Faux Adjustment Layer
- Open an image in Photoshop. Any image that could benefit from a bit of dodge and burn love will suffice for this tutorial.
- Create a new layer above the image. While technically not an Adjustment Layer, this is where the dodge and burn adjustments will be performed, instead of on the original image.
- Under the Edit menu, select Fill….
- Select 50% Gray in the Contents section of the Fill dialog box. Ensure the Blending Mode is set to Normal, Opacity is 100%, and Preserve Transparency is off.
These steps will result in a neutral gray color that covers the original image. This 50% gray color appears on its own layer above the image in the Layers palette.
- With the gray layer highlighted in the Layers palette, change its Blending Mode to Soft Light.

A 50% gray fill occupies an entire layer above the original image. Its Blending Mode has been set to Soft Light which, at this stage, has made it invisible.
Right now, the example photograph, above, appears unchanged because the Soft Light Blending Mode hides the 50% gray layer. This is why 50% gray is considered neutral. Therefore, dodging and burning can now be performed on this gray layer without directly affecting the original image.
Abandoning the Traditional Dodge and Burn Tools
The nature of this faux Adjustment Layer makes the traditional Dodge and Burn tools useless. I’d be a liar if I said I completely understood how the Soft Light Blending Mode changes the behavior of the Dodge and Burn tools. But, I do know, for one, that every test I performed while writing this tutorial resulted only in varying degrees of dodging. I could never perform any burning.
Secondly, since I am working on a single, 50% gray color, regardless whether it’s visible, there are no highlights or shadows. Consequently, the Dodge and Burn tools’ selector for adjusting Highlights, Midtones, or Shadows is a bust.
Use the Brush Tool Instead
Thankfully, the solution is a very simple one. I’ve established that the 50% gray fill on top of the image is completely invisible when the gray color’s Blending Mode is Soft Light. Quite predictably, if the gray becomes lighter, toward white, the result is that the image on the layer beneath is also lightened. Conversely, when the gray becomes darker, toward black, the image beneath is darkened.
So, instead of using the Dodge and Burn tools, the Brush tool makes the perfect stunt double. Here’s the procedure.
- Ensure the 50% gray layer is selected in the Layers palette. This is the layer to be edited—not the original image.
- Set the foreground color in the Tools palette to black for burning or white for dodging.
- With the Brush tool active, choose a brush size and hardness in the same manner as if the original Dodge and Burn tools were being used.
- Choose an opacity percentage. Higher numbers equal increased lightening or darkening.
- Use the Brush tool over the image in the same manner that the Dodge and Burn tools would be used.
Instead of toggling between the traditional Dodge and Burn tools to lighten and darken, respectively, painting white (to dodge) or black (to burn) with the Brush tool on the 50% gray layer offers near identical functionality while preserving the original image’s pixels.

The shadows and the people sitting by the water were lightened using a dodging method, but performed on the 50% gray layer instead of on the original image.
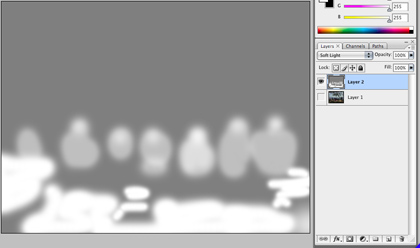
By hiding the layer containing the original image, the 50% gray layer becomes temporarily visible, revealing the exact areas where I painted white to lighten certain portions. 100% opacity was used on the bottom to lighten the ground shadows considerably. Only 50% painting opacity was used on the people in chairs, which is why my painted shapes only appear to be a lighter shade of gray instead of white.
The image above showing my 50% gray layer after some dodging exposes one small caveat resulting from the Soft Light Blending Mode: dodging and burning can only be done to a certain amount and no further. Even if 100% white or 100% black is painted with the Brush tool, the area painted will never become solid white or black because the Soft Light Blending Mode will always allow some of the original image to show through.
Yet, one must remember that the typical goal of dodging and burning is only to gently lighten or darken bits of an image by small amounts. When I require more significant lightening or darkening to areas of an image, I’ll generally reach for other Photoshop tools instead of Dodge and Burn.
Don’t Forget—It’s Nondestructive
Returning portions of an image to how it looked before any dodging or burning was done is accomplished simply by using the Brush tool to paint 50% gray back over the areas to be restored.
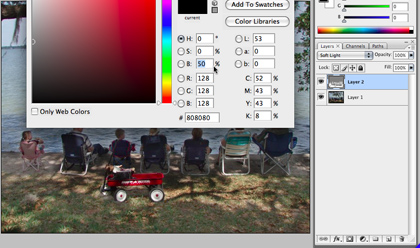
Instead of painting black or white, set the foreground color to 50% gray by clicking the foreground color well in the Tool palette, then set a value of 50 in the Brightness field, labeled B, with the H and S fields at 0, as shown above. Also remember to set the Brush tool opacity to 100%.
Now having used the Brush tool for dodging and burning instead of the actual Dodge and Burn tools, it becomes clear that one should never assume that a particular tool or command in Photoshop is only meant to accomplish one thing. With that in mind, here is this month’s…
Homework Assignment
I’ll be stepping outside the realm of nondestructive dodging and burning for this assignment. In the spirit of recognizing that probably nothing in Photoshop is a uni-tasker, this assignment is to use the same steps described above to perform a very different result—a hand-tinting effect.
You may have already surmised that there’s absolutely nothing wrong with using colors other than black, white, or 50% gray on the faux Adjustment Layer. The result can approximate a hand-tint effect on any part of the image.

By using some green and blue shades, I deepened the color of the grass and the water by painting a small bit of the respective colors on the 50% gray layer. Of course, tints like this don’t have to be restricted to improving realism. It would be just as easy to paint a purplish sky.
This effect can be even more pronounced when the original image is desaturated to grayscale. If the original image is grayscale to begin with, be sure to first change to RGB Mode from the Image menu. Now, try just a few accent colors.
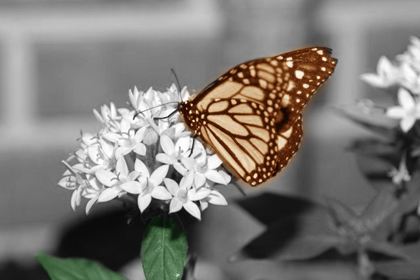
Take note that this is not the same as holding the original colors from parts of an image and desaturating the rest. This, instead, is tinting new colors onto specific areas of the photo.
I vividly recall using photographic tinting inks, cotton balls, cotton swabs, and toothpicks to hand-tint black-and-white prints I’d made in the darkroom. Today, using this faux Adjustment Layer technique, I can now continue to enjoy the fun of tinting grayscale photographs without the worry of permanent mistakes or costly tinting inks.
Above all else, don’t stop experimenting—on copies of your original images, of course! Try setting up multiple faux Adjustment Layers and overlapping your edits. Try Blending Modes other than Soft Light. And, most importantly, if a result is not what was expected, don’t be so quick to hit the Undo command. Take a second to examine the result and what was done to create it—knowing what was done might prove useful in the future.
![]() Copyright © 2008 Lee Bennett, lbennett@atpm.com.
Copyright © 2008 Lee Bennett, lbennett@atpm.com.
Also in This Series
- File Format Fever · November 2008
- Don’t Reset—Preset! · October 2008
- Don’t Yield—Merge! · September 2008
- What If I Just Left It Alone? · August 2008
- Screen Replacements—When Reality Isn’t Real Enough · July 2008
- No Smoking Gun: Re-tooling Dodge and Burn · May 2008
- Mask-erades · February 2008
- Back in February · November 2007
- I Love Layers · October 2007
- Complete Archive
Reader Comments (2)
What a simple workaround to create a non-destructive dodge/burn layer. I've been experimenting with layer masks to get the same effect but haven't come up with anything near this simple or elegant.
Add A Comment