Photoshop for the Curious
I Love Layers
Reader Don Bruno posted a comment to last month’s column saying:
One area I feel weak in is layers. Somehow I just don’t get it and it’s so important. Reviewing your past lessons, I don’t see one on that topic…do you intend to do one?
I can’t believe I didn’t previously give more attention to this vital function of Photoshop. Layers are so embedded in my thinking, that it’s easy for me to not realize that others might not understand them. So, for those individuals, let’s get started with a short story.
An Anecdote About Layers
Imagine it’s now centuries ago, and you’re standing next to one of the great artists of the Renaissance. There’s a blank painting canvas in front of the artist. He lifts his brush and begins spreading a seemingly infinite number of hues across the surface. He’s conversing with you about what he’s thinking and, at some point, muses about exactly where he should position a tree in the background of his painting.
Since you are a time traveler, you tell the artist to wait just a moment. You zip back to present day and acquire a large sheet of clear cellophane. You then return to the artist’s side and present him with this amazing, nearly invisible canvas. He marvels and places the cellophane over his art, then paints his tree. “I think that tree should’ve been a little more to the right,” he says. But before he has the chance to paint over the tree to restore the background, you simply lift the cellophane, move it a little to the right, and lay it back down.
Now, this is a fanciful tale, to be sure. But such is precisely the concept of the Layers feature in Photoshop. But, like nearly every other computer task that mimics or has origins based on real life situations, using Photoshop Layers is even better than a simple piece of cellophane over a canvas.
Modern Layers
Using cellophane over a canvas and using Layers in Photoshop are identical in some ways, but radically better in others. Instead of physical painting tools and pigments on cellophane, you have access to all the things Photoshop can do. Cellophane isn’t perfectly clear, and using several of them will begin to haze over the original canvas, but Photoshop gives you perfectly transparent Layers (up to 100 of them, the last time I checked). You don’t even have to use a solid background canvas since your Photoshop document can be made of only the various transparent Layers.
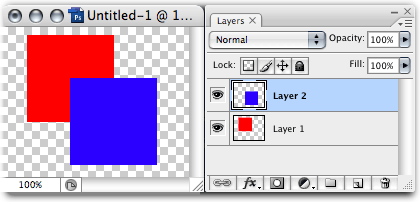
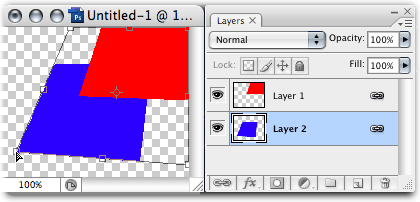
A basic Photoshop document with two Layers.
Without knowing anything about Layers, you may have assumed that I first painted a red square, then painted a blue square on top of it. Having overlapped the blue square over the red, you might believe that the red pixels that were beneath the blue ones are now gone—erased by the blue pixels. If I had only used a single Layer, you’d have been right. But since I placed each square on its own Layer, I still have the complete red square. It’s just as if I had painted the red square on the original canvas and the blue square on the cellophane.
You see in the Layers palette that Layer 2, which contains the blue square, is positioned above Layer 1 with the red square. The Layers palette behaves exactly as you’d expect—Layers at the top of the list appear above all that come below it. So let’s see what happens if I reverse the order of the Layers. I can do this by simply dragging the Layers around to reorder them.
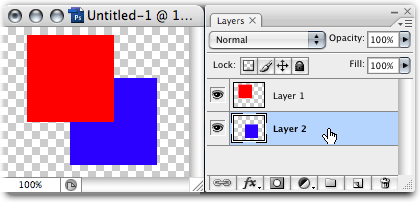
We’ve now put the red square’s Layer on top.
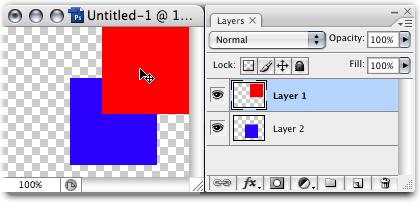
Just as was described in my anecdote, you can effortlessly slide a Layer around to reposition elements that are on that Layer. But completely unlike cellophane over a canvas, you can adjust each Layer’s opacity and how it appears to blend with the object beneath, even though the object beneath has not changed. Let’s see how this works. Suppose I want the red square to overlap on the top right instead of the top left. You’ll first want to select the Move tool from the Tool palette. (If you’re unfamiliar with the available tools in Photoshop, then you didn’t read the first article from this series that was published back in December.)
At this stage, it’s important to note which Layer or Layers are highlighted. When you are working with multiple Layers, you must always be mindful of the Layer on which you’re working—and yes, you can Shift-select multiple Layers.
With the red square’s Layer and the Move tool selected, simply drag the square wherever you want it to be.
You can freely slide Layers around wherever you like. And don’t worry if some of your objects go outside of the canvas boundaries. As long as you don’t forget them, you can still click the Move tool inside the canvas and drag them back in. Photoshop remembers them!
Breaking Down the Layers Palette
I mentioned also that you can make a Layer nondestructively blend in different ways with other Layers that are beneath. We’ll get back to that a little later. For now, let’s take a closer look at the Layers palette itself. As in past Photoshop for the Curious columns, there will be some items we won’t spend much time on since you probably won’t need them at a basic level.
We’ve already learned that each Layer is represented as its own line item in the palette. You can quickly turn Layers on and off just by clicking the small eye icon to the left of each Layer’s thumbnail. For those who like to be organized, you can double-click the name of the Layer to rename it. Be sure to double-click the name and not the Layer’s thumbnail, since that would produce a different result which we’ll cover in a moment.
Add, Remove, and Duplicate Layers
Next, let’s look at the row of icons at the bottom of the palette, starting with the two most straightforward functions on the right side. The trash can icon yields no surprises. Clicking it will delete a Layer that’s selected. Alternatively, you can drag a Layer to this icon. The New Layer icon to the left is equally straightforward. Clicking it will create a new, empty Layer that will appear above the one that is selected. You can hold Command while clicking this icon to have the new Layer appear below the one selected. Also, if you drag an existing Layer to this icon, Photoshop will create an exact duplicate of that Layer.
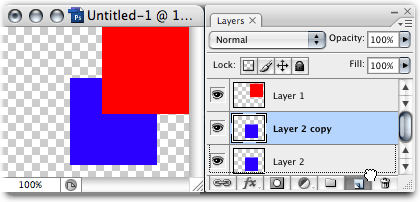
Dragging a Layer to the New Layer icon will duplicate it.
Layer Groups
The next icon to the left with the folder icon will add a new Layer Group to the palette. A Layer Group allows you to place several Layers inside to aid with organization. Note that all the Layers inside a Layer Group will retain their relative positions above and below other Layers.
In other words, an individual Layer that is above a Layer Group in the Layers palette will appear above everything inside the Layer Group. But, if you drag the Layer Group above that other Layer, everything inside the Layer Group will instead appear above that Layer which is not part of the Group. Just like regular Layers, Layer Groups can be renamed by double-clicking the name.
The next three icons are for creating special effects with your Layers.
Adjustment Layers
You’ll remember from my column in May that there are a number of adjustments available from the Image ‣ Adjustments menu, such as Hue/Saturation and Brightness/Contrast. If you’ve used these, you know that their effects are permanently applied when you click the OK button (Undos notwithstanding). Suppose you could apply Adjustments nondestructively!
The icon with a half black, half white circle is for Fill and Adjustment Layers. An Adjustment Layer avails all those different Adjustments, but assigns them to a Layer so that you don’t permanently adjust the image.
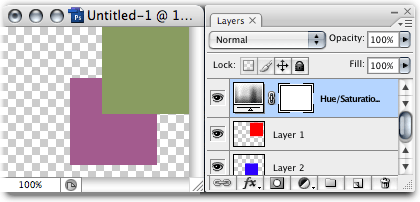
An Adjustment Layer for Hue/Saturation.
As you see above, I’ve used the Hue/Saturation adjustment to change the colors and desaturate the squares. However, you’ll notice that the original two Layer thumbnails still show red and blue squares. A new Layer appears above. If I double-click the adjustment icon (located in the position normally occupied by a Layer’s thumbnail), the Hue/Saturation adjustment window returns with the last settings that I used.
It’s wonderful to have the nondestructive adjustments available, but suppose you only want to make a change to a single Layer. By default, an Adjustment Layer will affect every Layer below it, and none of the Layers above. However, there’s a one-click way to attach an Adjustment Layer to only the Layer immediately beneath. Simply hold the Option key and click the divider in-between the Adjustment Layer and the single Layer. The Adjustment Layer will indent to the right and now only affect the one Layer below.
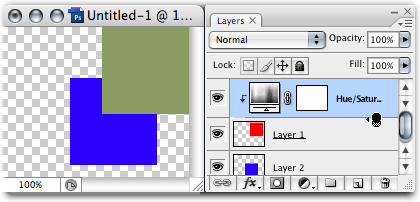
The same Hue/Saturation Adjustment Layer is now only affecting the red square.
Fill Layers
In addition to Adjustment Layers, you can also select one of the first three options in the Fill/Adjustments pulldown to create a Fill Layer. A Fill Layer can either contain a solid color, a gradient, or a pattern.
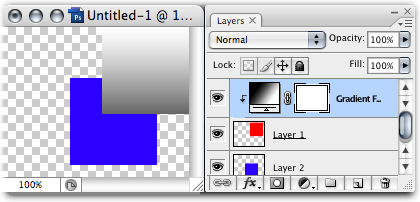
In this image, I’ve selected a gradient as a Fill Layer. At first, since the Fill Layer was at the top, it completely filled the entire canvas with the gradient. But by attaching it to the red square’s Layer, the fill is only visible within any pixels which live on that Layer.
Masks
The next icon to the left is for Masks. Next month’s column will cover Masks in greater detail. So, for now, I’ll just say that Masks allow you to remove the visibility of parts (or all!) of a Layer without erasing any pixels. This means you can restore visibility of those parts at will, and you can even use varying levels of translucency in your Mask.
In some of these screenshots, you may have also noticed a second thumbnail on a Layer located to the right of the primary thumbnail. These represent the Mask that you’ve applied. Masks are always grayscale, so the Mask thumbnails will only show black, white, or shades of gray. Any objects behind white areas of the Mask will show through. Black will obscure or hide any objects beneath.
Come back next month for more about Masks.
Layer Styles
The icon with a small fx is your access to Layer Styles. (Note that this icon changed in Photoshop CS3. The CS2 icon was a black circle with a light f inside.) We explored Layer Styles in July, and I was in error to not write this column about Layers first. By all means, head on over to to that article to learn more about Layer Styles.
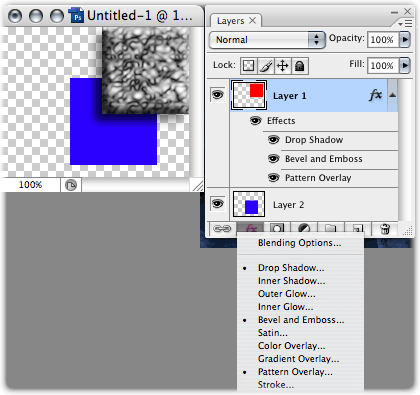
Several Layer Styles have been applied to the red square’s Layer.
Remember I said earlier in this article that, to rename a Layer, you should be sure to double-click on its name and not the thumbnail? If you double-click the thumbnail, the Layer Styles window will appear with the Blending Options visible. You can then choose different Layer Styles from there. As for Blending Options, these effects are somewhat more advanced. Feel free to mess around with the settings to see what happens, but we’ll skip the elaboration on Blending Options for now.
Linking Layers
The last icon will create a link between any Layers that are selected. Suppose you have a complex Photoshop document with 50 Layers, and there are 18 which you know you always want to to be in the same relative position to each other. Naturally, you could Shift-click each of those Layers every time you wanted to move them, but if you went to work on something else and wanted to move those 18 Layers again, you’d have to Shift-click every single one of them again.
Instead, after you’ve selected them all the first time, press the Link button. You’ll see the same icon appear on the right side of each Layer. Now, you only have to select any one of the Layers that are linked. When you use the Move tool to reposition the object, all the linked Layers will follow.
Additionally, if you use the transform tools found in the Edit ‣ Transform menu, the transformations will also be applied to all linked Layers.
Since Layers 1 and 2 are linked, even though only Layer 2 is selected, the Distort transformation command is affecting both Layers.
Now let’s look at the upper portion of the Layers palette.
Blending Modes
The pop-up menu that is set to Normal by default assigns a Blending Mode to a Layer. Blending Modes can create a large variety of interesting, as well as outrageous, effects by changing how a Layer appears to blend with those below. Most of these modes are fairly descriptive just by their names. Others, not so much. Fortunately, you don’t necessarily have to completely understand the mathematics behind what each Blending Mode does. As with anything else we’ve covered with Layers, they’re all nondestructive. So try them, and set it back to Normal if you don’t like what you see.
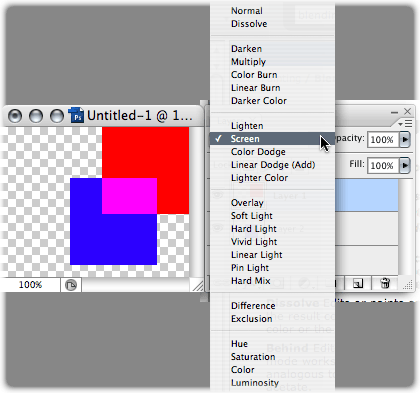
The red square is still above the blue square, but the Screen Blending Mode creates a different appearance where the two overlap.
If you’d like to tackle a technical explanation of what each mode does, head to the Help menu and choose Photoshop Help. Search for Blending Modes, then select the first hit, “About Blending Modes.” On the resulting page is a link for a “List of Blending Modes.”
Opacity and Fill
There’s not much mystery to the Opacity setting. Changing a Layer’s opacity assigns any degree of translucency. 100% is completely opaque, and 0% is completely transparent.
The Fill slider behaves exactly as the Opacity slider, but with one difference: if effects such as Layer Styles are applied, changing the Fill setting will only change the opacity of the original object on the Layer and leave the effects alone.
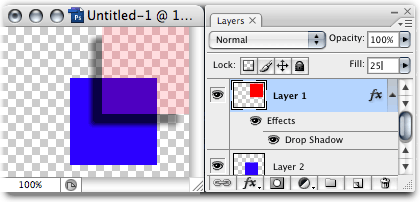
The Fill slider has been reduced to 25%, causing the red square to become translucent, but the drop shadow’s opacity is only affected by the Opacity slider which, here, is still at 100%.
Speaking of opacity, here’s a good point at which to reveal why there’s a checkerboard pattern behind the images. Since you obviously can’t see something that is completely transparent, Photoshop needs some way to indicate areas that are transparent. The checkerboard is how this is accomplished. If your document had no Layers, you would only see a single item in the Layers palette named Background, and it would be italicized to indicate that no part of it can be made transparent. In the screenshot above, you can see that the checkerboard behind the red square is still visible, but tinted because the square isn’t fully transparent. Seeing the checkerboard pattern through another object like this indicates a that the object is translucent.
Locking Layers
There are four buttons next to the Lock label. These will, to varying degrees, prevent changes to a Layer. The padlock on the right completely locks the Layer. When active, you can do nothing to change the it.
The three remaining buttons are partial locks. The first, on the left, locks only transparent pixels. If you were to use the Brush tool to paint color on a Layer with transparent pixels locked, the Brush would only affect areas that already had pixels before you locked transparency.
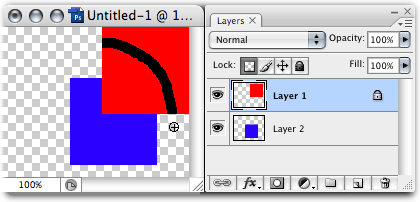
I drew a black circle freehand all around the canvas on the same Layer as the red square. But because transparent pixels were locked, the black line only appeared where the square was visible.
The next button with the paint brush is the image lock. It prevents any pixels on the Layer from being changed with a painting tool. It does, however, allow changes by other means such as the Transform tools.
The crosshair with arrows is the opposite of the image lock button. When active, you can paint on the Layer, but you cannot use the Move tool or Transform tools.
Note that the transparency lock and image lock buttons are always enabled for Shape Layers and Type Layers (we used Shape and Type Layers in June’s column for making speech and thought bubbles). This is not a bug. The partially locked nature is inherent with Shape and Type Layers.
Layers Palette Menu
In the Layer palette menu (the pop-up located just above the Opacity setting), you’ll find more options for working with your Layers. Some of the items are duplicates of the buttons and controls we’ve covered above.
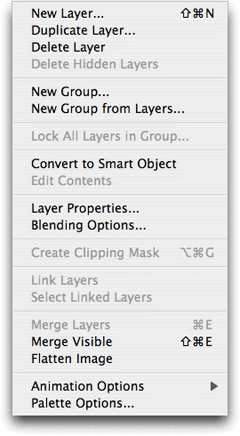
The Layers palette menu.
Some of these are simple, and I’ll go quick through them. The first three items replicate the first two buttons we covered that are located at the bottom of the Layers palette. A fourth option lets you delete every Layer that is hidden (the eye icon checked off). You might want to do this on a copy of a document you wish to send to someone and only allow them to have certain Layers.
The New Group… item is identical to the previously covered button. There’s also the New Group from Layers… command, which will automatically move all selected Layers into the new Group. This command automatically activates the New Group properties window (which you can also activate when clicking the New Group button by holding the Option key). We learn here that, in addition to pre-naming the Group, you can assign a color to the Group, assign an overall Blend Mode (Pass Through disables an overall mode and allows the modes of individual Layers inside the group to work as normal), and change the overall opacity of the entire group.
Lock All Layers in Group… shouldn’t need explanation. The command does the same as if you hit the full Layer lock button on each Layer inside.
Convert to Smart Object and Edit Contents are part of a feature that allows placement of another image which is saved elsewhere (or within the Photoshop document you’re working on if you convert one or more Layers to a Smart Object) and can be edited without changing/destroying the original image.
Layer Properties… is also accessible by Option-double-clicking a Layer’s thumbnail. It provides an alternate means of renaming the Layer plus offers an option to assign a color to Layers for organization purposes.
Blending Options… is identical to double-clicking a Layer’s thumbnail, as described earlier.
Create Clipping Mask is part of the Masking features we’ll cover next month. This particular item creates a Mask from a vector shape and is always grayed out when standard bitmap pixel Layers are selected.
Link Layers is identical to the Link button at the bottom of the palette. If you have one of a set of linked Layers selected, the Select Linked Layers command will highlight all of them as if you had manually Shift-clicked each one.
Merge Layers combines all selected Layers into one, retaining any transparency that was common to all of them. Merge Visible does the same, but instead of acting on selected Layers, it merges every Layer that is visible—with the eye icon turned on. Flatten Image is the same as Merge Visible, but will eradicate all remaining transparency by changing it to white. You’ll be left with the aforementioned Background Layer in the Layers palette. Hidden Layers will also be removed.
We’ll not be covering Animation Options any time soon. Palette Options… simply offers some choices like the size of the Layer thumbnails (or none at all), whether the thumbnails represent the entire canvas or just the area on that Layer that contains pixels, and some other advanced options.
Layers Contextual Menu
The last aspect of the Layers palette we’ll look at is the contextual menu that appears when you right-click (or Control-click) a Layer.
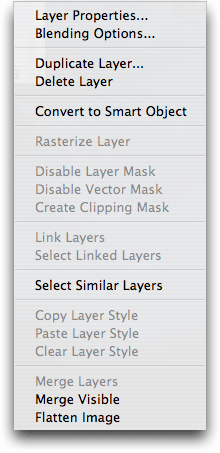
The Layers contextual menu.
Most items I’ll skip since they are duplicates from the Layers palette menu.
Rasterize Layer will convert vector art to bitmap art (pixels). It also rasterizes Text Layers into pixels.
We’ll cover the next three items for Masks next month.
At the moment, I have not learned what criteria Photoshop uses for the Select Similar Layers command. All I can say is that for the example image I’ve been using in this month’s column—two colored squares—the command does select the other unselected Layer.
The three items for Layer Styles can be very handy. Rather than repeatedly setting up the values for multiple Layers to which you want to apply the same effects, you can use the Copy Layer Style command, then paste it to one or more other Layers. This can be useful if you’ve created a drop shadow you like and want to quickly replicate it on other Layers. And yes, you can Shift-click multiple Layers and then use the Paste Layer Style command to affect them all at once. Finally, the Clear Layer Style will quickly eradicate Layer Style assignments for all selected Layers.
Homework Assignment
Sliding Layers around with the Move tool is too easy an assignment. Instead, I want you to work with the Blending Modes. Familiarize yourself with what they look like. Remember to use a variety of colors and opacities with each mode. Also make note of what happens to various Layer Style effects when different Blend Modes are applied to a Layer.
Topics For Upcoming Months
- Mask-erades
- Fun With the Automate Menu
- Photomerge
- Fun With Filters
- File Format Fever
If you have a topic suggestion, please share it. I'm definitely interested in expanding this list with topics that are of interest to you.
![]() Copyright © 2007 Lee Bennett, lbennett@atpm.com.
Copyright © 2007 Lee Bennett, lbennett@atpm.com.
Also in This Series
- File Format Fever · November 2008
- Don’t Reset—Preset! · October 2008
- Don’t Yield—Merge! · September 2008
- What If I Just Left It Alone? · August 2008
- Screen Replacements—When Reality Isn’t Real Enough · July 2008
- No Smoking Gun: Re-tooling Dodge and Burn · May 2008
- Mask-erades · February 2008
- Back in February · November 2007
- I Love Layers · October 2007
- Complete Archive
Reader Comments (4)
Thanks for you immediate response to my layers info request. I read this months lesson with great interest and enthusiasm . Will now digest it slowly and do the home work assignment. Its been a great series of articles.
It is either the background layers or the masked layer showing separately which does not allow me to create a new background on the masked layer. So is there anything that will make this work to get this project done?
Add A Comment