How To
Adding a Cooling Fan to the Mac Cube’s Video Card
Back in ATPM 13.05, I upgraded my venerable Mac Cube with an XFX GeForce 6200 video card. Its high performance and dual-monitor support proved a significant boost to my desktop work. Losing it would be a big step back, but that’s almost what happened last month. For the reader without time, a quick summary: one fan good, two fans better.
Too Hot? Too Cool? Just Right?
After the May installation of my new video card, I occasionally ran Bresink Software-Systeme’s Temperature Monitor to keep tabs on my system. The already-upgraded CPU and new GPU generated significant heat, and I wanted to keep an eye on things—even a ten-degree Celsius jump can radically reduce your system life.
My Cube’s base 80mm fan, similar to the Panaflow mentioned in May’s article, pushes air around the entire case. Indeed, I thought it would be plenty for the long-term. Wrong! A few months in, the Boston summer reached 95 degrees, quietly raising my office’s baseline temperature and setting the table for later problems.
In mid-August, the Cube’s video riser board gave off a disconcerting snap, crackle, and pop. Quick inspection showed a scorched capacitor that only replacement could fix. Though that sounds really bad, I actually lucked out. That particular component only costs $10 on eBay from a parts reseller and sits right on top, easy to find. The heat could’ve shorted something much more valuable, and it would’ve been time for a new Mac. A crash course on cooling told me the truth-I needed another fan just to handle the video card and its high-energy GPU.
Picking a Fan
Thanks to CubeOwner, it’s not hard to find the right part. The Titan TTC-CV3AB fits nicely onto the XFX GeForce 6200, gets power from the computer’s IDE cable, and runs quietly. Buying the fan should cost less than $20, and it includes a small tube of thermal paste to improve heat conductivity.
Installation
Take out the video card and remove its heat sink.
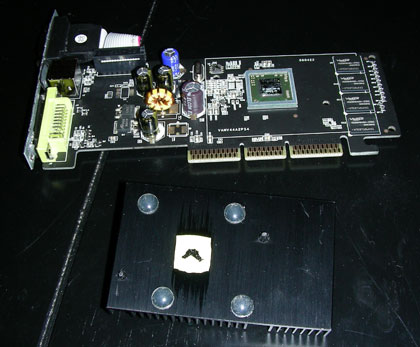
Doesn’t look like much, right?
The manufacturer just stuck my sink and card together without any connection, a real waste of cooling capacity. Fortunately, this is easily rectified by spreading a thin layer of paste on the card’s GPU chip. The paste should go only on the chip itself, not the surrounding area. After that, just match up the fan’s mounting holes, position the screws, and join the two together.

I hope you’re not also replacing the riser board like me. Either way, the video card returns to its normal place, which leaves the fan power cable. This cord connects to the IDE power cable.
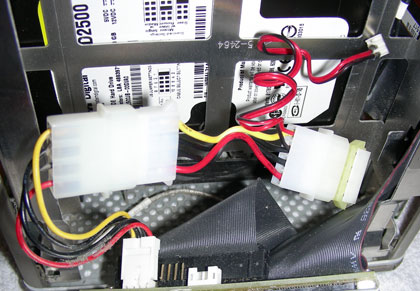
Once connected, let the IDE cables sit between the hard disk and optical drive. Note how the red-and-yellow cable runs along the gap next to the central heat sink to avoid being pinched when I close the Cube’s case.


The new fan stands out in copper against the other black-and-green components.
This picture shows the fan with its clear plastic cover. You can leave that piece off if you prefer. Some Cube owners report that the case didn’t close properly with it installed.
Checking the Result
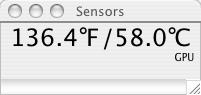
The proof is in the pudding and the temperature measurement.
With the fan running smoothly in the Cube’s interior, things look much better at 58 degrees C (136° F). Some people on the CubeOwner cooling forums report around 15 degrees C above room temperature, which I can’t quite achieve. It’s possible a better thermal paste or improved room airflow would help further.
Summary
This article reinforces the maxim that a stitch in time saves nine. It doesn’t cost much in time and effort to add more computer cooling, something especially useful in a compact system like the Cube. The installation does take patience and skill, however, so let a professional handle the work if it looks too tricky. It’s no good messing things up when you’re just trying to protect your Mac against future problems!
If you find success with other Mac cooling projects, feel free to mention them in your comments. This just scratches the surface of controlling heat inside a computer system.
![]() Copyright © 2007 Matthew Glidden, mglidden@atpm.com.
Copyright © 2007 Matthew Glidden, mglidden@atpm.com.
Also in This Series
- Give Alert Sounds a Little Personality · March 2012
- Create Your Own iPhone Ringtones · February 2012
- Create Your Own Homemade Audio Book · December 2011
- Upgrade to Lion Painlessly · August 2011
- Make the Most of TextEdit · July 2011
- Using the Free Disk Utility on Your Mac · May 2011
- Making Use of QuickTime X · March 2011
- Making the Most of What’s Already on Your Mac · February 2011
- Making the Most of What’s Already on Your Mac · January 2011
- Complete Archive
Reader Comments (2)
Andy
Add A Comment