Photoshop for the Curious
An Overview, Part 2
If you’re just now tuning in, I strongly encourage you to hop back one month in your time machine and start with part one of this overview. You’ll probably want to be familiar with the material there before diving into this month’s column.
Ah, you’re back already. So, you may have noticed that I said I’d cover the palettes and the menu items this month. I suppose I fibbed a little bit. This month’s column became too long to cover both, so I’m saving the menu bar items for February. But not to worry—there’s plenty of material for you to digest along with whatever holiday dinner might still be in your system.
Your homework assignment last month was to memorize the four main groupings of tools in the Photoshop Tool palette and then start experimenting with the various tools. There’s a very good chance you encountered some tools with which you had absolutely no clue what to do. Don’t fret. Throughout this series, we’ll take a closer look at the tools as we need them and, in this month’s column, I’ll show you where you can quickly see a hint for what you can do with a tool as soon as you select it.
I’d love to know some of the things you taught yourself just by experimenting. Maybe you’ve discovered something I haven’t!
Interface Upheaval
OK, perhaps calling it an upheaval is a bit extreme but, by now, you’ve probably heard about the Photoshop CS3 beta Adobe made available to current CS2 users. If you’ve seen it, you know about the changes Adobe made to the way floating palettes work. Unfortunately, I’ve not yet had the opportunity to try Photoshop CS3, and I’m a little worried that some of the things I may write in this month’s column will be invalidated by CS3. Based on what I’ve seen, however, the biggest changes lie with how the palettes are accessed and organized—not so much with the actual function of the palettes. Therefore, I’ll try to spend minimal space describing how the floating palettes in CS2 can be manipulated and focus mostly on the functions in the palettes.
A Palette of Palettes
Adobe has earned considerable criticism concerning the number of floating palettes generally found in its applications. Personally, I don’t feel the criticism is justified since the user can quickly turn on a palette that is needed and, just as quickly, send it away. In fact, the palettes presented by default aren’t really overwhelming, and you often don’t have to enable some palettes thanks to Photoshop’s Options toolbar. The Options toolbar will update itself with items relevant to the tool you’re using—often duplicating settings from a palette you may not have enabled.
Before I go further, let’s make sure we’re all on the same, um, palette:
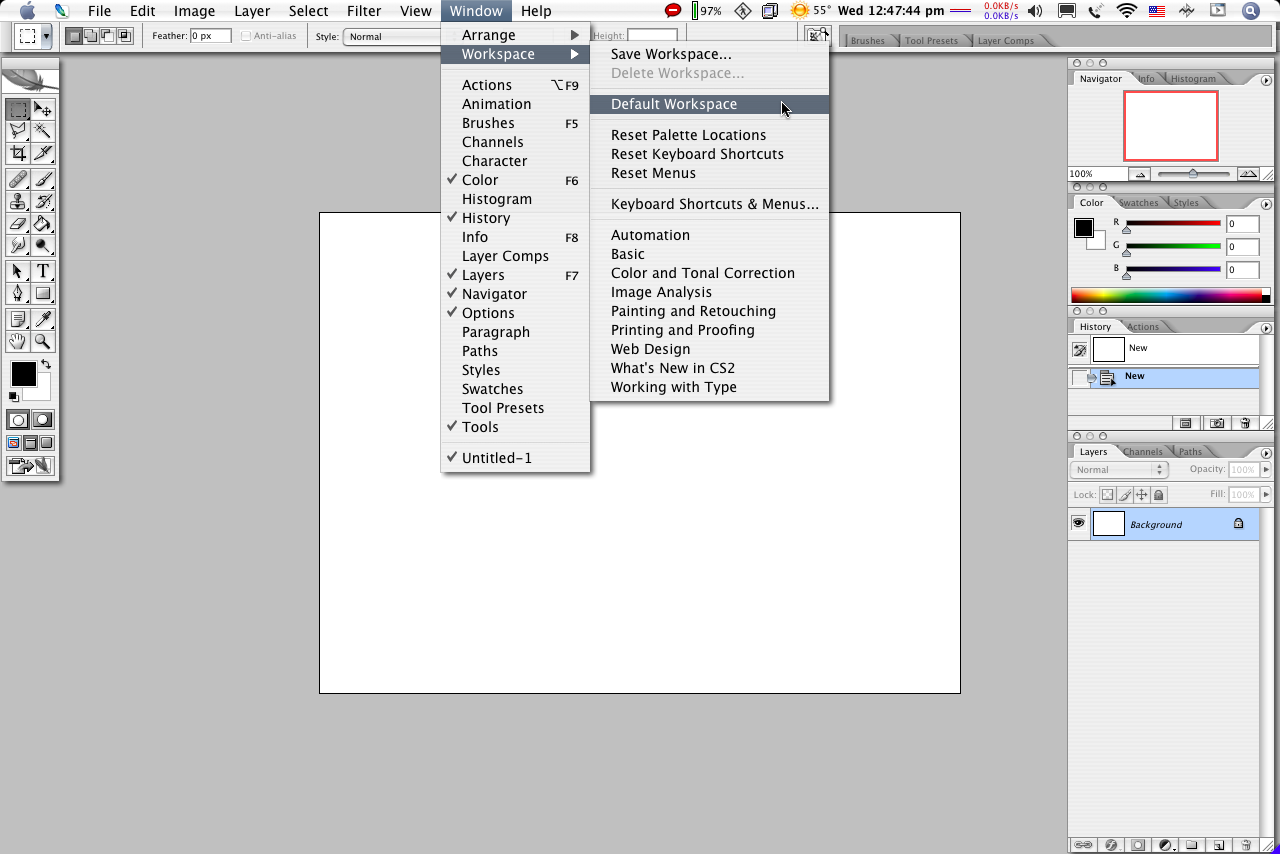
Default palette configuration (click to enlarge).
As you can see, the basic Photoshop palettes are stacked on the right side of the display. In the Window ‣ Workspace menu, the Default Workspace option will reset the palettes to this configuration unless you’ve saved the default as something else. Saving workspaces is a wonderful feature since you can lay out any number of palettes however you like, save those locations, move them to another configuration that helps you with a different task, and then save that configuration as well. At my day job, I have a an older 15″ Apple LCD in addition to my main 21″ CRT. My default configuration has nearly all of Photoshop’s palettes open and in a logical arrangement over on the smaller display. As you become more proficient in Photoshop, you may find that being able to glance at the information in a palette without having to open it is very convenient. Keeping them on a secondary display also means your primary display isn’t cluttered with the palettes. The result: you can view your image on your primary display with nothing covering portions of it.
For the purposes of this overview, we’ll essentially stay with the default workspace.
Palette Proliferation
If you looked at the above screenshot for more than just a fleeting moment, you’ll have noticed that all four of the default palettes have two or three tabs at the tops. This is one of the ways Adobe has addressed the issue of palette clutter—allowing more than one palette to share the same window. Simply click a tab, and the window refreshes to reveal the selected palette that is named in the tab. But the best part of this feature is that you are neither locked into these tab arrangements, nor do you even have to combine palettes into tabs. You can drag a tab from one palette window to another as well as drag a tab out to the open area where it will live in its own palette window.
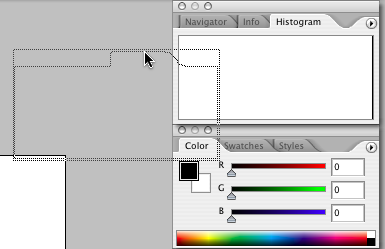
Dragging a tab away from a palette window allows you to position a palette in its own window. Alternatively, while dragging, you can touch a different window and drop the palette’s tab within that second window.
If reordering the tabs isn’t enough, there’s an often-overlooked palette organization feature that allows you to stack multiple palettes as one tall window. To do this, start by dragging a tab as if you were going to move it to another palette window. Normally, the entire border of the new window will highlight in black to tell you that’s where you’re going to drop the tab. To instead attach it to the bottom, touch the mouse pointer to the bottom edge of the palette window, and you’ll see just the bottom highlight in black. When you release the mouse, the attachment is complete. You can then add more tabs to this new section of the overall palette window, or attach another tab beneath, making it even taller. Of course, you can also insert a tab between two attached palettes by touching the separator between them.
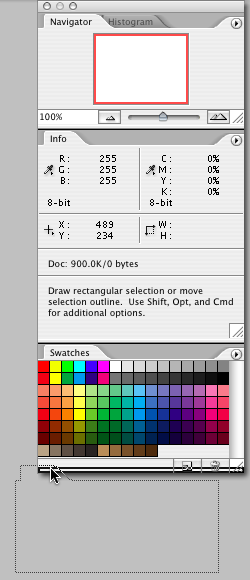
In this image, I am preparing to attach a fourth palette beneath three that are already attached. Note the black highlight on the bottom of the Swatches palette that reveals I’m about to attach a new palette below. Remember, you must drag palette tabs—not the title bar above the tabs.
Dragging the title bar instead of the tabs simply moves the entire palette (or stack of palettes) elsewhere on your screen. You’ll note that the edges and corners of the window outline being dragged will visually snap to other palette windows, the purpose being to help precisely align the windows to taste. You’ll also find that the Tool palette can snap to the other palette windows. Since it does not have a tab, it is not possible to combine it with other palette tabs in a window, nor attach it to the bottom of window.
Now that I’ve probably caused you to thoroughly louse up the position of your palettes, I’ll advise that you go back to the default configuration as seen above, via the Window ‣ Workspace menu. If that workspace does not match the one I’ve shown, try selecting the Basic workspace instead.
As a final note about the palettes in general, note the circle with a black triangle inside, located in the upper right corner of palettes—the same row as the tabs. Clicking this icon reveals a menu that pertains to the active palette. Go ahead and look inside any of them that you wish. Just remember that as we prepare to look closely at some of the palettes, this is the menu to which I refer when I talk about a palette menu.
Tools You Can Use
Time to jump from where you can put the palettes to what you can do with them. Note that we’ll skip a couple of the palettes this month—palettes that a beginner Photoshop user won’t need any time soon. I’m going to follow the top-to-bottom, left-to-right palette and tab order shown in this column’s first screenshot. If you have settled on a different arrangement of your palettes, or the palette in question is not visible, you can always head to the Window menu to activate the desired palette. Also, go ahead and open a small new document since some items I’ll cover here may not appear quite right if there is no image document open.
Navigator
It’s appropriate that the first palette on the list is one of the most straightforward to use. The Navigator will always show the entire image that you’re working on and a colored box that represents what portion of the image is currently in view. If the entire image is visible on the screen, the colored box will outline the full image in the Navigator palette. If you’ve zoomed in close, the colored box will squeeze down to the area on which you zoomed. You can drag that box around inside the Navigator to quickly move to another part of the image.
At the bottom of the Navigator, you’ll find a simple slider for zooming in and out on your image.
The Navigator palette menu has two options. The first, Dock to Palette Well, is something you’ll find in all the palette menus. I’ll reveal what that’s for in a moment. The second option in this palette menu allows you to change the colored box from the default light red to a color of your choice.
Info
Similarly straightforward, but probably more useful, is the Info palette. The primary function of the Info palette is to show various numeric color value information for the pixel directly beneath your pointer, as well as to show the coordinate location of your pointer in X (horizontal) and Y (vertical) values. You can view the coordinates in a variety of measurements including pixels and inches. The W and H portion reveals the width and height of a selection on your image.
I received some comments last month suggesting I should’ve provided a little more explanation on the Tool palette items so that readers would be better-equipped to experiment with the tools. What I should’ve done was direct your attention to the bottom of the Info palette which is where a short description of what you can do with that tool appears when you activate a tool.
Besides the aforementioned Dock to Palette Well item, the Info palette menu has two other items. Palette options is where you can modify exactly what type of information is displayed. If you’re confident in the use of all the Tool palette items, you can also deactivate the tool hints to make the Info palette shorter. You’ll note that the Color Samplers option is grayed out. This is because no color sampler markers are present in your image. You may recall last month when I quickly mentioned the Color Sampler tool. When you mark a spot on an image with a color sampler, the Info palette is where the sampled color’s numerical values appear. The option in the palette menu simply shows or hides this information.
You should also note that you don’t have to go into the palette menu to change the color type or the measurement units in the Info palette. You can, instead, click the icon next to the numeric values to reveal a menu that allows you to make the change more quickly. The W/H icon does not have a menu since it always follows your setting for the X/Y icon.
Histogram
This palette is a bit more advanced so we won’t go into detail now. The Histogram palette’s purpose is to show a summary of color information from the darkest to the lightest contained in the entire image. The more a particular shade is present, the taller the indicator within the Histogram.
Color
Yet another straightforward palette, the Color palette contains a foreground/background color tool that duplicates the one at the bottom of the Tool palette, sliders to fine-tune the color values, and a color spectrum to quickly sample an approximate hue. The sliders adjust the chosen primary color from dark (on the left) to light (on the right). The palette menu contains options to change what color mode you wish the sliders to work within (e.g. RGB or CMYK) as well as some choices for the spectrum’s color mode.
Swatches
The Swatches palette is probably most deserving of the “palette” name because it represents a customizable selection of colors from which you can paint—just like a real artist’s paint palette. There are two icons at the bottom to add a new color or trash an existing one. The palette menu contains options to change the size of the palette blocks and choose one of many other presets of colors. Use the Reset Swatches option to return to the default. You can also save your own swatch of colors.
Styles
The Styles palette is a collection of presets for layer effects. We’ll cover layer effects in greater detail in the future. Suffice to say for now that Photoshop allows you to create things like drop shadows, special effect fills, bevels, etc., all without destroying the original image. As its name indicates, a layer effect applies an effect to a layer. Some fascinating effects can be created by using multiple layer effects on one layer, and the Styles palette is where you’ll find a nice collection of effects already created for you, or you can add your own. Just like the Swatches palette, the Styles palette menu lets you choose other batches of presets or reset to the default.
History
Think of the History palette as an Undo command on steroids. In this palette, you’ll find a chronological selector for each recent state of your image. The default allows you to go back 20 states. If you have lots of RAM, you can increase this number in the Photoshop preferences. The icons at the bottom allow you to open a brand new document that reflects the current History state of the active document. There’s also a tool to snapshot the current state so that you can return to it even if you move beyond the number of states defined in the preferences. The palette menu has some duplicates for the icons at the bottom of the palette and several options for enhancing the History palette for intermediate and advanced users.
Actions
The Actions palette is something of an automation playground. Adobe included a healthy array of actions, but you can record your own, as well as find plenty of cool actions to download and install from the Internet.
An action is simply a series of steps that you would normally do manually. An action does nothing you could not do yourself, rather it automates and speeds up a series of steps necessary for a task. The default actions are just single-step duplicates to select various workspaces (see first screenshot, above) but you can load other Adobe-supplied actions via the palette menu. For example, one of my favorites is in the Text Effects batch. It’s called Cast Shadow and is used to create a shadow that appears to be caused by a light source behind your text. There are lots more available by loading other sets from the palette menu.
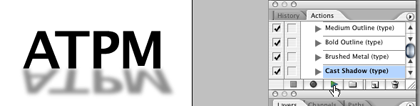
The Cast Shadow action is one of many Adobe-supplied toys in Photoshop.
Layers
Layers were introduced back in Photoshop 3.0 (that’s version 3, not CS3) and, as far as I’m concerned, they make Photoshop what it is. The simplest way to understand layers is to think of two or more paint canvases in front of/behind each other in a stack—not necessarily equidistant. Now imagine that you can not only paint whatever you want on each canvas and add/remove canvases at will, but also slide each one around independently. The real kicker is that, unlike real life, you can make any of the canvases translucent—any value between 100% opaque and completely invisible. Even wilder is that a canvas can be made to blend in a variety of ways that interact with the canvas(es) behind it.
I’m getting a bit ahead of myself because we’ll look more closely at the Layers palette in the future. For now, I’ll simply add that each new version of Photoshop builds on what the Layers palette can do and that so much of Photoshop’s power depends on layers.
Channels
The Channels palette allows for adjustments to be made independently for each color in the active color mode. For example, if you are looking at a photo in CMYK (cyan, magenta, yellow, black) mode as would be used for a printing press, you could turn some channels off to see what the photo would look like if only the black and magenta inks were laid down on paper. Spot colors are also managed in the Channels palette. (In brief, a spot color is a single, specific hue of ink used by a printing press.)
Paths
Last month, I briefly touched on the drawing and path tools in the Tool palette. Whenever a path is created, it appears on a layer (of sorts) in the Paths palette. Text is the only exception and would only appear in the Paths palette if it were converted to a path and could no longer be edited as text.
The Palette Well
I said above that I’d come back to the Dock to Palette Well palette menu item. Look at the Options toolbar across the top of the screen. The Palette Well is located on the right side of the Options toolbar. This is another location to which you can drag a palette tab, or use the Dock… command in a palette menu to send it there. The default palettes which live in the Palette Well are as follows:
Brushes
You’ll probably visit the Brushes palette often. This is where you can choose the size and shape of your Brush tool as well as how hard or soft the edges are. The palette menu (located on the actual tab whenever a palette is in the Palette Well and is active) has many more brush shapes that can be loaded and an option to turn the Expanded View on or off. The Expanded View options might be confusing to a beginner and you may turn them off if you wish—but some are rather fun to play with.
Tool Presets and the Options Toolbar
Before I can describe the Tool Presets palette, I need to talk about the rest of the Options toolbar. As previously stated, the Options toolbar will change depending on which item from the Tool palette is chosen. The settings which appear in the Options toolbar will adjust how the tool is used. For example, when using the Magic Wand tool, the Options toolbar has adjustments for tolerance, whether or not to anti-alias the selection, whether you only want to select a contiguous area, whether you want to select from just one or from all layers, and for how the next selection will interact with any previous selection.
You might imagine that you’d have many different configurations to the options of just one tool that you’d like to use over again without having to set them all up again. Tool Presets to the rescue! Once you’ve configured a tool’s options in a way you feel you may use again, just head to the Tool Presets palette and save that configuration with a descriptive name. You’ll see that the palette can auto-refresh to only show presets for the selected tool, or it can list presets for all tools, essentially doubling as an alternative Tool palette.
Layer Comps
The last palette visible by default, Layer Comps (short for composites), is a place to save multiple states of your Layers palette. Suppose you are a designer and have created a logo for a client. Within one Photoshop file, you might have several layers containing different versions of a text line that makes up part of the logo—different colors, different typestyles, different amounts of shadow, ad infinitum. Turning layers on and off for just this one part might be easy, but suppose in order to show your client three entirely different versions that consist of changes to many layers, you’d have to turn off 20 or so layers and turn on 20 more. Instead of clicking the visibility mode (the eyeball next to each layer) when the client is at your screen, you can set up the layer visibility in advance and save it as a Layer Comp. Other options such as a layer’s position, opacity, and various layer styles can be included in the Comp. Now, all you have to do is switch from one Layer Comp to another to show the different logo versions, and they’re all in one handy Photoshop file.
You might be thinking, “Why not simply have a different file for each version?” One argument for keeping all versions in one file could be that that if you have a text layer with a phone number, and that phone number has different colors, layer styles, and/or positions in each version of the logo. Suppose your client told you the number had changed. You’d have to update the number in every file. With Layer Comps, you can change the phone number just once and that change can be reflected in every Layer Comp immediately.
Character and Paragraph Palettes
There are a few other palettes I won’t spend time on right now, but two which do not appear by default deserve some attention.
Head to the Window menu and turn on the Character palette. Photoshop’s default settings will show the Paragraph palette as a second tab in the same palette window. If you plan to do much text manipulation as part of your Photoshop work, you’ll want both of these open. Familiarize yourself, also, with the palette menu options for both. We’ll cover more ground on these palettes’ capabilities in the future, but anyone with intermediate skill at text editing will understand the purpose for most of the Character and Paragraph palettes’ items.
Tiny Tips
To appease my error of planning to do the overview in two parts and instead dragging it out to three, I’m going to share a couple of little tiny tips that I’ve picked up over the years which help make using Photoshop more pleasant.
Crop Snap
If you’ve ever tried to use the Crop tool to remove just a smidge of pixels from the edge of an image and were annoyed that the crop selection snaps to the edge of the image if you get too close, simply hold down the Control key while dragging the crop box to temporarily deactivate the snapping feature. (Sorry, I’m not sure of the Windows equivalent. It may also be the Control key, but since ATPM is a Macintosh publication, those are the keyboard commands I’ll always be using.) Yes, there’s a menu setting for turning overall snapping on and off, but I generally like to leave that on, so the temporary crop snap deactivation is most handy.
Ad Hoc Polygonal Lasso Tool
If you’re using the Lasso selection tool and want to just quickly switch to the Polygonal Lasso tool briefly, holding the Option key will change to the Polygon mode. The tool immediately reverts back to the standard Lasso tool when you let go of the Option key. As such, it is possible (though tricky) to have both standard and polygonal lasso selection shapes in the same run.
Brush Size
If you’re content with all of the current Brush settings but simply want to change the size, instead of heading to the Brushes palette, you can use the [ and ] keys to make the brush smaller and larger, respectively. This keyboard tip applies to many other situations as well, such as the tools for Clone Stamp, Healing, Dodge, Burn, Sharpen, Blur, etc. Any time you see a Brush selector near the left side of the Options toolbar, you can use [ and ] to change the size.
Next Month
As I’ve said, I decided to not overload this month’s column and will save the menu items overview for February. But, in addition to the third and final overview chapter, I’ll bring a tutorial along, too, that will teach you some useful things you can do with Photoshop.
In the mean time, your homework assignment is to play with the Layers palette. Discover how you can move around the order of the layers, group them into sets (the folder icon at the bottom of the palette), change the opacity and the blend mode (use the pop-up menu to the left of the opacity setting), etc. I promise you, any amount of time spent learning more about the Layers palette is time well spent. Webreference.com has a nice write-up about working with layers. Consider this reading material as part of your homework.
![]() Copyright © 2007 Lee Bennett, lbennett@atpm.com.
Copyright © 2007 Lee Bennett, lbennett@atpm.com.
Also in This Series
- File Format Fever · November 2008
- Don’t Reset—Preset! · October 2008
- Don’t Yield—Merge! · September 2008
- What If I Just Left It Alone? · August 2008
- Screen Replacements—When Reality Isn’t Real Enough · July 2008
- No Smoking Gun: Re-tooling Dodge and Burn · May 2008
- Mask-erades · February 2008
- Back in February · November 2007
- I Love Layers · October 2007
- Complete Archive
Reader Comments (2)
Not knowing a thing about photoshop, and just sort of teaching myself by stumbling around the buttons a bit, was probably not the best idea!
But thanks for these articles - I'll be back to check if there are any more in the future.
Its much appreciated, at least by me ;)
Add A Comment