Networks in Action
Learning to Share With Others: Sharing Preferences Overview
Introduction
Mac OS X moved most of OS 9’s system functions (i.e., control panels) to the new System Preferences application. Functions previously in control panels like Sharing Setup, TCP/IP, and AppleTalk now reside in the Network and Sharing preference panes. Network controls the interfaces (i.e., Ethernet and AirPort) and your Internet connection. Sharing adds functionality like Internet sharing, Windows File Sharing, and others. This article covers the Sharing preferences functions.
What to Do First
If you want to network with other Macs or Windows computers, do the hardware side first. The software just sits there and looks dumb if there aren’t any wires connecting computer A to computer B. Want to go wireless? Install an AirPort card (or AirPort-friendly wireless card) in each computer.
This overview assumes you’ve already got the network hardware sorted out. If not, see other network articles on ATPM.com or the Three Macs site.
First Glance
Open System Preferences and select Sharing. Better yet, drag the Sharing icon to your shortcut bar. You’ll probably need it later.
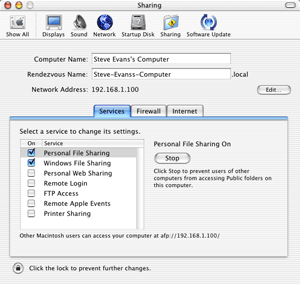
The Sharing preferences window.
Sharing shows your computer name and opens to the Services tab. Most of the action is in the Services tab. We’ll start with Personal File Sharing and Windows File Sharing to get your files moving around the network.
Personal File Sharing (PFS) handles Mac-to-Mac file sharing. Type the “afp” address (in my example, afp://192.168.1.100/) into an Internet browser to browse the files as if they were on your own Mac. You can’t access shared files from the same Mac, so only enable PFS if you’re sharing files with other Macs.
Windows File Sharing makes your files available to Windows network users. Check Windows File Sharing (WFS) if you didn’t already, or select the name and push the Start button. Once WFS is active, open “My Network Places” to see your Mac’s files on a networked Windows computer.
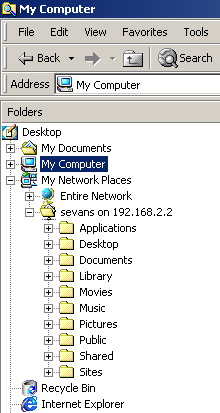
My Mac appears under “My Network Places.”
You can also map your Mac as a network drive. On the Windows computer, right-click on the “My Computer” icon and select “Map Network Drive.” Enter your Mac’s WFS address (in my example, \\192.168.2.2\sevans).
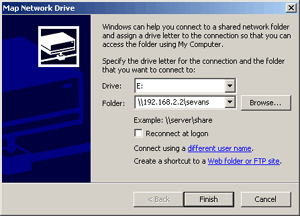
Mapping your Mac to a network drive.
For Mac OS 9, sharing files conveniently with Windows required extra software. Mac OS X includes the SMB protocol, which shares files between Windows and Unix-based systems. Using WFS means you’re using Samba. Note: your dance skills will not improve.
Note on Multiple IP Addresses
Sharing Preferences shows your Internet IP address in its examples, which might not be your IP address for sharing files. My computer uses AirPort for the Internet connection, with the address \\192.168.1.100 (shown in the example screenshots). However, I share files to my home network using Ethernet. Its IP address is \\192.168.2.2, different from the Internet IP address.
If you use two network addresses like I do, don’t try to use the Internet IP address for file sharing and vice-versa. (Nothing “bad” will happen, it just won’t work.) If you use a single IP address for both Internet and file sharing, you don’t need to worry about this.
Other Items in the Services Tab
Remote Login lets you connect to your Mac from networked computers using ssh. Enable this if you want to log in remotely from the command line.
FTP Access turns your Mac into an FTP server, providing file upload and download for any network computer with an FTP program. Sign in with your user name and your file sharing IP address (ftp://192.168.2.2/ in my example).
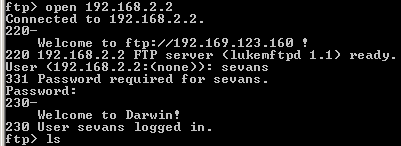
FTP access from the Windows command line.
Some programs use Remote Apple Events to communicate across the network. I’ve never used this function, so I assume a program will tell you if it needs to use them.
Printer Sharing does just what it says—it makes your Mac’s printer available to the network. Other Macs can add your printer from the Print Center application. Just select Add and locate your printer by network type (AppleTalk, Rendezvous, etc.). Print to it as you would a normal printer. You must install the printer software on the networked Mac before using a shared printer.
Firewall Preferences
Firewall software protects your network connection by restricting specific kinds of incoming traffic. Select Start on the Firewall tab to prevent network users from accessing the selected services. Home users probably won’t need this often, but Internet users can use it to enhance security. See the Mac OS X help files for more information about firewalls.
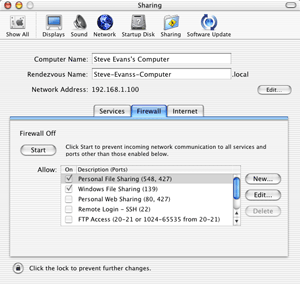
The Firewall preferences tab.
Internet Preferences
Select Start to share your Internet connection with other computers on the network. Your Mac turns into a DHCP server, looking for other computers and assigning them IP addresses. Set the other computers to use DHCP (or “Get IP address automatically”) and they’ll “see” your Mac and use its Internet connection.
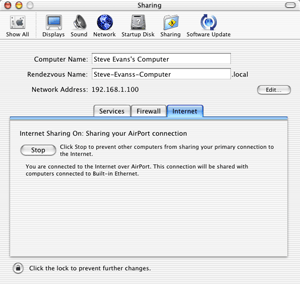
The Internet preferences tab.
Note: On my Windows laptop, I sometimes have to switch the network connection from DHCP to a manual IP address and back to DHCP before it works properly. It’s currently unclear to me why this is necessary, but you should try it if you have problems.
Example Setup
I frequently move files from my work laptop to my Mac. When I bring the laptop home, I connect its Ethernet port to my switch. While it’s starting up, I open the Sharing preferences on my Mac. I start Windows File Sharing and share my Internet connection.
When the laptop finishes booting, I open My Network Places and confirm that my Mac appears in the list. If it doesn’t, I check the laptop’s network connection, then mount my Mac as a network drive. File movement is now a simple drag-and-drop from Windows Explorer. I can also browse the Net from my laptop. If I had a network game on both computers, I could set them up to play against each other. And so on.
Once I finish working with the laptop, I disconnect it and shut down the services from the Sharing preferences. I repeat the process any time the laptop returns home. Mac OS X’s network services make this kind of connection a snap after years of Mac-to-Windows networking headaches.
![]() Copyright © 2003 Matthew Glidden,
mglidden@atpm.com. Matthew Glidden is the webmaster of Threemacs.com, a guide to constructing and maintaining home and small-office Macintosh networks. He can also tango and juggle, not necessarily at the same time.
Copyright © 2003 Matthew Glidden,
mglidden@atpm.com. Matthew Glidden is the webmaster of Threemacs.com, a guide to constructing and maintaining home and small-office Macintosh networks. He can also tango and juggle, not necessarily at the same time.
Also in This Series
- Mac to Windows: Troubleshooting the “No Logon Servers Available” File Sharing Error · October 2004
- Using WEP Security on an AirPort Network · July 2004
- Whatever happened to…Threemacs.com? · September 2003
- Clandestine Wireless Networking and MacStumbler · July 2003
- Learning to Share With Others: Sharing Preferences Overview · April 2003
- Serving Files Using FTP in Mac OS X · December 2002
- Switching Between Networks in Mac OS X · November 2002
- The Audio/Video Quadras (660av, 840av) · September 2002
- Thoughts on Apple’s Xserve · July 2002
- Complete Archive
Reader Comments (1)
gestuaria
Add A Comment