What’s Under the Hood
Got Vinyl? LPs to CDs Part 2: Recording and Editing
Thank You
Before we get started with part two, I must take a moment to thank everyone for all the great comments and suggestions sent to me. In all my years of writing articles, I have never received so many accolades from my readers. Yet I would be wrong not to credit our great copy editors at ATPM. They have the hardest task of taking my sometimes off-key writing and making it fit into the magazine like a glove. Therefore, as you thank me, I must in turn thank them. With that out of the way, let us move on to part two.
I Almost Cringed
Last month, after ATPM went to press, I purchased the February issue of a certain UK Mac magazine that happened to also have an abridged article about converting LPs to CDs. The hairs on the back of my neck stood straight up when I read the author’s assertion that it was OK to use the microphone port to transfer music to your Mac. I also received one or two comments from readers to this effect.
Again, I must emphasize that you should not use the microphone port for this purpose. It is not well shielded, which means it can (and will) pick up any electrical noise that is produced within your Mac. You want the signal you record to be as clean as possible. Part one discussed devices you can use instead of the microphone port.
The Story So Far
Last month, I said that there were no FireWire audio input devices on the market, and I was corrected by one of our readers. FireWire devices do indeed exist, but I found that they cost close to $800. Digital video (DV) converter boxes and camcorders can also double up for audio work. If you already own one of these devices, it may make sense for you to try to use it, but that is beyond the scope of this article.
The Right Software
For the rest of this article I will look at Amadeus II, Final Vinyl (in conjunction with iMic), Spin Doctor, Peak LE, and Montage with Ray Gun Pro for recording and editing your music. The steps I am about to take you through can also apply to importing from tapes and other input sources.
Most of what I will discuss here applies to all of the previously mentioned programs. No matter which program you decide to use, make sure you take the time to read the relevant instruction manual. All of the aforementioned software comes with excellent documentation.
Preparation
Make sure the drive you are going to record on has enough space for your recording. On average, you will use about 10 MB for every minute of recording time. That adds up to between 400 MB and 700 MB in disk space per full-length album.
Take the time to quit any unneeded applications that are open in the background. Do not try to do any multitasking while recording or editing, as either process can be extremely demanding on your CPU. Although Mac OS X is supposed to share CPU time among applications, background processes can still eat crucial CPU time. OS X is good at avoiding this situation, but not perfect.
You may also wish to purchase an album cleaning solution. Normally, these solutions come with special wipes to use on your LPs. These solutions help to reduce unwanted noise by removing dust, fingerprints, and static buildup. I use Gruv Glide II on all my albums; it costs around $25 and can be found in any Guitar Center.
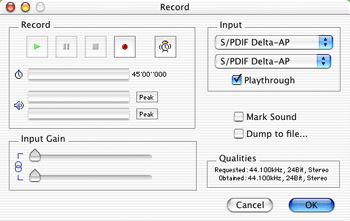
Before you start recording, open your application’s Preferences panel and set the input source and the bit rate. If your program allows, try to record at 24-bit to achieve a higher resolution. Set the sampling rate to 44.1 kHz. Ironically, only Amadeus II (the cheapest of all the programs) has support for a 24-bit sample size. Bias hopes to eventually add such support in a future release of Peak LE. It would be nice if Apple added a digital input port to future Macs.
Recording
If you have done any recording using a tape deck, you will feel right at home recording to your Mac. Depending on the program, you will either work with one or two main windows for the job. The first contains the control panel, which lets you record, play, pause, fast-forward and rewind just like on a tape recorder. The other window contains the Volume Units (VU) meters. These meters show the intensity of the left and right channels of your recording.
Depending on the program, you may also find a pair of sliders for increasing or decreasing the gain of each channel. This prevents your recording from red-lining and avoids distortion. Programs that lack VU meters usually control the gain of the recording automatically. I have worked with both modes of recording, and I prefer having control over the VU meters so I can fine-tune what I record.
Amadeus II Record Window
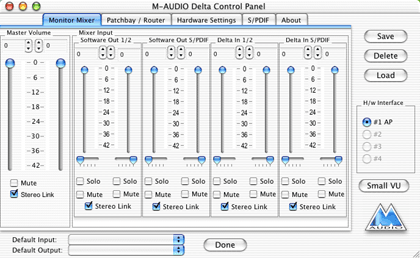
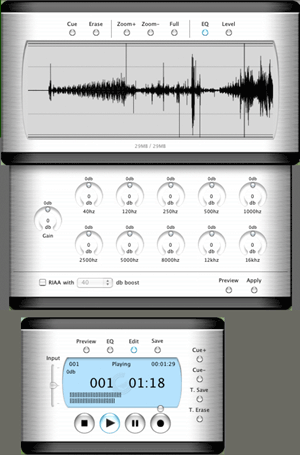
Most sound cards and devices come bundled with software that simulates a master sound mixing board. My Audiophile 2496 came with such software; it lets me sample and adjust the incoming signal before it reaches my recording program.
M-Audio Delta Control Panel
Once you have set all of the parameters to your taste, you are now ready to start recording. Cue your needle to the beginning of the album; this can be done with your tone arm lifter. My Stanton STR8-80 has an on/off switch for the turntable motor, which means I can place the needle on the LP at the exact beginning.
Now, press the Record button on your Mac, drop the needle slowly onto the album or start the motor and sit back as your Mac does the rest. Once you reach the end of the first side of the album, flip it over and continue recording. Don’t worry about pressing your program’s Pause button while doing this; you can delete the gap when you come to edit your recording.
Once side two of the album has finished playing, press Stop on the software control panel, save your recording as an AIFF file, and give it a name. You will also be presented with a window that shows you a 2D image of your recording, where you will do all your editing.
Editing
Now I will show you how to clean up your recording. I recommend that you make a copy of the recording at this point; this way, if you do make some glaring irreversible mistake you can revert to your original recording. Let us now look at how to use some of the editing functions of the applications I mentioned earlier.
Amadeus II ($25)
The first thing to do is trim the beginning and end of your recording, and cut out the gap created when you flipped the album. Highlight these sections with your mouse, being careful not to cut into your recording, and select Clear from the Edit menu. Amadeus II lets you magnify the image of your recording so that you can fine-tune your editing to the nearest millisecond in length. Try to leave about a two-second gap both at the beginning and between sides one and two.
All of the filters I will now discuss can be selected from the Effects menu.
Denoising
The Denoising filter is designed to suppress background noise. First, select a section of your recording that contains only noise. The best place to look is a quiet point in the recording. From the Filter menu, select Sample Noise. Amadeus will create a noise profile of the selected portion. Then select the whole recording and choose Suppress Noise in the dialog. Amadeus II will then go through the entire recording and filter out all background noise based on the section you sampled earlier.
Sometimes you may find that there is no ideal section in the recording to get a sample from. In that case, you will have to use the White Noise function. This presents you with a dialog window where you select the amount of filtering you wish to apply in decibels (db). Start with a low number of -70db and slowly raise that setting until the desired noise disappears. Go too high and you risk major degradation in your recording.
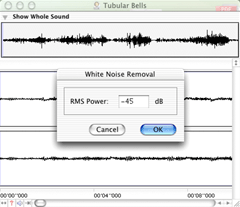
Amadeus II White Noise Window
You can customize the Denoising tool by selecting Options… in the Denoising sub-menu. Those transferring tape to CD will find the extra options useful in eliminating tape hiss. In this window, set the noise type at smooth, with Adaptive Filtering checked. Select Long FFT from the pop-up menu, and select a Sensitivity Enhancement between 30% and 70% as advised by the author of the program. For more information on this, I urge you to read the documentation that comes with Amadeus II.
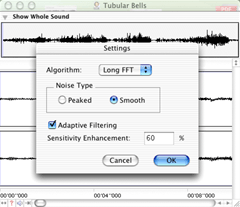
Amadeus II Denoising Window
Normalize
The Normalize filter is very useful for boosting the amplitude (loudness) of a recording that was recorded at too low a level. When applied, the overall volume of your recording is optimized so that its maximum possible amplitude is reached without any frequency clipping. You can apply it either to both channels as a whole or to one at a time. You can also experiment with the level you wish to apply.

Amadeus II Normalize Window
Sound Repair
The Repair filter helps to eliminate the cracks and pops in your recording. Remember how I told you to note down the times at which you heard these noises? This is where these times will come in handy. If you look at the window with the image of your recording, you will see that it is marked off in time segments at the bottom.
Referring to your notes, scroll to the first time you heard a pop. Zoom in as far as you can on that section of the recording. You may have to scroll around a bit before you find the pop, but it will stand out like a sore thumb in the form of a spike shaped like a “V.” It may appear in either or both channels. Highlight a small portion before and after the spike, not exceeding 40-50 milliseconds either way. Then select Open Repair Center, click Repair, and the pop is history.
You can also set the Repair Center to do the repairs automatically. To do this, you will have to tinker with the sensitivity slider so that it catches all the pops. After you have fully applied this filter I recommend that you play back your recording, to make sure you have nailed each defect.
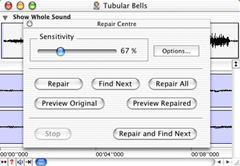
Amadeus II Repair Center
iMic with Final Vinyl ($35)
At first, I was skeptical of how well the iMic would perform. To test its abilities I recorded the same album at 16-bit with Amadeus II and Peak LE through my Audiophile 2496, and again with Final Vinyl through the iMic. To my delight, I found that the Final Vinyl recording came out sounding almost as good as the recordings produced by the other two programs. I am still of the opinion that using the digital sound card produced a better sounding and clearer recording, but at $35 the iMic does offer an inexpensive way to do the job.
With Final Vinyl, as with other programs, you can listen to audio input and adjust the levels before you start recording. One feature unique to Final Vinyl however is the ability to boost your signal, as a substitute for a phonograph pre-amp. I am surprised that this feature is not found in other audio programs.
Although Final Vinyl is excellent software for recording, its editing functions are not quite up to scratch. I read the manual and tried to edit my recording, only to come away a bit frustrated. The manual is not clear on how to use Final Vinyl to clean up your recording. It lacks the required filters to clean up your recording, but it does include an 8-band equalizer to tweak the different frequencies.
Final Vinyl
Bear in mind that this is version 1.0 of Final Vinyl. In the ReadMe, Griffin Technology even admits that they plan to add many more features in future updates. In the meantime you can always use Amadeus II, Spin Doctor, or Montage with RayGun to do your editing.
Peak LE ($99)
Peak LE, like Final Vinyl, is a great tool for recording, but not for editing. As Photoshop users rely on third party plug-ins to manipulate photos, Peak LE has third party plug-ins to handle automatic pop and click removal. Peak does however include a pencil tool that you can use to manually remove pops.
Under OS 9.x, Peak LE works with a filter program called RayGun by Arboretum Systems, Inc. As I write, the only way you can use RayGun in OS X is within another program called Montage, also by Arboretum. I spoke to Bias, and they told me that Arboretum is in the process of writing a plug-in version. For now, though, you will have to use Amadeus II, Spin Doctor, or Montage with RayGun to benefit from automatic removal of clicks and pops.

Peak LE
CD Spin Doctor (Bundled with Toast w/Jam, $199)
Recording with CD Spin Doctor is straightforward, but I do recommend that you check your sound levels beforehand. You can use the gain control to change the intensity of the signal. The filters bundled with Spin Doctor do an excellent job of cleaning up audio from your LPs or tapes. The Filter window can be broken down into three main sections: noise and pop, realizer, and output level.
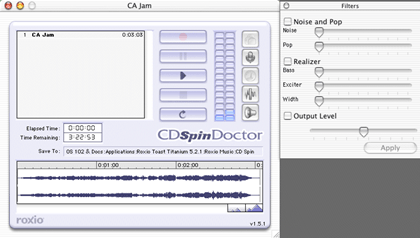
CD Spin Doctor
The noise filter eliminates unwanted hum and background noise while the pop filter removes cracks and pops. Those working with tapes will find the noise filter most useful for removing hiss. You control the intensity of these filters with a set of sliders. The best way to eliminate hiss is by finding a point in your audio where it is most prevalent and highlight that section. Then, move the noise filter slider to the right in small increments. Each time you do so, press Play to hear how that section sounds. Once you have removed the hiss to your liking, highlight the whole recording and click Apply.
The pop filter is used in the same way as the noise filter. To use this filter, you will have to refer back to those notes you took while you were dubbing to keep track of where the pops and clicks occurred. If you did not keep such a timesheet, then you will have to listen to the entire recording to locate each flaw.
To remove a pop, go to the point where it occurred and magnify that section. As I mentioned earlier, the pop will show up as a pronounced spike in the form of a “V.” Highlight the exact section where the pop occurs. Using the slider, make changes just like you did with the noise filter. Make sure you pre-listen to your changes until you get it just right. In most cases, I was able to rid myself of almost every snap and pop on my album with this filter.
I say almost because there was one glitch that I could not quite correct in Spin Doctor. The flaw was more like a skip in the music, and attempts to remove it resulted in distortion rather than restoration. I decided to switch back to Amadeus II and Montage with RayGun Pro; both were able to identify and rectify this one glitch without missing a beat. Apart from this one unusual defect, Spin Doctor does an excellent job in removing pops and clicks from your recording.
Realizer attempts to enhance the sound of your music in much the same way as an equalizer does. It has three bands you can adjust; as always, listen to any changes before applying them. Finally, the output filter tries to compensate for changes in audio levels resulting from the use of other filters.
Montage 1.0 with Ray Gun Pro ($269)
Montage is a fully-featured multimedia editor. It is the perfect blend for those looking for a package that deals with audio, movie, and text editing. By itself, Montage costs $149. Arboretum’s audio restoration filter Ray Gun Pro (RGP) costs an additional $149, and both bundled together cost $269.
The PDF manual is well done. I ended up printing out about 70 to 100 pages of the manual so that I did not have to go switch back and forth between reading and using the program. Montage also comes with an excellent tutorial to help you dive right in.
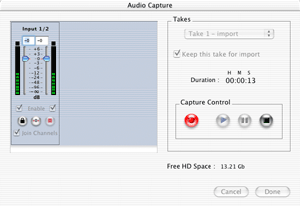
Recording in Montage is straightforward. From the Record/Playback menu, select Audio Capture…. From the resulting window you can adjust the gain of the left and right channels. Once satisfied with the levels, press Record.
Montage Record Window
Using RGP filters, you can clean up unwanted noise in your recording. To access RGP, select Process from the menu, then in the Audio Effect sub-menu scroll to the bottom and select Ray Gun Pro.
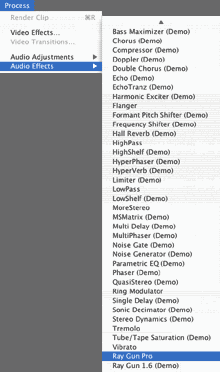
Montage Menu Selection for Ray Gun Pro
Upon selecting RGP, your audio window will be placed into a RGP capsule. Scroll up to the top of the RGP window and double-click on the dark tan bar. That will call up the RGP filter window. RGP is composed of five modules that can be used separately or in any combination. These filters include Pop, Rumble, Hum, Noise, and Enhancement.
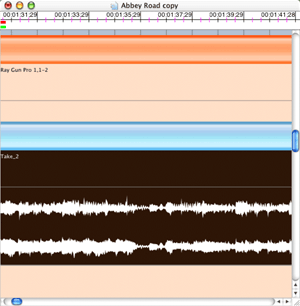
Montage Audio File in Ray Gun Pro
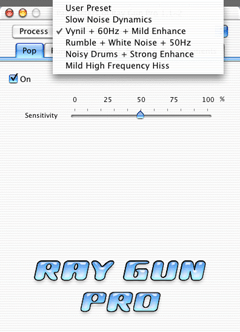
Other features in this window include a Process/Bypass button and a menu with five presets to get you started. The Process/Bypass button lets you turn the filters on and off so you can hear how they are affecting your music. The presets include Slow Noise Dynamics, Vinyl+60Hz+Mild Enhance, Rumble+White Noise+50Hz, Noisy Drums+Strong Enhancement, and Mild Frequency Hiss. If you decide to make any changes in the presets, the menu will change to User Preset. In the release current at press time, User Preset settings cannot be saved. Future updates of Montage will include the ability to create and save your own presets; Arboretum expect an update in the near future.
Pop
True to its name, the Pop filter removes any unwanted pops and clicks you may have in your recording. The intensity of the filter is controlled by a slider that goes from zero to 100%. In general, I found settings between 50-75% to be a good range to work with. Anything above 75% will have a negative effect on the audio. The preset for vinyl is 50%.
Montage Pop Filter with Preset Menu
Rumble
Rumble is a problem unique to LPs. The Rumble filter is a low pass filter that is designed to cut out everything below an adjustable frequency cutoff. It consists of a Low Cut and Peak slider. The Low Cut slider controls frequencies of the low pass filter ranging from 5 to 100 Hz, while the Peak slider adds tone to compensate for the loss of signal and ranges from -6 to +6 dB. The presets for vinyl are about 40 Hz for the Low Cut and -6 dB for the Peak filter.
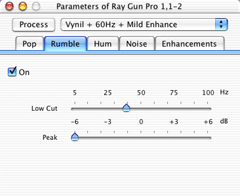
Montage Rumble Filter
Hum
Hum is a 60 Hz hum (or buzz) caused by alternating current interference. The Hum filter is composed of three sliders: Frequency ranging from 40 to 70 Hz, Fine ranging from -1 to +1 Hz, and Sensitivity going from 0 to 100%. The presets for Vinyl are 60 Hz for Frequency, 0 for Fine, and 20% for Sensitivity.
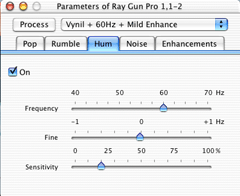
Montage Hum Filter
Noise
This particular filter is very similar to the Denoising filter found in Amadeus II. It acts as any other audio compressor would to try to eliminate noise produced by tape hiss, computer fans, and other types of sound that exist across the entire recording. Of all the filters, the noise filter is the most complex. Arboretum goes on to recommend that you should use either a good set of headphones or a high quality monitoring system when using this filter.
Due to the complexity of this filter, an extra menu is included with preset values. These presets include, Vinyl (33/45 rpm), Vinyl (78 rpm), Tape (Type I Ferro), Tape (Type II Chrome), F.M. Radio (USA), F.M. Radio (Europe), and White Noise. I suggest that first time users try with the presets before experimenting with the sliders.
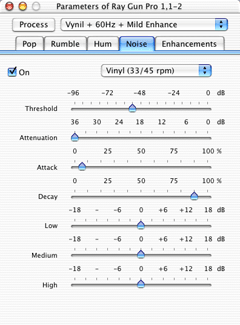
Montage Noise Filter
The Noise Filter is composed of four main sliders: Threshold, Attenuation, Attack, and Decay. Threshold is the overall level at which noise reduction works best. The Attenuation slider determines how much noise to pull from a signal; too much of this filter will begin to clip the higher frequencies in your recording.
Last, the Attack and Decay sliders complement each other. These sliders control the on/off switch speeds for the compressor, determining how fast to apply noise reduction once levels pass the Threshold level (Attack) and how quickly to fade back (Decay).
Apart from the four main sliders, there are Low, Medium, and High (dB) sliders that act as a gain control to help compensate for the other sliders. Once again, go with one of the presets before going on your own with this filter.
Finally, the Enhancement filter is a three-band equalizer used to adjust the Bass (dB), Treble (dB), and Stereo (%). While the Bass and Treble adjust the gain of these frequencies, the Stereo alters your sound by widening or narrowing the spatial recording without a change in the overall volume.
Next Month
When I first started writing this article, I thought (Ha!) that I could cover this whole topic in the space of one article. Boy, was I ever wrong. After three weeks of hard work, I have finally completed what is now part two of this series.
Next month, I will look at how to break your recording up into individual tracks, organize them into a playlist, and finally burn them to CD. I will also explain how to use iTunes to convert your tracks to MP3 so you can download them onto your iPod. Sadly, that last part will be mostly theory since I do not own, and cannot afford, an iPod. Sigh.
![]() Copyright © 2003 Robert C. Lewis,
rlewis@atpm.com. Robert is a Mac consultant.
Copyright © 2003 Robert C. Lewis,
rlewis@atpm.com. Robert is a Mac consultant.
Also in This Series
- Tips—Getting More Out of Your Mac · June 2003
- Got Vinyl? LPs to CDs Part 3: The Playlist and Burning to CD · May 2003
- Got Vinyl? LPs to CDs Part 2: Recording and Editing · April 2003
- Got Vinyl? Converting LPs to CDs Part 1: Terminology & Hardware · March 2003
- Eye Candy for the Mac · February 2003
- New Year, More Utilities · January 2003
- ’Tis the Season · December 2002
- What’s Under the Hood · November 2002
- What’s Under the Hood · September 2002
- Complete Archive
Reader Comments (29)
Obviously something must have stuck from that first article, as I ended up with an iMic and Final Vinyl. Two points about Final Vinyl: I'm glad to hear that I'm not the only one to have trouble with its editing function. Second, I found that, with my LPs, it produced first class results which needed (IMHO, but then I'm no audiophile!) no further adjustment. With my 78s, well, I'll have a go at the results with Amadeus. I remembered it had something to do with Mozart, but ... ?
As for SpinDoctor, I found it virtually useless under OS X. I have a copy of Toast Titanium 5.2.2, but the version of SpinDoctor we get here in the colonies insists that it can't run with Virtual Memory on. Now, if somebody can tell me how to switch Virtual Memory off in Classic!
Finally, I'm looking forward to the rest!
I use a Roland UA-30 USB box using the analogue RCA inputs. It is clean sounding except for the clicks which I have not been able to remove. For vinyl, I connect the turntable to my Sony receiver and then to the USB and the clicks are there, but I didn't notice them until I started to copy MD recordings I do in live venues.
Any suggestions??
Thanks for the tip on KYSO! You are right. The 8511 series high gloss, 250-sheet pack, is $325.
However, there is very good news, if I'm understanding the pricing correctly. You can buy 8511 high gloss series 20, 1-9 packs, for $32.60 each. These are 8.5" by 11" sheets that are compatible with the CD Stomper kit, which I happen to have! Costly, true, but that's 40 labels for that price.
So, the 8511 20-pack appears to me to be the way to go. BTW, Ken, I have the Griffin iMic and Sound Studio. I love 'em both. Sound advice on your part.
Great job! Thanks.
Mark
Gerry
I made an error. The only place you can buy 20 of the KYSO 8511 Hi Gloss labels is not at the KYSO web site you gave, but at their distributor sub-web site of label.com. Here's the actual price list.
First, the UA-3D works great. It has a slider for input levels, so you can tweak it right at the source.
My gripe comes with CD Spin Doctor.
It would also be nice if you could just set an in and out point instead of having to click and drag to define your track, but I suppose that's another story.
Gaah! Otherwise, it works great for my purposes, but a few adjustments would make it perfect.
Oh, yeah...
First of all, I have not yet purchased a CD burner for my (older model) G3. Does anyone have recommendations as to what model might work best? I read elsewhere that burn speeds faster than 4x are too fast for audio. I've also read that a USB connection is too slow for audio. Will I get useful results from a 48x18x48x USB CD burner?
My other issue is the connection from the stereo system to my Mac. This seems like a rather prosaic problem, but my stereo system is in a different room. I don't want to set up my Mac in the living room or put my stereo system in the den. Is it possible to use long cables (probably 30-40 feet) to connect the stereo to the Mac or will there be signal loss along such a long cable? My only other options would seem to be moving everything every time I want to record an LP (quite a pain) or investing in a whole new secondary stereo system for the den (more money than I want to spend). How have others dealt with this issue?
Running cables that long would be tough on the audio quality. There is a real chance to get RF (radio signals) or other noise into the system as the signal is amplified at the Mac end.
In pro-audio, when going over 25' you go "balanced." The setup is a direct box (one per channel), and then a mic cable. Have you seen the cables with 3 pins? Those are one per channel also.
Let me put it this way: you need help from a pro audio store, but I think it will be cheaper than buying another good stereo.
Brian
Now, as far as transfer speed is concerned, moving your sounds through the USB port is fine. If anything, transferring though Firewire is overkill. M-Audio just released a version of the PCI Audiophile 2496 in a box that plugs into your Mac by means of the USB port. If you have a Guitar Center near you, I suggest you go there for your audio needs and advice. I have to admit that, in some areas, they were instrumental in getting me started with the article.
As far as the cable problem is concerned, I agree with Brian. The longer your cables, the more chance you will have for RF interference or leakage. Forty feet of cable is a long distance to go. Again, I agree that you need to take the time to get audio advice before you proceed. I think Brian put it best, so I will leave it there. End of Line.
Definitely talk to a pro (or at least prosumer) audio shop about which one is best. They'll cost anywhere from $25 to $125 or more, depending on features. There are some that have stereo.
For what it's worth, Rolls and DOD are two brands, but please note that I am, in no way, specifically recommending these. They're just two that turned up pretty often in my searches.
For what it's worth, I have connected keyboards and CD/tape decks to PA systems using direct boxes. I have had hum with both the ground on and lifted but, in every case, I just switch to the other setting and the hum goes away. It's like SCSI--nobody knows why for sure. Just try the other way and it will probably work.
Brian
I am limited by Toast to burn at 4x as the maximum speed when burning from hard disk.
Is there any way to set the burn speed higher?
Should this NOT be used as the input to the Mac from the record deck or tape player? If that is the case, is it necessary to purchase the iMic in addition to a program such as Amadeus, Audiocorder, or Spin Doctor?
I'm simply looking for the simplest and cheapest method to get the job done to a reasonable quality level. What would you suggest to achieve this?
Also, when I connected a cable between the the 2 outputs of my tape player to the audio line in socket on my PowerBook, I managed with the old version of Spin Doctor to create a very quiet and indistinct AIFF file that I could play back in CD Spin Doctor, but when I tried to import the file into iTunes, the AIFF file icon remained faded and couldn't be imported. Why is this and is there a solution?
Thanks in advance to anyone that can give any advice.
Gus
Okay, I give up. What do you think USB and FireWire are?
The reality is that neither provides anything vaguely resembling the "fidelity" found on the original vinyl.
When played back on the standard types of speakers found on a computer (even the new HK ones for Apple), the sound is very good. However, if you jack your Mac into your real stereo, let alone a home theater system, the results are not as good as they were.
Granted, this applies to audiophile concerns, but it is something to remember when discussing the number of clicks per second one can get with RoadRunner (a local TV commercial pushing RoadRunner cable modems.)
Sure, probably not by very high end audiophile standards, but I've had surprisingly good results with CDs burned from vinyl using this set up (internal line in/Amadeus) and playing the results through a reasonable stereo system (Rega Planet/Naim Nait). At least with the new PowerBooks, I can't see that the shielding of the internal line in is a serious problem. If anything, I would imagine that using an external converter adds more links in the chain and risks further degredation of the signal. Just a point of view.
As far as the final product is concerned, yes there is going to be some frequency loss. That is why I go digital from my turntable to the digital input of my 2496 card. I am not a high end audiophile and the results I get are very satisfactory in my car player.
William, the best way to get sound into your Mac if you do not have a PCI slot to use is USB. Although FireWire is faster, the rate of transfer of sound into you Mac can be well handled by the USB ports. M-Audio makes a box called the Audiophile USB that is basically the same as the Audiophile 2496 PCI card.
If your records are badly scratched, you will want to look into using some of the pop and tick filters in various audio editing suites. Robert discussed some of this in the article above...
1. to get a SONY HiMD Walkman (MZ-NHF800 or MZ-NH1), both capable of using the new 1GB MDs, of making WAV files and of transfering them via USB to a computer for further processing (declicking, dehissing) using the Nero or other software before burning the files onto a recordable CD.
or
2. to get an iMic to transfer the content of LPs to my computer. I am afraid that only AIFF files will result (which will hardly work on standard CD players).
I have no other use for portable audio, never use headphones, do not use MP3s or any other compressed file formats. Just pure WAV-files, that´s what I need...I would describe myself as a lover of very good and transparent sound but no audiophile ready to spend a fortune on a CD player, SONY ES or the like.
Any suggestions?
Milos
You'll be pleased to know that you can easily convert back and forth between AIFF and WAV. As long as you retain the same sampling rate, the converted file should sound identical to the original.
The simplest way to convert is with QuickTime Pro which is $30. You simply open the AIFF, select Export, check your sample rate settings, and hit the gas.
There are other apps that a Google search may turn up that might be cheaper.
However, I think you have your information crossed. the iMic has very little to do with what format the sound is saved as. It's only a bridge to get the audio from your analog device into the computer. It's up to the recording software you're using that determines what formats you can save as, and you can pretty well bet any respectable audio recording/editing app will be able to save as either WAV or AIFF.
Additionally, your need for WAV files may or may not be accurate. AIFFs will work on CD players just as well as WAVs. On a Macintosh, you can drag AIFFs into iTunes, create a playlist of them, and burn that playlist of AIFFs as an audio CD. If you're burning on a PC, yes, I agree there are some apps that will read WAVs but not AIFFs. I have an application on a PC at my office that mass-duplicates CDs on a dedicated dupliator. If I feed it an audio file, it has to be a WAV, but that's a limitation of the application—not the hardware.
Add A Comment