Networks in Action
Switching Between Networks in Mac OS X
Introduction
Mac OS X significantly changes the way your Mac deals with networks. After years of juggling multiple control panels, seemingly random collections of extensions, and network terms that read like alphabet soup, OS X has only “Network,” a single panel in the System Preferences. Whether you use Ethernet, AirPort, or whatever, it all funnels through Network.
My own network consists of an AirPort-enabled Mac Cube and the occasional Windows laptop (courtesy of my corporate masters). Ninety-nine per cent of the time, I connect to the Internet world through AirPort, a blissful existence free of wire and worries. Sometimes, however, I need to copy an essential document (i.e., “tiny_dancer.mp3”) from the laptop, which lacks a wireless card. Since the AirPort Base Station is in a different part of the building, the only option is connecting the laptop and Mac directly. Fortunately, the Mac easily falls back to its built-in Ethernet port, but it takes a bit of reconfiguring.
Step One: Hardware Hookup
Hooking up the laptop to the Mac is no problem, just connect both Ethernet ports using a crossover cable. Find a crossover cable in the network section of your favorite (or even second favorite) computer store.

Two-Computer Crossover Connection
Step Two: Switch to Ethernet
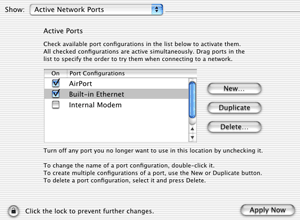
Opening the Network panel on the Cube shows “AirPort” as the active connection. We need to change this to “Built-in Ethernet,” so choose “Active Network Ports” from the “Show” pop-up menu.

Check the Ethernet port and either disable the AirPort port or drag Ethernet above it on the priority list. Choose “Apply Now” and the Ethernet port becomes active.

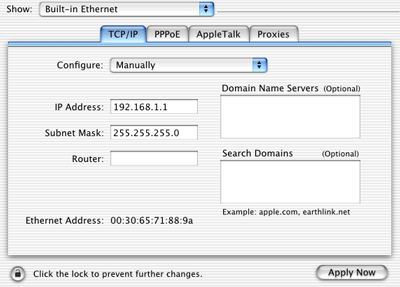
Switch the “Show” pop-up menu to “Built-in Ethernet,” then choose “Manually” from the “Configure” popup. Enter an address like 192.168.1.1 (the 192.168 prefix is reserved for private networks) and choose “Apply Now.” This gives the Mac an IP address, which you need to make the file transfer from the laptop.

Step Three: Configure the Laptop
Configuring the Windows laptop (mine runs Windows 2000) is similar to the Mac. To assign an IP address, open the Network control panel from Start Button>Settings>Control Panels. Highlight the TCP/IP protocol connected to your network interface and click on “Properties.” Select the “IP Address” tab and enter the IP address (192.168.1.2, for example—just make it different from the Mac) and subnet mask (255.255.255.0). Close the Network control panel.
Step Four: File Transfer
Transferring files between computers requires a way for them to communicate, as AppleTalk allows Macs to talk to each other. Since AppleTalk isn’t a convenient option for my laptop, I use an FTP (file transfer protocol) server instead. FTP is just like it sounds, good for file transfer, but without much glitz and glamor.
I run the FTP server on my laptop, then use an FTP client on the Mac to upload and download files. For help setting up the FTP server and client, see Basic FTP File Sharing Between Macs and PCs from ATPM 7.11. For downloading files, most Web browsers will also work as FTP clients.
Downloading files is as easy as connecting to 192.168.1.2 from the Mac’s FTP client (or ftp://192.169.1.2/ from a browser). Once I’ve selected and transferred my (shockingly important) files from one to the other, I can disconnect the crossover cable and shut down the laptop, freeing my Mac to return to its natural, wireless state.
Step Five: Back to AirPort
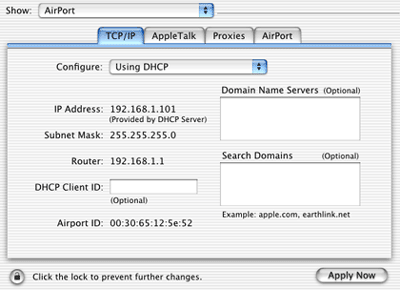
Open the Network panel again (from System Preferences), then choose “Active Network Ports” from the “Show” pop-up menu. It’s time to re-enable AirPort and disable Ethernet, then choose “Apply Now.” Choose “AirPort” from the “Show” popup and “Using DHCP” from the “Configure” popup. Wait a few moments and you should receive a new IP address, indicating AirPort is up and flying again. Success! The switch is complete.
Technical note: I’ve noticed that AirPort won’t successfully reconnect until I unplug the Ethernet cable, even if I’ve disabled the Ethernet port. I’m not sure why, and your mileage may vary.
Conclusion
Mac OS X handles multiple networks with minimal fuss, even with the extra baggage of Windows. My own temporary switch is a good way to demonstrate moving from one to the other and you (yes, you) might find yourself in the same situation one day (unless, of course, you already have “Tiny Dancer”).
Also in This Series
- Mac to Windows: Troubleshooting the “No Logon Servers Available” File Sharing Error · October 2004
- Using WEP Security on an AirPort Network · July 2004
- Whatever happened to…Threemacs.com? · September 2003
- Clandestine Wireless Networking and MacStumbler · July 2003
- Learning to Share With Others: Sharing Preferences Overview · April 2003
- Serving Files Using FTP in Mac OS X · December 2002
- Switching Between Networks in Mac OS X · November 2002
- The Audio/Video Quadras (660av, 840av) · September 2002
- Thoughts on Apple’s Xserve · July 2002
- Complete Archive
Reader Comments (13)
What is most important is that you don't forget to set your settings back to what they were, as you might otherwise have problems connecting to the internet and leave yourself vulnerable on the web.
http://www.iogear.com/main.php?loc=product&Item=GUN161
thanks.
l.hamilton
Add A Comment