Review: TiVo Home Media Option

Developer: TiVo, Inc.
Price: $99 (first TiVo in household); $49 (additional TiVos in household)
Requirements: 400 MHz G3, TiVo Series2 DVR, USB Network Adapter, Mac OS X 10.2, iTunes 3.0.1, iPhoto 2.0, home network.
Trial: Fully-featured (30 Days)
It seems like members of the press and the computer industry have been talking about the convergence of computers and home entertainment systems for years. When the topic comes up, somebody almost always wants to tell you how computers will move into the living room. However, just about every attempt to put a computer in the living room has been a miserable failure. There are numerous reasons why these devices have failed, but the basic lesson is that computers and televisions haven’t played well together.
Within the past two years, the number of people with home networks has increased dramatically. Some companies have realized that, thanks to networking, you can put your computer wherever you want it and still reap many of its benefits. Given the popularity of MP3s, it’s not surprising that many of these products are designed to connect your computer to your stereo system.
TiVo, the maker of digital video recorders that people either adore or know nothing about, has entered the world of home networking. Their Home Media Option is more than just an MP3 player in the living room—it also lets you view photos on your computer, share recordings among other TiVos in your house, and schedule recordings over the Internet.
This review will focus mostly on the Digital Photos and Digital Music portions of the Home Media Option.
Setup
I wasn’t really sure what to expect when I tried to configure my TiVo for use in my existing network. One of TiVo’s selling points is that it’s simple to use. However, many of TiVo’s subscribers are the sort of people who want to control every aspect of their home network.
TiVo seems to have both ends of the spectrum with their configuration options. If you just want to plug in and go, your TiVo can automatically select the appropriate configuration options via either DHCP or BootP. If you want total control, you can specify all the network settings. I chose the latter option and was presented with a series of easily-understandable configuration screens. When I entered a typo that would have prevented the TiVo from connecting to the network, a warning message was displayed and I could not continue until I fixed the error.
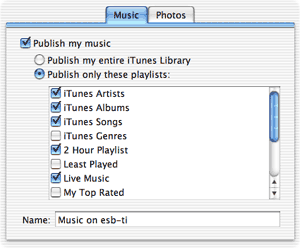
To make your Mac share its music and photos with your TiVo, you need to install TiVo Desktop. TiVo Desktop is a Preference Pane that reads both your iPhoto and iTunes libraries to determine what sort of media you have on your computer. It also sees your iTunes playlists and your iPhoto albums, so you can choose to share only portions of you libraries.

Sharing some of your iTunes Playlists.
Honestly, the functionality of TiVo Desktop sounds like it belongs in the Sharing Preference pane, but I’m not certain if Apple allows third-party developers to add entries to the list of services.
Although this all sounds straight-forward, I hit a major snag during my initial setup—my TiVo just did not see my Mac. It turns out this was due to having turned on OS X’s built-in firewall, and made worse by the fact that TiVo did not have its Macintosh documentation complete when it released the Home Media Option. Currently, the documentation is available and the answer to this problem is basically to open ports 8101, 8102, and 8200 on your firewall. If you don’t understand what this means, don’t worry—the new documentation does a very good job of explaining it.
Interface
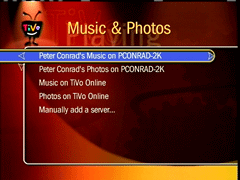
After you purchase the Home Media Option, an appropriately named Music & Photos option appears in your TiVo Central menu. When you select this option, you see a list of all the people sharing music and photos via TiVo Desktop on your network.

See who’s sharing music and pictures on your network.
Music
The Music screen shows you every playlist you’ve elected to share in the TiVo Desktop Preference Pane. Additionally, iTunes creates four “playlists” of its own that you can choose to share with your TiVo: iTunes Artists, iTunes Albums, iTunes Genres, and iTunes Songs.
These four “playlists” show up as folders in the Music screen. The first three contain sub-folders for each artist, album, or genre, respectively. iTunes generates these groupings from the ID3 tags associated with each of your MP3s, so you should make sure the information in your music library is correct to use the Home Media Option to its fullest. The fourth list displays all of the songs you are sharing.
Playlists behave as you would expect—whatever songs you have in the playlist in iTunes are in the playlist on your TiVo. TiVo also supports both normal and Smart playlists, though it cannot update Smart playlists. From the Music menus and playlists, you can either listen to a particular song or listen to a whole playlist by pressing Play on your remote when you highlight a playlist of folder.
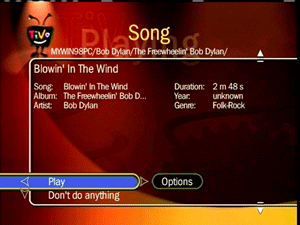
Listening to music is a fairly straightforward affair. Your options are limited to shuffling your music, repeating your music, and whether or not you should play any sub-folder in your current playlist. While you are listening to music, your TiVo will either display a blank screen or some textual information about the currently-playing song. You can move around within the song with the fast-forward and rewind buttons on your remote and advance to the next song with the Channel button. Additionally, your TiVo can also display some basic information about songs from the menu system, assuming your ID3 tags are correct.

Getting information about a song.
Photos
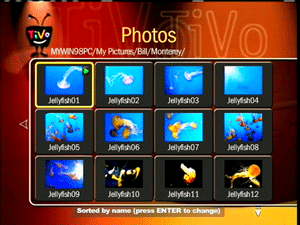
The Photo menu works somewhat differently from just about any other function in the TiVo. Instead of items running down the left side of the screen, your screen is broken down into a 4 x3 grid. Each entry in the grid can contain an item from your photo collection, along with a preview.

Previewing a number of jellyfish photos.
In theory, this lets you easily see all the pictures on your computer while staying within the menu system. Since the Home Media Option gets your photo albums from iPhoto, though, the first Photo menu contains nothing but folders representing the different photo albums. I suspect the Photo menu system was designed this way for Windows users, since Windows uses completely different methods to organize pictures.
On the bright side, TiVo determines the name of the pictures based on the titles set in iPhoto as opposed to the seemingly random names your digital camera assigns to files.
Slide shows work pretty much as you would expect—every photo in the selected album is displayed on the screen for a few seconds at a time. As with listening to music, your slide show options are fairly limited: time per photo, shuffle, and repeat.
In addition to viewing a slide show, you can display a single image or get information about a photo. When getting information about a photo, you can see the date the picture was taken, the date it was imported, and the date it was modified. You can also rotate the picture in 90° increments, if necessary.
When displaying photos on the television, TiVo scales the photo as large as possible without distorting the proportions. If the photo won’t scale to the full size of the screen (common with rotated or cropped images), the picture will be displayed with a black border.
Only the Basics
I have essentially the same complaint about both playing music and slide shows: the options are far too basic. Music playback doesn’t support any sort of cross-fading. There aren’t any transitions when images change during a slide show.
However, my biggest complaint is that you can’t mix audio and video. After using the iLife applications, it seems natural to have music playing in the background during a slide show or to have visual effects while listening to music. With the Home Media Option, though, it’s one or the other—visually boring music or silent slide shows. Since your TV has both a screen and speakers, the TiVo should be able to use both of them at once.
Also, the Digital Music option is currently limited to playing MP3s. If you have music you’ve imported into iTunes in the AIFF or WAVE formats, you won’t be able to play them on your TiVo. More importantly, this means your TiVo cannot play AAC files ordered from the new iTunes Music Store or encoded by iTunes 4. Fortunately, the Digital Photo option is a bit more forgiving in terms of file formats—it supports JPEGs, GIFs, BMPs, TIFFs, and PNGs.
Beyond Music and Photos
I haven’t really touched on Remote Scheduling and Multi-Room Viewing for a few reasons. First, I haven’t had a chance to use either feature yet. Second, the behavior of these portions aren’t anywhere near as Mac-specific as the Digital Photos and Digital Music features. Finally, I really think that the Digital Photos and Digital Music option are the more important features.
Is It Worth It?
The way I see it, people interested in the Home Media Option will fall into at least one of two categories—people who already own Series2 TiVos, and people who want their digital music and photos accessible from somewhere other than their computers.
If you already own a Series2 TiVo, the Home Media Option presents a significantly less expensive option for accessing your digital music via your entertainment center than its competitors—both the Slim Devices SLIMP3 and the Turtle Beach AudioTron cost more than $200 and aren’t integrated with iTunes. I looked briefly around the Internet for a stand-alone product that has similar functionality to the Digital Photos portion of the Home Media Option, but wasn’t able to find anything.
If you don’t already own a Series2 TiVo, the answer isn’t as easy. You need to factor in the cost of purchasing a TiVo, either the monthly or lifetime fee for the basic TiVo service, and the cost of the Home Media Option. If you just want either the Digital Photos or Digital Music functionality, there are certainly less expensive ways to accomplish this.
Personally, I already owned a Series2 TiVo with the lifetime service plan before the Home Media Option was announced. Since I was already looking at home entertainment devices, $99 seemed like a small price to pay when compared to the competing, stand-alone devices.
Reader Comments (7)
I am so confused about about how and what I need to do to get the Tivo's connected together, so I can send shows to different rooms.
I have a desktop, laptop and wireless web how do I connect the Tivo's?
Can they be connected together with a wire?
What do I need to buy? Thanks
Add A Comment