How To
Performing a Video Extraction
When my trusty VCR finally died, I had tons of old videotape footage lying around the house. While searching for a replacement, I decided to join the DVR revolution. After all, it seems like everyone was replacing traditional VCRs with some kind of digital recorder. Why shouldn’t I do likewise?
After some searching, I settled on a TiVo unit with a built-in DVD burner. I chose this unit because I could connect a borrowed VCR and transfer the content of my videotapes to the unit’s hard drive. That way I could salvage the tapes without having to buy a VCR or dedicated video capture solution.
With my usual dive-right-in attitude, I purchased the TiVo and connected it to our wireless network. With any luck, a Mac version of TiVoToGo would be available before I had time to start transferring the tapes. If not, surely I could burn the files to DVD and bring them to my Mac to edit in iMovie or Final Cut Express. This should be the easiest project I had undertaken in quite a while.
This Is Easy—Not
Fast-forward several months. It’s time to start transferring and editing tape. TiVoToGo still isn’t available for the Mac, so I’ll have to burn the files to DVD to put them on the Mac. It reminds me a little of the “sneaker net” days, but that’s a minor inconvenience. I’ve already spent several hours recording tapes to the TiVo in real time, and half an hour or so later the DVD is burned and I’m ready to pop it into the Mac and start editing.
I insert the DVD into my Mac, and it plays without a hitch, but that’s where the problems start. DVDs capable of being played in set-top DVD players store their video content in a series of DVD Video Object (VOB) files. The important thing to remember is that these files present problems for most consumer-level video editing software—including iMovie and Final Cut Express. Before being imported and edited, VOB files must be converted to a format the iLife suite understands.
Converting VOB files for use in iLife or Final Cut Express presents two problems. First, these files store the video content that we want in a format known as MPEG-2. Even though it creates standard DVD files, iDVD does not import MPEG-formatted video.
The second problem presented by VOB files is that they have been muxed. Muxing, also known as multiplexing, involves combining several streams of digital information into one file. In the case of DVDs, muxed files typically combine video, one or more audio files, and possibly subtitles, in one file. Before we go any further with the project we need a tool that will convert these files into something that iLife can comprehend. Let’s find our tools and get to work.
Gather Your Tools
I looked around for a while before I found a program called MPEG Streamclip 1.5.1. According to the information page, this program is compatible with Mac OS X 10.2 and higher. It works with QuickTime 6 under Jaguar and QuickTime 7 under Panther and Tiger. Although the program itself is free, in order to examine VOB and other MPEG-2 files you will need to purchase and install the QuickTime MPEG-2 Playback Component (currently $20). The current version of MPEG Streamclip can run on Intel processors through Rosetta, and on PowerPC Macs. A Universal version is anticipated at a later date. MPEG Streamclip can be used as a video player, but its file conversion capabilities are what caught my attention.
Since I eventually want to put the edited footage on DVD, I am most interested in the conversion from VOB files to DV format. This is an important consideration, since Apple recommends that for best results movies that are going to be used in iDVD should be in DV format with an audio sample rate of 48KHz. MPEG Streamclip is capable of handling this conversion quite well. Now that we have found the right tool, let’s get down to work.
Getting Down to Work—Loading the Files
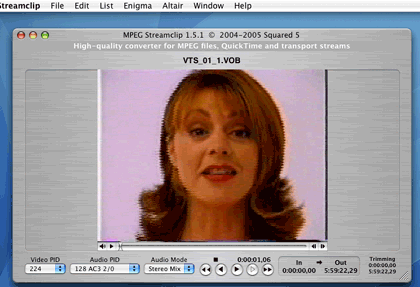
After downloading and installing MPEG Streamclip and the QuickTime MPEG-2 Playback Component, it’s time to get to work. Insert the DVD that you want to retrieve footage from and launch MPEG Streamclip. Choose Command-O, navigate to the DVD, and open its VIDEO_TS folder. A basic DVD, one without complex menus or additional data content, will contain three types of files: IFO, BUP, and VOB. IFO files contain information that the DVD player needs in order to understand the disc’s structure such as total running time and the number of chapters. BUP files are essentially backups of the information contained in the IFO files. The VOB files are the ones of interest to us because they contain the video information we are attempting to extract.
There are several VOB files on any given DVD. How do we know which VOB to attempt to extract? Thankfully there is a pattern to the order of these files. The VIDEO_TS.VOB file contains the main background screen for the DVD. The naming pattern for the remainder of the VOB files provide clues to their content. Each title on the DVD has a corresponding series of VOB files. The VOB files for the first title will all have the number 01 in their title. VOB files for the second title will all have the number 02 in the title and so forth.
Let’s assume for a moment that I want to extract the first thirty minutes of the first title on the disc. Double-click the first VOB file that has “VTS_01” in the title. MPEG Streamclip will ask whether you want to open just that file or all of the files for that title. I usually open all of the VOB files for a given title, because I want to extract multiple clips from the same piece of footage. If you have a good idea which file contain the information that you need, it is possible to open just that file.
When I ran tests for this article I used Streamclip’s option to open all VOB files. I wanted to see how well my system would handle such a task. In about a minute, the first video frame appears in the editing window. This window has controls similar to QuickTime Player. From here you can play the video or scroll to the footage that you want to recover and mark editing points. It doesn’t take long to get used to this window.
The Editing Window
On some videos, the first frame appears in the editing window when you open the file. Sometimes I have to use the playback controls to scroll forward a frame or two until a video frame appears in the window. Once you have found the first frame that you want to salvage, go to the Edit menu and choose Select In. Once that is done, you can use the playback controls or the slider to move to the point where you want to stop. Now return to the Edit Menu and choose Select Out. Select In and Select Out mark the beginning and ending respectively of the clip that you want to extract.
Now that you have marked the beginning and end of the clip, it’s time for extraction. Don’t worry; unlike some trips to the dentist, Streamclip makes this about as painless a process as possible.
Extracting the Video
Since we are ready for extraction, let’s take a look at some of our options. A quick trip to Streamclip’s File menu reveals several options for exporting, converting, and demuxing MPEG files into a variety of other file types. Since the goal of this project is to move the files to iMovie or iDVD, we are interested in the Export to DV option. Choosing this option brings up a dialog allowing us to set exporting options. The default compression is set to DV25. The drop down menu labeled Standard is already set for NTSC with a screen size of 720 × 480 and a frame rate of 29.97. These are the standards for DVD in the US. If you need the PAL standard, which is common in Europe and around the world, you can choose that as an option from this menu. If I understand the documentation correctly, inserting a PAL disc would automatically change the settings to those needed for a PAL DVD. Make sure that you know which format you need.
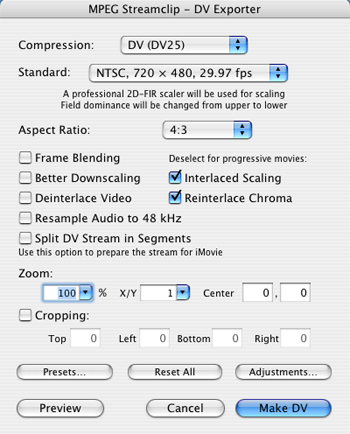
DV Export Options
A variety of other options can be set from this box, including whether to set the screen to the standard 4:3 aspect ratio or the 16:9 ratio needed for widescreen formats. There are a variety of other settings here, including adjustments to color and volume, as well as accounting for progressive video. For my purposes, I am interested in the checkbox that says “Split DV Streams in Segments.” This will divide the resulting file into iMovie-friendly segments that are slightly less than 2 GB.
When you are finished selecting options, choose Make DV to close this dialog. Closing the dialog brings up the standard Save As dialog allowing you to choose where the file will be stored. Extracting video can consume drive space quickly. My test DVD, for example, contained six hours of video footage. I selected a half hour of footage, extracted the video, and saved the resulting files. Four files were created, which consume a total of 6.03 GB of drive space. From the time that I closed the Save As dialog until all files were saved, the process took 13 minutes 37 seconds. Testing was completed on a dual-2GHz G5 with 512 MB of memory. If more than one file needs to be saved, Streamclip saves the files with a .dv extension and three-digit number. This makes it easier to keep the clips in sequence when importing them into iMovie or iDVD. Importing the resulting files into iMovie takes about 1 minute 15 seconds for each file. If you only need to do basic video trimming and editing, you may not even need iMovie. MPEG Streamclip functions well as a basic editor. If you are counting on this program to extract video from encrypted DVDs, you’ll have to look elsewhere. That’s one thing it won’t do.
Final Thoughts
Believe it or not, once I got started this project was fun. There were some problems along the way. It was testing for this project that convinced me I was having the memory problems I wrote about a few months ago. I tried several pieces of software to complete this project. Perhaps one day when I add a little memory to my system I will write a comparison of the software. Along the way I found a nice piece of free software for my digital toolkit.
![]() Copyright © 2005 Sylvester Roque, sroque@atpm.com.
Copyright © 2005 Sylvester Roque, sroque@atpm.com.
Also in This Series
- Give Alert Sounds a Little Personality · March 2012
- Create Your Own iPhone Ringtones · February 2012
- Create Your Own Homemade Audio Book · December 2011
- Upgrade to Lion Painlessly · August 2011
- Make the Most of TextEdit · July 2011
- Using the Free Disk Utility on Your Mac · May 2011
- Making Use of QuickTime X · March 2011
- Making the Most of What’s Already on Your Mac · February 2011
- Making the Most of What’s Already on Your Mac · January 2011
- Complete Archive
Reader Comments (34)
MacWorld Review: FireWire Digital Video Converters
The article is a bit out of date now, but the information is basically the same. There are now a number of other models from Canopus from which to choose (high end to low end). Best of all, you would be cutting out most of the export, import and translation steps by going this route. Also, your final video quality might not lose as much in the translation process. I don't know this for sure, because I haven't tried it yet.
I've been researching both options for over a year and have frequently thought about doing things exactly as you have done them (I may go both routes simultaneously, just to be safe; but prices will have to continue to drop before I do that); however, I suspect some quality is lost converting from VOB to DV. Am I wrong about that?
I like the idea of converting my many home videos directly to DVD, as you have done, without going through the bottleneck of my computer's hard drive, but I also really want to be able to edit my home videos in iMovie, and I do not like the thought of all the extra steps involved in converting them from VOB to DV and the possibility of quality loss.
I have read a number of customer reviews of analog-to-DV converters at various sites, and most of them are quite positive. Are you in a position to get "loaner" analog-to-DV converters?
I'm not in a position to borrow an analog-DV converter at the moment but may be able to do so soon. With the transfers that I have completed thus far there has not been any significant quality loss. The tapes that I have tried are not a good indication though because they started out in pretty bad condition. Any time things get converted from one format to another and then back again (MPEG-DV-MPEG) there is the potential for loos of quality-especially if the format/settings are not chosen correctly.
I'm hoping that after trying this mpeg stream program that i will successfully be able to watch the video's in quicktime WITH sound and no have any quality loss...
all thought's are welcome...
The only thing I have to add is, get the fastest Macintosh you can afford (Steve, hurry up with the new Intel quads please!) and get lots and lots of (reliable) hard disk storage, especially when fooling around with HD video (and why wouldn't you now?). Hardware RAID is best.
Can someone please resurrect Firewire 800? :-)
PS - I bought Sony only because it was the only solution and I needed a semi-affordable HDV camcorder for an important vacation otherwise...
http://www.dvdxdv.com/DVDxDV.overview.htm
The basic app is $25, and the pro is around $80. Just a heads up - the trial version is free, but will put the words "TRIAL VERSION" across your imported video.
The only downside is that it takes two days to compress the file from 6 GB to about 600 MB, so I turn the monitor off and let the machine run while I do other things on my primary machine.
It's not the fastest or most elegant solution, but it's cheap, and it will (eventually) let me move these video tapes to Video CD, which play in most DVD players.
I recently discovered that I can edit two pieces of footage simultaneously. One window is exporting a finished file while I edit a difference piece of footage in the second window. The only apparent drawback is that you cannot export changes to the second piece of footage until the first one is finished. Working this way may also slow down the export process for the first file a bit.
I also received a personal e-mail from a reader describing similar problems. After a few e-mails and some testing it appears that there are two issues which might be causing this problem.
In my case it appears that the DVD burner in my TIVO unit is failing and may not be finalizing disc burns properly. For ATPM reader Darren Milligan the solution was as simple as changing the brand of blank DVD being used. Try this first before you conclude that the burner is bad even if it is a brand you have previously used successfully.
Thanks Darren fro giving us a heads up about that issue.
I am wondering if this is a result of my other problem. I purchased the Quicktime MPEG2 software package. I finished installation but when I looked for it in my applications (and using spotlight) it does not show up anywhere. Only the installer appears. I have loaded it several times now. I was wondering if it just upgrades Quicktime?
I tried dragging the VOB file directly into MPEG Streamclip. It says it is an unsupported file and asks if I want to open it anyway which I tried. The wheel just keeps turning and nothing happens. Only one of the VOB files on the dvd will open in Streamclip, and that is the one frame title page. So I am back where I started except I am out the $20. Any ideas? Thanks. VC
As for your trouble, check the other VOB files. The one you opened sounds, indeed, like it's only the title page. Try opening one called VTS_01_1.VOB. Sounds like you may have opened VIDEO_TS.VOB.
An ideal app would display title/chapter info in the same fashion that DVD Audio Extractor does. Maybe that's too much to hope for. hehe
It's coming together, in my mind, slowly but surely, and you've added another morsel of understanding, so you have my gratitude. /wave
btw, pretty good little utility, that Streamclip.
You're right, Streamclip is a pretty good little utility. New versions are available for both platforms as of September 30, 2007. The Windows version is a beta though.
If all this is too much, then Sylvester should advise about quality settings with the alternative capture methods mentioned on this page. If EyeTV/Canopus can be configured to capture at full resolution (640x480 or 720x480) with adjustments for high quality (maybe even using the DV codec), then that would be superior to ripping from a DVD recording. But if EyeTV/Canopus can only offer smaller size and/or significantly compressed settings, it may be that the DVD recording is the better route. If so, and if possible, record using 1-hour mode on the DVD for the least degradation.
I haven't had any experience with either of the products that you mentioned. The few anecdotal reports I have read so far suggest that the output from a quality camera is usually as good or better than some of the dedicated products available. This is somewhat subjective though and posts within the same thread are often contradictory. I'll keep investigating and see if I can find a more definitive answer.
The files inside video_ts are compressed for DVD. Perhaps you know how JPEG images degrade a photo slightly by compression. DVDs just use the motion version of JPEG compression, called MPEG.
You should be saving your iMovie and iDVD projects. The correct workflow would have been to open the iMovie project that you had previously edited, add the credits, and export it for iDVD. Then, open the iDVD project which should still have all your menu configuration. You can then replace the old video that was inserted into iDVD with the newly exported one. Last, you'd burn out a new DVD (video_ts).
If you're saying you made a video_ts folder and deleted your iMovie and iDVD projects, I'm afraid I must inform you that you booboo'd. If you search versiontracker and macupdate, you'll find utilities that can extract video from a DVD so you can edit it, but with caveats:
1) The video may not be quite as good of quality the next time you burn because you're compressing it a second time.
2) It will just be the straight video, so you'll no longer have the edits and transitions in the iMovie project—only a single video file to which you can tack a new clip of end credits.
3) You'll have to completely start over on your iDVD menu setup if you deleted the iDVD project. That part cannot be restored from the video_ts folder.
One application that I've used to extract video from DVDs is MPEG Streamclip, but it requires Apple's MPEG playback component. I already had that because it's part of the Final Cut Pro video editor. If you don't use Final Cut Pro, Apple sells it for $20. but MPEG Streamclip is free from a company called Squared 5.
But my comment still applies. You have to have MPEG Playback Component to extract from DVDs, and you definitely will no longer have your edits from the iMovie project or the menus from the iDVD project if you didn't save those project files.
Many thanks,
Cliff
Cliff
Thanks for any help you can offer.
Cliff
My test DV file was 1 hour 22 minutes long and takes up 16,5 GB of drive space. It seems to have imported fine. The import took approximately 22 minutes on a quad core 2.66 GHz Mac Pro with 4 GB of memory. When you export the DV in MPEG Streamclip uncheck the split DV stream in segments option and see if this fixes the problem.
Add A Comment