FileMaking
Incremental Progress
Last time, we built the beginnings of a FileMaker database to track books. In this column we’ll build on this, providing some additional features that will be useful to us as the developers of this system. We’re going to touch on many of FileMaker’s features, including layouts, table occurrences, scripts, and custom functions.
If you didn’t participate in the tutorial last month, you can download the file we’ll begin with that was completed in that column.
Roadmap
Starting with this column, I’m going to depart from the standard progression of teaching about FileMaker. Most FileMaker tutorials in books teach you about databases in general, moving to fields and calculations, then relationships, and moving to scripts, getting progressively deeper into the guts of FileMaker. We’ll be taking a different route. I’ve been building FileMaker databases for a long time, and while we will cover all those topics eventually, I’m going to build this system, for the most part, just as I would if I were building it for a client. Therefore, we’ll cover some advanced topics early.
Along the way, you’re going to learn not only how to use FileMaker’s development tools, such as ScriptMaker and Custom Functions, but you’ll also learn how one developer, me, uses them in the real world.
I’ll be using FileMaker Pro 9 Advanced for all of my development. This means that if you’re using FileMaker Pro 9 instead, or an earlier version, we’ll be covering some topics that you won’t be able to follow along with. For example, Custom Functions can only be created with FileMaker Pro 9 Advanced (although once they’ve been created in a file, they can be used in FileMaker Pro 9). As a similar example, when we cover custom menus, you’ll need at least FileMaker Pro 8.
Some topics we’ll introduce and explain as we need them, while others (including much of what’s covered in this column) we’ll introduce in advance of their need. When we do need to cover a topic, we’ll cover just as much as needed for the moment. We’re going to be moving rather quickly, so if there’s anything I gloss over too much, just let me know.
What Are Layouts?
FileMaker’s ease of use and development extends beyond the easy creation of tables and fields. Without the ability to view and edit data, tables and fields would be rather useless. So FileMaker also includes the ability to create customized views into the database. These views are called layouts in FileMaker terminology.
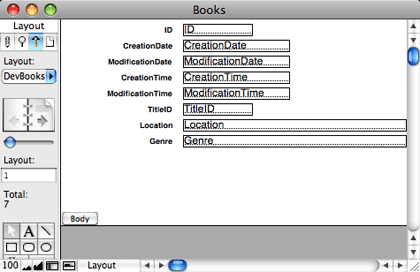
You can think of layouts as windows into your database. When we created the Books database, creating tables automatically induced FileMaker to also create layouts for each of the tables we created. In the case of the Books table, it also created our first record (this was done only for the Books table, which was the table created automatically by FileMaker when we created the database file).
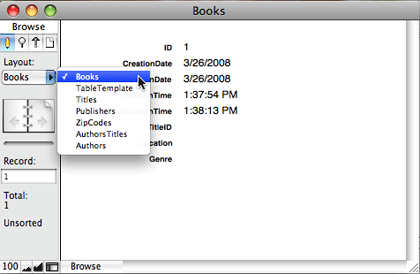
All of the fields we created in the Books table are placed by FileMaker on the layout. Using FileMaker’s menus, we could create book records and fill out the TitleID and other fields on the layout.
That’s the first and primary purpose of layouts: to enable users to view and edit data in the database. But layouts serve other purposes as well. A secondary but very common purpose is for printing reports. We’ll get to report design in a future column, but for now you can keep in mind that FileMaker provides layout design tools that are especially useful for creating reports. They are still views into data, but the difference is that the view isn’t designed to be interactive. Print reports will (generally) not be seen on the screen and will (generally) not be used to enter data.
A third use for layouts is within scripts. There are times when a script needs access to data in a particular form that simply isn’t useful to the end user. A layout might be created, and accessed only by a script, never being seen by the end user.
Finally, a layout may be seen by the user, but not be interactive in any way. The most common reason for this might be a splash screen shown to the user during the launching of the FileMaker system. Perhaps some lengthy script operations need to be performed at startup, and rather than showing a data entry layout, a splash screen is displayed with, perhaps, a progress bar.
90% of the layouts you create, however, will be used for data entry. We’ll begin, however with developer layouts, converting the automatically created layouts to developer layouts with some minor changes. Before we get there, let’s cover table occurrences and how they differ from tables.
Tables vs. Table Occurrences
We’ve already seen (last time) that tables correspond to the things we’re storing data about. Usually a table corresponds to a “thing” that our database tracks. But layouts don’t actually view the data in a table. Rather, they view the data in a table occurrence that is linked to a particular table.
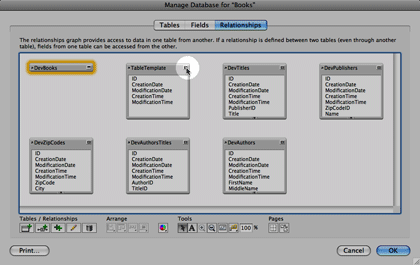
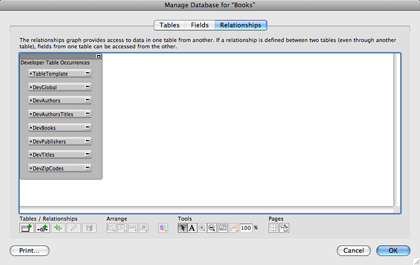
Table occurrences can be viewed in FileMaker’s relationship graph, seen by choosing File ‣ Manage ‣ Database and clicking on the Relationships tab. If you do this for our Books database you’ll see something like this:
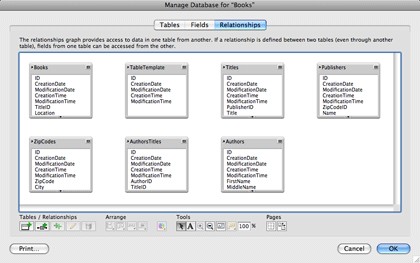
A single table can have many table occurrences. Each table occurrence can be linked to a layout (or a portal on a layout). The table occurrence can be thought of as the context for the table.
For example, if you create three tables, Companies, People, and Pets, where in your design, Companies are related to multiple People and People to multiple Pets, you could create relationships in FileMaker in one of a number of ways. The first, and most obvious way, is to simply create a series of relationships leading from Companies through People to Pets.
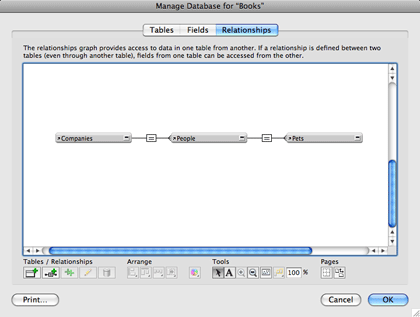
With such a set of relationships, you can create a layout showing records from the Companies table occurrence (not the Companies table) and use portals (to be discussed in detail later) to display data about related People or related Pets. Or you you create a layout linked to the Pets table occurrence and see information about the related person and company.
But you could also create a relationship graph that looks completely different.
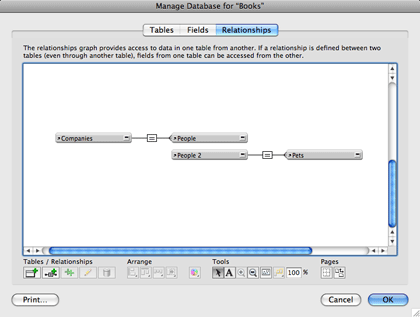
Notice that there, there’s no direct link between Companies and Pets. If we now created a layout linked to the Companies table occurrence, we wouldn’t be able to automatically get information about Pets, because it’s not linked to the table occurrence that the layout looks into. The context of our view into the Companies table doesn’t include any information about Pets.
So, tables in FileMaker define what information the system is able to store. Table occurrences, on the other hand, define how the tables are linked and which data is viewable from each particular context. This will become much more clear as we actually begin to build table occurrences and link them to layouts.
Setting Aside the Developer Layouts and Table Occurrences
First, let’s change the names of the table occurrences that have been automatically created and the names of the layouts linked to them. We’re going to set them aside as for developer use only, so we will prefix their names with “Dev.”
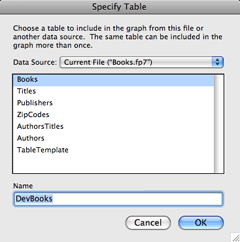
Open the database management window by selecting File ‣ Manage ‣ Database (or pressing Shift-Command-D) and click on the Relationships tab. Double-click the “Books” table occurrence and rename it “DevBooks” by changing the name in the “Name” field at the bottom of the “Specify Table” window. Then click OK. Repeat this process for the other tables in the relationship graph.
Now let’s organize the table occurrences a bit. We won’t be creating relationships to these table occurrences, so we’ll collapse them to show only the table occurrence name and group them together.
To collapse the table occurrence boxes, click the button in the upper right of each one.
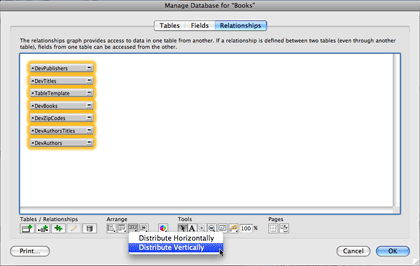
Now select them all by drawing a rectangle around them with the pointer or by pressing Command-A. At the bottom of the window are a number of groups of buttons. Under the “Arrange” heading, select the left-most button and select “Align Left Edges” and then select the third button in this group and select “Distribute Vertically.”
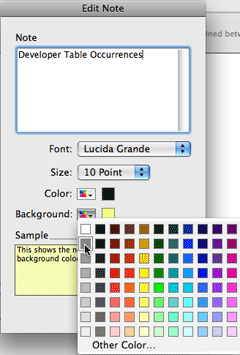
Now we’ll add a border around these table occurrences to visually group them. Click the second button from the left under “Tools” at the bottom of the window (it has the letter A in it) and draw a rectangle around the table occurrences. This will create a note, which always appears behind table occurrence boxes. In the “Edit Note” window that appears, enter a note of “Developer Table Occurrences” and change the color to one of the grays using the “Background” pop-up menu. Then click OK.
Click on one of the table occurrences and then Shift-click on the rest to position them so that the note title is visible. Resize the note to surround all of the table occurrences if necessary.

Now we have some table occurrences for use only by the developer. The user will never directly edit data through these table occurrences, although we may write scripts that do so. Now let’s change the associated layouts to have identical names.
Click OK to save your changes. If you’re not on the “DevBooks” layout (automatically renamed from “Books” when the associated table occurrence was renamed), select it from the Layout menu in the status area on the right. Enter Layout mode by choosing View ‣ Layout Mode or pressing Command-L. You’ll see the three sections of the layout: the Header, the Body, and the Footer. We’ll cover the purposes of these sections later, but for now, know that we don’t need to have a header nor a footer for our developer layouts. Remove these by clicking the button associated with each one and pressing the Delete key.
Note that this action won’t change the functionality of the system, as it’s being designed, in any way. These layouts will work just as well for developer purposes if the header and footer remained, but as they aren’t being actively used for any purpose, I prefer to remove them.
Further note that renaming a table occurrence will not usually automatically rename a layout associated with it. It happened in this case because the layout had been automatically created when the table was created. If we had renamed the layout manually, changing the associated table occurrence’s name would have had no effect.
Go ahead and remove the headers and footers from the other layouts. There are a number of ways to move from one layout to the next. You can select the next layout in the Layout menu in the status area, you can click the book page on the right below the Layout menu or you can press Control-Down Arrow. When you move from one layout to another, unless you’ve set a preference to the contrary, you’ll be asked if you want to save your layout changes. I suppress this dialog box when it first appears, or you can do so manually by selecting FileMaker Pro ‣ Preferences, clicking the Layout tab, and checking the box labeled “Save layout changes automatically (do not ask).”
The Global Table
Before we begin creating actual user layouts, we’re going to create one more table (and table occurrence and layout). This will be the Globals table. The Globals table will be used to hold information that is global to the entire system. It will have a single record only (which we will eventually ensure with a script that runs automatically). Such global information will be the version of the system, and eventually some graphic elements that are used throughout the system.
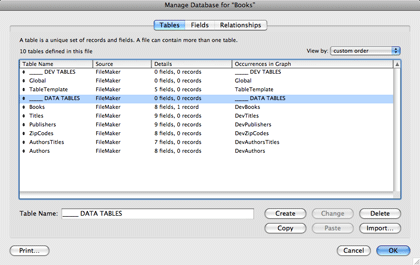
Return to the Define Database window (Shift-Command-D) and click on the “Tables” tab. This Globals table is not one that stores normal data, so we will not use the TableTemplate table here. Instead, click on the Table Name field at the bottom of the window and type in “Global”, followed by pressing Return.
We now have two categories of tables: developer tables (Global and TableTemplate) and data tables (everything else). It will be handy to separate these. Tables can be ordered as you like using the double-sided arrow to the left of each table name. Click on this next to the Global table and drag it to the top. Then reposition the TableTemplate table just below Global. You can also reposition a table by selecting it and holding down the Command key while pressing the up and down arrow keys.
Since these tables are of a different sort than the rest, a separator between them will be handy. Create a table called “_____ DEV TABLES” (prepended with five underscores) and position it above the “Global” table. Create another table called “_____ DATA TABLES” and place it below the TableTemplate table.
Some table occurrences were automatically created when we created these three tables. We don’t need table occurrences for our separator tables, as we will never create layouts to view data in them. Click on the Relationships tab and delete the table occurrences for “_____ DEV TABLES” and “_____ DATA TABLES.” Collapse the Global table occurrence, rename it “DevGlobal”, and arrange it within the “Developer Table Occurrences” note, using the alignment and distribution menus to position it with respect to the previous table occurrences.
Return to the Tables tab and double-click on the Global table to define its fields. For the time being, we’ll only need one field in the Global table. Create a text field called “Version.” We’ll use this to store the version of the database, which will periodically be increased as it’s developed. Click OK to save your changes.
FileMaker has automatically created a layout for the DevGlobal table occurrence. Go to that layout, make sure you’re in Layout mode, and remove the header and footer. Enter Browse Mode by choosing either View ‣ Browse Mode or pressing Command-B. Create a new record by selecting Records ‣ New Record or pressing Command-N. You’re automatically placed in the Version field. Enter “1.0a1”.
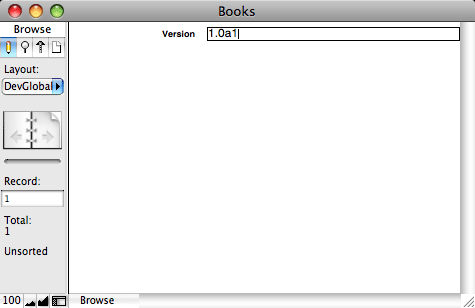
This is the first version of our system (indicated by “1.0"), we are in the alpha stage (indicated by the “a”), and this is the first alpha version (indicated by the final “1”). The integer portion of the number is the major version number, the fractional portion is the minor version number, and the final number is the revision number. Software development generally goes by stages. Alpha stage is when the initial development takes place, where the programmer adds and tests new features. Each time we work on the system, we’ll increment the alpha version by 1. So next month, we’ll be working on version 1.0a2. Once we’ve added all of the features we want to the system, it will move from the alpha to the beta stage, and we’ll change the version to 1.0b1, incrementing the last digit each time we work on the system, removing any bugs that have been reported. After the system is feature complete and (hopefully) bug-free, we’ll move to a release version, indicated by 1.0r1. We’ll use scripts and custom functions to automate the process of incrementing the revision number.
Automating Development
As we’ll see as we build this system, FileMaker offers many tools for building the software for the user, but these same tools can be used to make the life of the developer easier as well. For example, we just discussed how the software’s version number will be incremented. While the computer can’t tell when we’ve moved from one stage to the next (alpha to beta to release), it can tell what the next revision number should be. We’re going to create a custom function to determine what the next revision number should be, and a script that runs at startup will ask the developer if the revision number should be incremented. Before we do that, however, we’ll need to cover the concepts of user accounts, custom functions, and scripts.
User Accounts
A database system must do more than simply provide the means for storing and retrieving data. It also needs to make sure that only authorized users are able to view sensitive data and be able to perform certain actions. FileMaker handles this responsibility with the mechanisms of accounts, privilege sets, and extended privileges. For the time being, we’ll touch briefly only on accounts and privilege sets.
An account is a user name/password combination that identifies who a user is and confirms that they are who they say they are. Generally, each user of a FileMaker system will have their own account, and there may be additional accounts as well, for Web access to the system, for instance. All access to a FileMaker database is received through a user account that must be entered when the file is opened.
You might be thinking at this point that you’ve not been entering any user account information. That’s because when FileMaker created the Books.fp7 file, it created an account automatically, and set the file to automatically use that account when opening the file. The account it created is called “Admin” and it currently has no password. You can verify this by selecting File ‣ File Options. There, you’ll see that the options specify that the file should be opened automatically using the Admin account, leaving the password blank.
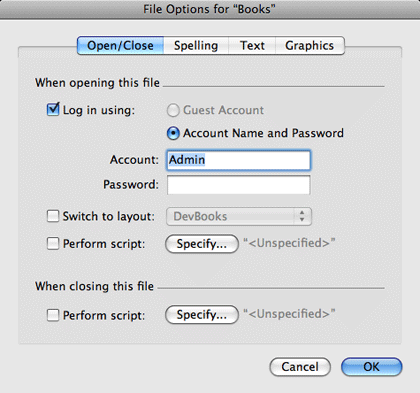
We’re going to change these options. First we’ll remove the automatic login option from the file options. Go ahead and uncheck the checkbox labeled “Log in using.” After you click OK to save this change, if you close the file and open it again, you’ll be presented with a login window, prompting you to enter a user name and password. In all likelihood, the user name will be autofilled with “Admin” (obtained from the FileMaker application preferences, seen by going to FileMaker Pro ‣ Preferences). Since no password is associated with that account, you can simply click OK to log in.
The second component of accounts is the privilege set assigned. You can think of privilege sets as a way to break users into groups, specifying which actions each group can perform. So, for example, if you’re tracking employee salary information within your database, it’s likely that only people in accounting and management should be able to view the data. You can give access to the employee table to everyone (perhaps in addition to storing salary information, it also stores phone numbers that everyone needs access to), but limit the salary portion of the table to the privilege sets associated with management and accounting.
FileMaker comes with a number of privilege sets automatically, and the default Admin account is assigned to the “[Full Access]” privilege set, which you can think of as developer access. It includes access to everything, including defining how the database works. We’re going to modify the Admin account to be specific to you, and we’re going to provide it with a password.
Select File ‣ Manage ‣ Accounts & Privileges and make sure the Accounts tab is selected. You’ll see two accounts: a disabled [Guest] account and an enabled Admin account. We’ll ignore the [Guest] account for the time being.

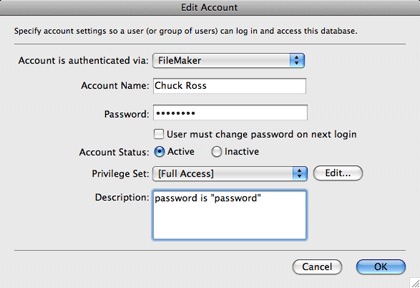
Double-click the Admin account to see the Edit Account window. Enter your first and last name for the Account Name and give yourself a password. Since I’ll be making my copy of the file available on our Web site, I’ll just use “password” for the password.
Leaving the Privilege Set menu as is, you can place anything you like in the Description field. During development, I often create sample accounts for each privilege set. These accounts are removed before delivering the system to the client. For easy reference, I’ll often place the password for the account in the description so that I can see it when viewing all the accounts.
Click OK to save your changes and then OK again. Since you’ve changed the settings, FileMaker wants to ensure that you know how to get back in. It will present you with a window to confirm that you know how to log in with Full access. Enter the name and password you just used for the edited Admin account, and click OK. If you now close and reopen the file, you’ll need to enter this account and password in order to access the file.
Scripts
Most tasks that FileMaker can perform can be automated with a script, which is a set of steps that should be performed. Scripts can do just about anything that a user can do, but faster and more accurately. As a simplistic example, suppose that you’ve created a layout for the user to view the list of all books in the database. The end-user can then choose Records ‣ New Record to create a new record and then manually navigate to a layout designed for data entry. By using a script, you can automate this process, creating the record and taking the user to the appropriate layout and perhaps performing other actions as well (maybe creating a log entry that the record was created and by whom it was created).
FileMaker offers dozens of script steps, many of which take parameters that affect the behavior of the step. We’ll be creating a script in a few moments that will check which account was used to log into the system, and perform certain actions if the user is one particular person (you).
Custom Functions
We haven’t yet gotten to calculations in general, but briefly, calculations are used throughout the FileMaker application, within field definitions, privilege sets, and scripts, among many other places. A calculation uses functions to return a value. For example, if you have an Orders table with related line items, you would probably have a number of calculations that eventually determine the grand total of the order. First, each line item on the order probably has a Quantity and a Price, so you would create a calculation field with an equation of Quantity * Price, which multiplies the quantity by the price. Then, in the Orders table, you might have fields for shipping amount and the tax rate, which might produce a TotalOrder calculation in the form of ( Sum( LineItems::ExtendedPrice ) ) * ( 1 + TaxRate ) + ShippingAmount.
In this calculation, Sum is a built-in FileMaker function which returns a total of all the values in the records related to the current record. FileMaker has dozens of built-in functions. Some are logical, so that a calculation can return different values based on some condition, and some work with text, allowing you to combine strings or pull them apart. But often, FileMaker doesn’t have a function for what you want to do. This is where custom functions come in.
Any time you create a similar calculation more than once, consider placing it in a custom function. For example, it’s common to combine a first, middle, and last name into a single string for display. You could type in the same sort of calculation each time, or you could create a custom function, and simply call it, as in FullName( FirstName, MiddleName, LastName ).
We’re going to create a custom function now that will accept as a parameter a version string and return the incremented version. So if passed, for example, "1.4r13", it would return "1.4r14".
Select File ‣ Manage ‣ Custom Functions and click the “New” button at the bottom of the window.

Give the function a name by typing “NextVersion” in the Function Name field. Our function will take a single parameter, the current version, so type “CurrentVersion” in the Function Parameters field and press return. Now click in the calculation definition field (the largest text area in the window), and you’re ready to begin defining the equation.
We’re going to build our function in a couple of iterations, refining the equation each time. Let’s analyze what we need to do.
A version number is in the form of X.YmZ. We want to extract the Z from this, get it’s numerical value, add one to it, remove the Z from the original string, and append this new value to what is left.
The value of the m in our version string template will be either “a”, “b”, or “r”. Only one of those should appear in the string, so whichever one is in it, we can assume that any characters after it are the revision number we want to increment.
How can we tell which letter is used? It isn’t very straightforward to do so. FileMaker doesn’t have a function called something like StringContainsSubstring, but it does have a function called PatternCount, which will serve the same purpose. PatternCount has a template of PatternCount( text; searchString ) and will return the number of times searchString appears in text. If searchString does not appear in text, a zero is returned. So we can search for the letter “a” in our version string with PatternCount( CurrentVersion; "a" ). If the result is not zero, “a” is in the version string. Similarly, PatternCount( CurrentVersion; "b" ) and PatternCount( CurrentVersion; "r" ) will tell us if there’s a “b” or an “r” in the version string.
Case is another built-in FileMaker function. Its template is Case( test1; result1 {; test2; result2; …; defaultResult} ). Case performs each test, and after finding one that returns true, returns the result following it. If no test returns true, the defaultResult is returned. The curly braces around test2 through defaultResult indicate that those parameters are optional, and the ellipsis between result2 and defaultResult indicates that additional tests could be placed there. If no test returns true and there is no default result, an empty string is returned ("").
One further item to mention before we build the Case function: FileMaker interprets a zero value as false in tests and any other value as true. This works well for treating our PatternCount function as a ContainsString function. If the searchString is found at all, a number greater than zero will be returned, and this will be interpreted by FileMaker as true.
We’ll use the Case function to test for each of the three possible strings. For whichever string is found we’ll keep that letter. Here’s what our Case function will look like:
Case(
  PatternCount( CurrentVersion; "a" );
  "a";
  PatternCount( CurrentVersion; "b" );
  "b";
  PatternCount( CurrentVersion; "r" );
  "r"
)
This portion of the equation will return whichever letter appears in the version string. But what do we do with this? FileMaker has another function called Let, which allows us to store temporary variables in the equation for later use. Although anything you can do in FileMaker with the Let function is possible without it (with an advanced exception to be covered with the topic on script variables sometime in the future), it often makes the equation much more readable. So we’ll store the above calculation’s return value in a variable. The template for Let is Let( {[} var1 = expression1 {; var2 = expression2…]} ; calculation ).
Let(
  [
    Letter = Case(
      PatternCount( CurrentVersion; "a" );
      "a";
      PatternCount( CurrentVersion; "b" );
      "b";
      PatternCount( CurrentVersion; "r" );
      "r"
    )
  ];

  // Final result
)
Whichever letter appears in the string, we now want to know where it appears. FileMaker’s built-in function for this purpose is Position( text; searchString; start; occurrence ), where text is the string we are looking for the position of something in, searchString is the string we are looking for, start is the position at which we should start looking, and occurrence is which occurrence should be considered. 90% of the time, start and occurrence both have a value of 1, meaning we begin at the beginning and find the first occurrence.
Since the variable Letter stores which letter we are searching for, our Position function takes the form of Position( CurrentVersion; Letter; 1; 1 ). In the case of a version string like "1.0r1", this would return 4, as the “r” is the fourth letter in the string. Let’s store this in a variable and add it to our equation.
Let(
  [
    Letter = Case(
      PatternCount( CurrentVersion; "a" );
      "a";
      PatternCount( CurrentVersion; "b" );
      "b";
      PatternCount( CurrentVersion; "r" );
      "r"
    );
    LetterPosition = Position( CurrentVersion; Letter; 1; 1 )
  ];

  // Final result
)
Once we know the position of the letter, we want to get everything to the right of it. FileMaker’s built-in functions for this purpose are Length and Right. Length, with a template of simply Length( text ), returns the number of characters in a string, so that Length( "1.0a1" ) would return 5. Right’s template is Right( text; numberOfCharacters ), so that Right( "1.0a7", 2 ) would return "a7".
Note that if we subtract the position of the letter from the length of the version string, this provides us with the number of characters on the right that we are interested in. So, Right( CurrentVersion; Length( CurrentVersion )—LetterPosition ) will return the revision number as a string.
Let(
  [
    Letter = Case(
      PatternCount( CurrentVersion; "a" );
      "a";
      PatternCount( CurrentVersion; "b" );
      "b";
      PatternCount( CurrentVersion; "r" );
      "r"
    );
    LetterPosition = Position( CurrentVersion; Letter; 1; 1 );
    RevisionNumber = Right( CurrentVersion;
                            Length( CurrentVersion ) - LetterPosition )
  ];

  // Final result
)
Our RevisionNumber variable isn’t actually a number; it’s a string. We don’t increment a string; we increment a number. We convert this string to a number with the GetAsNumber( text ) function. After doing that, we can increment it.
Let(
  [
    Letter = Case(
      PatternCount( CurrentVersion; "a" );
      "a";
      PatternCount( CurrentVersion; "b" );
      "b";
      PatternCount( CurrentVersion; "r" );
      "r"
    );
    LetterPosition = Position( CurrentVersion; Letter; 1; 1 );
    RevisionString = Right( CurrentVersion;
                            Length( CurrentVersion ) - LetterPosition );
    NextRevisionNumber = GetAsNumber( RevisionString ) + 1
  ];

  // Final result
)
We need to append this incremented revision number to the base version string with everything up to the letter we found. Just like the Right function, there is a Left function for this purpose.
Let(
  [
    Letter = Case(
      PatternCount( CurrentVersion; "a" );
      "a";
      PatternCount( CurrentVersion; "b" );
      "b";
      PatternCount( CurrentVersion; "r" );
      "r"
    );
    LetterPosition = Position( CurrentVersion; Letter; 1; 1 );
    RevisionString = Right( CurrentVersion;
                            Length( CurrentVersion ) - LetterPosition );
    NextRevisionNumber = GetAsNumber( RevisionString ) + 1;
    BaseVersionString = Left( CurrentVersion; LetterPosition )
  ];

  // Final result
)
Now we can finally fill in the final result, converting our number back to text now that we’ve incremented it.
Let(
  [
    Letter = Case(
      PatternCount( CurrentVersion; "a" );
      "a";
      PatternCount( CurrentVersion; "b" );
      "b";
      PatternCount( CurrentVersion; "r" );
      "r"
    );
    LetterPosition = Position( CurrentVersion; Letter; 1; 1 );
    RevisionString = Right( CurrentVersion;
                            Length( CurrentVersion ) - LetterPosition );
    NextRevisionNumber = GetAsNumber( RevisionString ) + 1;
    BaseVersionString = Left( CurrentVersion; LetterPosition )
  ];

  BaseVersionString & GetAsText( NextRevisionNumber )
)
To give you an idea of how complicated this would have been without the Let function, and to demonstrate that anything you can do with Let you can do without, here’s the same function after removing the Let function.
Left(
  CurrentVersion;
  Position(
    CurrentVersion;
    Case(
      PatternCount( CurrentVersion; "a" );
      "a";
      PatternCount( CurrentVersion; "b" );
      "b";
      PatternCount( CurrentVersion; "r" );
      "r"
    );
    1;
    1
  )
) & GetAsText( GetAsNumber( Right(
  CurrentVersion;
  Length( CurrentVersion ) - Position( CurrentVersion; Case(
    PatternCount( CurrentVersion; "a" );
    "a";
    PatternCount( CurrentVersion; "b" );
    "b";
    PatternCount( CurrentVersion; "r" );
    "r"
  ); 1; 1 )
) ) + 1 )
Notice that, even after using indenting to make this a bit easier to read, it’s still quite difficult to understand what’s happening, and that our large Case function appears twice.
Why did we go through all this trouble? For most cases, current revision number is a single digit at the end of the version string. Why not simply use something like Left( CurrentVersion, Length( CurrentVersion )—1 ) & GetAsText( GetAsNumber( Right( CurrentVersion; 1 ) ) + 1 )?
Such an equation would work so long as the revision number never got higher than 9. Similarly, although the letter is going to usually be the fourth character, that’s only true so long as the minor version is 9 or lower.
Note, however, that we haven’t covered all the possibilities. If a version string is passed to this function that doesn’t conform to X.YmZ, our function will fail in an unpredictable way. Perhaps we’ll cover error checking with this in a future column.
Now that we have the equation, we can comment it. Comments are notes within a calculation directed to the reader, not FileMaker. Here’s our final custom function calculation with commenting.
// Accepts a version number of the form X.XxX, where Xs are integers and x is
// either "a" (for alpha version), "b" (for beta version) or "r" (for release
// version) and returns the next revision. It does this by keeping the X.Xx
// portion and adding one to the last X.

Let(
  [
    Letter = Case(
      PatternCount( CurrentVersion; "a" );
      "a";
      PatternCount( CurrentVersion; "b" );
      "b";
      PatternCount( CurrentVersion; "r" );
      "r"
    );
    LetterPosition = Position( CurrentVersion; Letter; 1; 1 );
    RevisionString = Right( CurrentVersion;
                            Length( CurrentVersion ) - LetterPosition );
    NextRevisionNumber = GetAsNumber( RevisionString ) + 1;
    BaseVersionString = Left( CurrentVersion; LetterPosition )
  ];

  BaseVersionString & GetAsText( NextRevisionNumber )
)
Enter this into the calculation field for your custom function and click OK to dismiss the Edit Custom Function dialog. Then OK again to save your changes.
Startup Script
The whole purpose of this is to allow the computer to automatically increment the version number. We’re going to write a script to do this and configure the database file to automatically run the script when the file is opened.
Here’s how the script will operate: it will first check to see who is logged in, and if it’s you, it will ask if it should increment the file’s version number. If you opt to increment it, it will set the value in the Version field in the Global table to the incremented version number.
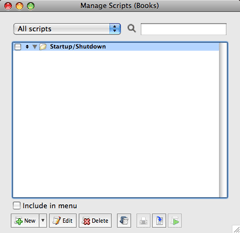
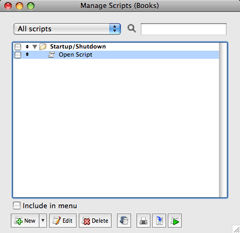
To begin building the script, select Scripts ‣ ScriptMaker or press Shift-Command-S. Scripts can be organized into folders, so let’s first create a folder for scripts that deal with starting up or shutting down the system. At the bottom right of the Manage Scripts window is a “New” button with a menu to its right. Click this menu and select “New Group.” When the Edit Group window appears, enter a name of “Startup/Shutdown.” Click OK to save your changes. Click the checkbox “Include in menu” at the bottom of the Manage Scripts window to turn off this option.
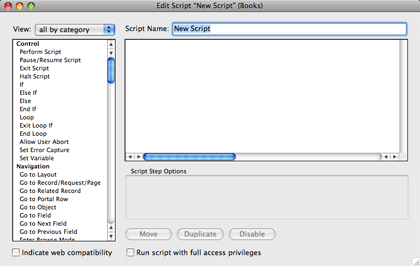
Now click the “New” button or click the menu next to it and select “New Script.” The Edit Script window is where you specify the name of the script, which steps it has, and what options those steps include.
Our first script will check to see who is logged in. We only want to perform the majority of the steps in this script if a particular person is logged in. Alternatively, you can check if a developer belonging to the [Full Access] privilege set is logged in. When I’m creating a solution, however, I’m generally the only one who will be interested in incrementing the version number, so I tie it to my name.
In the Script Name field, give the script a name of “Open Script” to indicate that this will be run when the file is opened. Along the left side of the Edit Script window are the script steps that can be added. Double-click the If step, which will add not only an If step, but also an End If step because every If step needs a corresponding End If step.
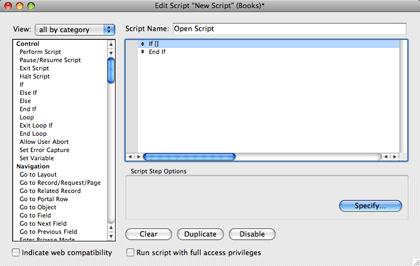
Double-click the If step in the script definition on the right. This will bring up the calculation that will be tested. If the calculation returns true, the steps between the If step and the End If step will be executed. If the calculation returns false, they will be skipped.
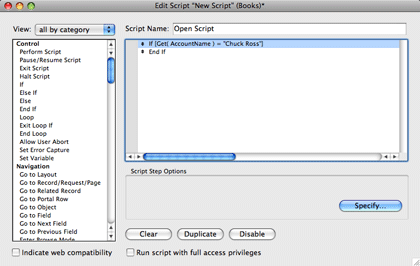
We want to check who has logged in. FileMaker provides a built-in function called Get( AccountName ) that returns this information. Enter Get( AccountName ) = "Chuck Ross" into the calculation area at the bottom of the window, replacing “Chuck Ross” with whatever name you happened to use when you edited the Admin account, and click OK.
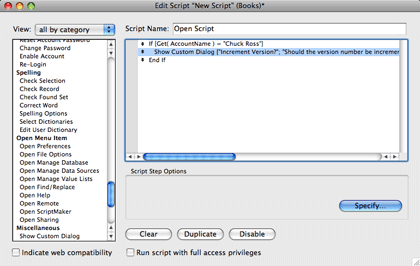
If I’m logged in, I want a dialog box to ask if the system’s version number should be incremented. Scroll down the list of available script steps until you find “Show Custom Dialog” under “Miscellaneous.” Alternatively, you can press the Tab key until the script step list is highlighted and then type “show c,” which will highlight that script step. Either double-click it or, if you navigated to it with the keyboard, press the spacebar after pausing for a second. Now either double-click the script step in your script, or press the spacebar again to bring up the script step options.
For the title of this dialog box, enter “Increment Version?.” Type in “Should the version number be incremented?” for the “Message.” You can specify three buttons for a custom message, one of which can be a default button that is activated if the user pressed Return. In this case, I want the Cancel operation to be the default action, so change the “Default Button” field to read “Cancel” and the “Button 2" field to read “Increment.” Click OK to save your changes.
Now we need another If block, so add one below the Show Custom Dialog step. FileMaker’s built-in function for determining which button was clicked is the Get( LastMessageChoice ) function, which returns the number of the button clicked. We want to continue executing the script steps in the If block if the user clicked the second button, so enter Get( LastMessageChoice ) = 2 into the If step’s calculation.
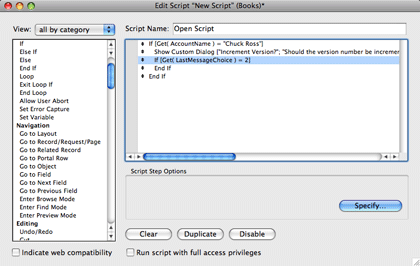
Now we can perform the actual increment. But to do so, we need to make sure we’re on the right layout. Find the “Go to Layout” script step under Navigation and add it to the script. In the Specify menu at the bottom right of the window that appears, select DevGlobal. Now add a “Set Field” script step. For its options, set the Specify target field to Version under the DevGlobal table occurrence. For the calculated result enter NextVersion( DevGlobal::Version ). Your script should look like the one shown below.
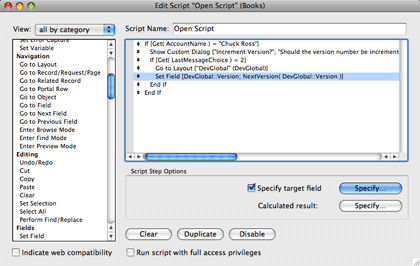
You still need to save your script. You can do so by pressing Command-S or by clicking the close box for the window (or pressing Command-W) and clicking “Save” in the dialog that appears. Your new script should appear in the Startup/Shutdown group in the Manage Scripts window. Press Command-W to close this.
Now set this script to run when the file is opened. Select File ‣ File Options, click the Perform script checkbox, select Startup, and click OK to return to the file options window and OK again to save your changes.
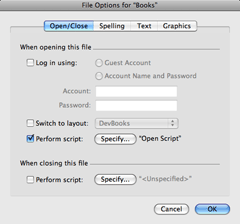
Try it out! Close the file and reopen it, logging in with the account and password you set earlier. You should be presented with a dialog asking if the version should be incremented, and if you click “Increment” and check the version number on the DevGlobal layout, you should see it as 1.0a2.
![]() Copyright © 2008 Charles Ross, cross@atpm.com. Charles
Ross is a Certified FileMaker 7 Developer and the Chief Technology
Officer of Chivalry Software, LLC, a company specializing in
custom database, web and automation software and publisher of
Function Helper, a
FileMaker calculation debugging tool. He was a contributing writer
and the technical editor for The Book of FileMaker 6 and has
contributed to ISO FileMaker Magazine and Macworld in addition to his series on
AppleScript for ATPM.
Copyright © 2008 Charles Ross, cross@atpm.com. Charles
Ross is a Certified FileMaker 7 Developer and the Chief Technology
Officer of Chivalry Software, LLC, a company specializing in
custom database, web and automation software and publisher of
Function Helper, a
FileMaker calculation debugging tool. He was a contributing writer
and the technical editor for The Book of FileMaker 6 and has
contributed to ISO FileMaker Magazine and Macworld in addition to his series on
AppleScript for ATPM.
Also in This Series
- Incremental Progress · November 2008
- Getting Relational · April 2008
- FileMaker 9 · March 2008
- FileMaker 8.5 · September 2006
- Script Parameters and Results · July 2006
- “Real” Programming with FileMaker · June 2006
- Text Parsing With FileMaker · May 2006
- Welcome to FileMaker 8! · November 2005
- Common Functions · October 2005
- Complete Archive
Reader Comments (3)
I originally purchased the Missing Manual for FileMaker Pro and, using that and the FM Help Menu, I have learnt enough to create several FM databases. However when I found the archive of your series on FileMaker - it enabled me to go back to basics to learn the correct way to design and implement them.
This series is so carefully structured and simple to follow that I have thoroughly enjoyed it.
Is there any chance that you will be adding any further articles to this series on more complex scripting, layouts etc?
Kind regards,
Glo
Add A Comment