FileMaking
“Real” Programming with FileMaker
Welcome back to FileMaking, where this month we’ll take a look at scripting in FileMaker, which allows you to turn a FileMaker database into a FileMaker application.
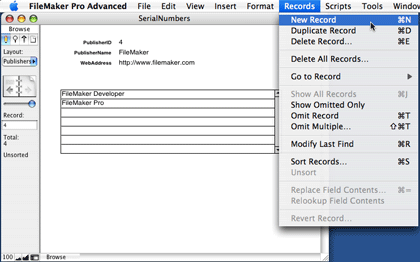
FileMaker can be used on two levels: first, it’s a simple database management system. You define tables, fields, and relationships, and FileMaker provides a structured way to store and retrieve data. Even though I’ve created some very large and complex systems with FileMaker, I have often used it in this manner to create simple databases that are basically glorified list managers, such as the Serial Numbers database we’ve worked on in past columns. Used in this mode, manipulating data in the database is a matter of using FileMaker’s built-in interface elements, such as Command-N to create a new record, View ‣ Find Mode to search for records, etc. FileMaker is very useful at this level. Anyone can create a simple database with a couple of tables and a few fields and begin storing data in it within minutes. Here is an example of a simple database like this:
The other level that FileMaker can be used at is as a cross-platform application development environment, which basically means that you create a complete application within FileMaker that will run on either Mac OS X or Windows. In such applications, the built-in interface elements of FileMaker will often be disabled, and all interaction with the database happens through scripts. Layout tools are used to build a custom interface, and the user clicks buttons or chooses custom menus that execute these scripts. The application can then be hosted on a server, to be accessed by multiple users, or possibly bound as a double-clickable file that doesn’t even need the FileMaker application in order to run. An example of such a database application is shown here:
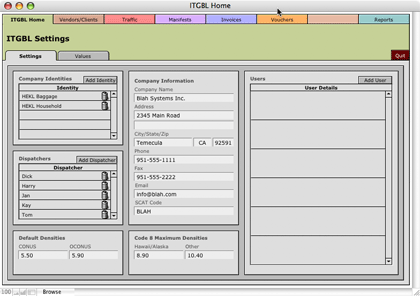
The interface you see above was drawn completely with FileMaker’s layout tools (which we will cover in a future column). The functionality of the system is provided via buttons that are linked to scripts.
What Are Scripts?
Scripts are small programs within FileMaker. If you’ve ever done any programming in AppleScript or another programming language, you’ll be right at home with FileMaker scripts. They are simply named sets of instructions that FileMaker can execute in response to a button being clicked, a menu item being chosen, or a call from another script.
Pretty much anything you can do manually in FileMaker can be done with a script. If there’s an operation that you perform repeatedly in FileMaker, it’s a good candidate for automation with a script.
For example, let’s say that you often perform the following manual steps in FileMaker (using our Serial Number database as an example):
- Go to the SerialNumbers layout.
- Switch to Table view.
- Sort the records by publisher name and product name.
- Print the layout.
If you perform this action on a regular basis, doing so manually will get tedious, so you create a script to perform the actions for you.
Creating Your First Script
First navigate to the Products layout of our SerialNumbers database. The layout you are on when editing scripts has a bearing on which options are set by default for some script steps, so if you’re going to be scripting with regards to a particular layout, it’s usually a good idea to manually navigate to that layout before you begin writing your script. Then, open ScriptMaker by choosing Scripts ‣ ScriptMaker or pressing Command-Shift-S. You’ll see the following window.
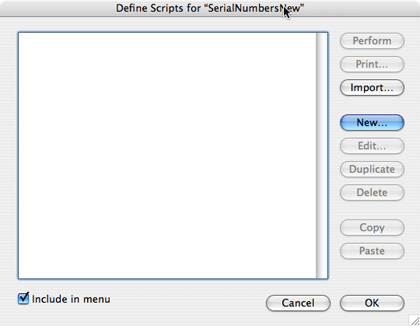
The Define Scripts window is where you edit the scripts available in your file, as well as which appear in the Scripts menu. Go ahead and click the New button to create a new script, and you’ll be presented with the Edit Script window.
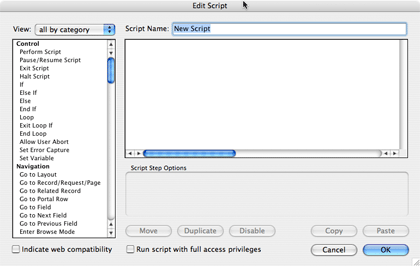
Here is where you add the steps to your script. The list box on the left displays available script steps (individual instructions to FileMaker). The larger area to the right shows the steps that are included in your script. Above this is where you give your script a name. Go ahead and enter “Print All Products” for the Script Name.
You add steps to your script by double-clicking on a step listed in the available steps section. Find the script step named Go to Layout (under the Navigation sub-heading) and double-click it. It will be added to the list of steps that will be executed and will have a default option of original layout (the original layout is the layout that was active when the script began execution). In the box labeled “Script Step Options,” choose Products from the menu. The script step changes to read Go to Layout["Products" (Products)]. The parenthetical Products is to indicate that the “Products” layout is linked to the “Products” table occurrence (created in our first column in the series).
If you’re using FileMaker Pro (rather than FileMaker Pro Advanced 8 or FileMaker Developer 7), your window may look slightly different from the screen shots you will see below. In my screen shots, there is a grey bar to the left of the script steps in my script. This is where breakpoints are defined when debugging scripts. The Pro versions of FileMaker don’t have this debugging capabilities, but everything should work identically.
Let’s use a different method to add the second step. From the View menu, select Windows. The list of available script steps now shows only those script steps dealing with the control of windows. Find the script step View As and double-click it. From the Specify menu select “View as List.”
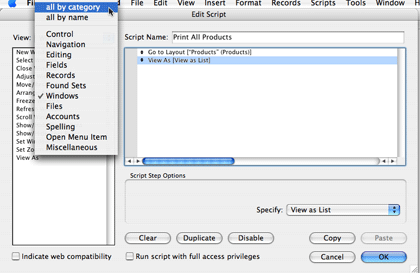
Now that I’ve shown you two ways to find the script step you want, I’ll show you how I actually tend to select script steps. Go back to the View menu and select “all by category.” Press the Tab key until the available script steps highlights. If you are performing the exact steps I’ve outlined and had just added the View As script step, pressing Tab once will take you to the Script Name field, and pressing it again will take you to the script step list. The list box should have a blue outline. Type the word “Sort” and the Sort Records script step should highlight. Wait about half a second (so that FileMaker knows you’re no longer typing to highlight a script step, since some script steps have spaces in their names) and press the space bar. The Sort Records step should be added to your script, and the focus ring (that blue outline) should now be around the script definition box with the added script step highlighted.
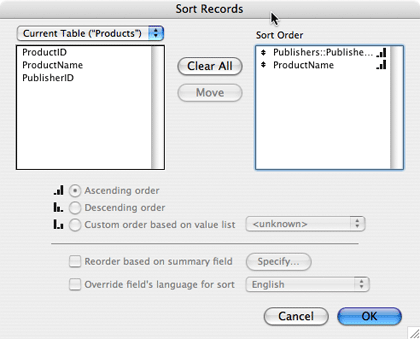
You can now specify the sort options in one of three ways: either double-click the newly added script step, click the “Specify” button, or press the space bar. We want to sort by the publisher’s name and then by the product name. Click the menu above the field list and select Publishers and then double-click “::PublisherName” (the field name begins with two colons to indicate that it’s a related field). Choose “Current Table” to return to the original field list, and double-click “Product Name.” Then click OK.
In your script listing, the Sort Records step now says Sort Records [Restore] (you are restoring a sort order that you just specified). So that this happens automatically without any input from you when the script executes, click the checkbox for “Perform without dialog.”
Using whichever method works for you, add the Print Setup script to the script and specify the options to print to any printer on US Letter paper in portrait mode at 100% scale (the default options, in all likelihood). Also specify that the step should be performed without a dialog.
Add the Print script step and set the specified options to their default. This time, don’t suppress the dialog box so that you can change these options when the script is run.
You may have noticed that there’s an operation that we listed as being manually performed which isn’t yet performed by our script. The script doesn’t yet find all records in the table. I’ll show you two ways to insert a script step in the middle of a script.
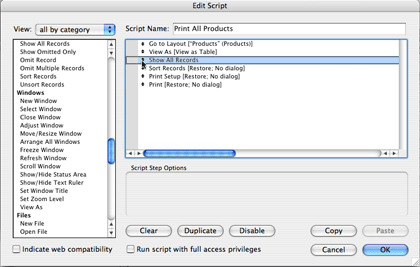
First, find the Show All Records script step and add it to your script. It should be added to the end of the script, just as the previous additions were. To the left of the added script step is an icon showing up and down arrows. Click this and drag the script step so that it is third in the list, just above Sort Records.
To see the other method for inserting a script step into the middle of a script (and to see how to remove a script step), click the added Show All Records step and press the Delete key on your keyboard. Sort Records should now be highlighted. Press the up arrow key to select View As and again add the Show All Records step. It should be added below View As. If no step is selected, a new script step is added to the end of the script. If a step is selected, a new step is added after the selected step.
Click OK to save the script and you should see it listed in the Define Scripts window. Click OK here also to actually save the script to your file.
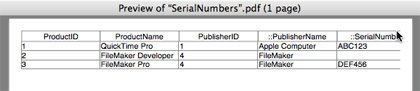
If you now click the Scripts menu, you’ll see a new addition to it, “Print All Products.” You can execute the script by selecting it from this menu or by pressing Command-1. When you do so, you should see the layout change to table view, and a print dialog box should appear. Click Preview to view the printout in the Preview application.
Editing the Script
There is at least one problem with the script. The user may not have been viewing the layout in table view. Let’s edit the script to correct this. Return to ScriptMaker by pressing Command-Shift-S.
Like most programming languages, ScriptMaker includes the ability to store temporary information in variables. Add the Set Variable script step just after the Go to Layout step in your script. For the specify options, set the name of the variable to $OriginalView (the dollar sign specifies that you’re referring to a variable in later calculations, rather than a field) and the value to Get( LayoutViewState ). This will store the view state the user already has for later use. The Get( LayoutViewState ) function will return 0 if the view state is in form view, 1 if it’s in list view, and 2 if it’s in table view.
Also like most programming languages, ScriptMaker has flow control steps. Normally a script simply executes from top to bottom, but there may be cases where you wish some steps to only execute conditionally or repeatedly. For this, we want to return the view state to the original state. Unfortunately, the View As script step doesn’t work with the values returned by Get( LayoutViewState ) so we need to use If and Else If steps to return the state to the original state.
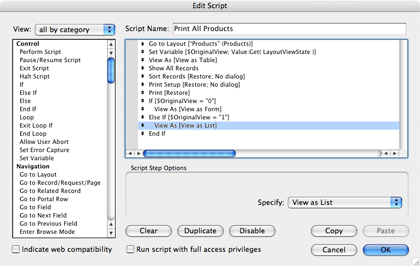
Select the Print step in your script (the last one) and add the If step. Notice that in addition to If, the End If step was also added. Whenever you have an If step, you must have an End If step, so both are added at once (although if you ever accidentally delete an End If step, you can add it manually). Edit the options for the If step to read $OriginalView = "0". Then add a View As step with the option set to View as Form. Add an Else If step with the options set to $OriginalView = "1". Click the View As step above it and click Duplicate, moving the duplicated step below the Else If step and changing the option to View as List. We don’t need to check for the original view being a table view, since if it is, we are already in that state. Click OK to save your changes.
Executing Scripts
You’ve already seen that you can execute a script by selecting it from the Scripts menu. Scripts only appear in this menu if they have the “Include in menu” checkbox checked in the Define Scripts window. The first ten scripts (as seen in Define Scripts) that have this checkbox checked will also have keyboard equivalents of Command-1 through Command-0. As you might imagine, in a file with dozens or even hundreds of scripts, including them all in the menu will not be very helpful. You may have noticed that the Define Scripts window has a Perform button, and scripts can also be executed by selecting them here and clicking that button, but that generally seem very useful (although it can be while you’re creating and testing a script). The primary method for executing scripts is with buttons.
Uncheck the “Include in menu” checkbox for the “Print All Products” script and click OK to save your changes (note that the script no longer appears in the Scripts menu). Enter layout mode by pressing Command-L. In the toolbar on the left is a button tool, which looks like a small button with a hand pointer over it.

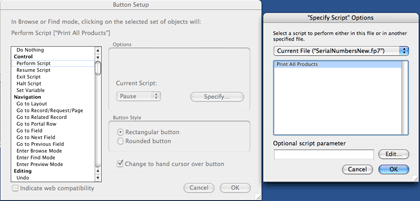
Click this and move your pointer over the body section of your layout. The pointer is now a set of crosshairs. Click and drag to draw a button on the layout. The Button Setup window will appear. You can assign any individual script step to a button, but the only one I ever use is Perform Script. Select this script step and click “Specify” to select the “Print All Products” script. Click OK for each of the two windows. You should see a blinking cursor in the button allowing you to name it. Type “Print” and press the Enter key. (Enter will end the editing of the script name, while Return will insert a carriage return into the name.)
Enter Browse mode by pressing Command-B and try clicking your new button. If you’d like to view the finished file, you can download my copy of it.
Conclusion
Congratulations! You’ve learned quite a bit this month. Scripts are a source of much of the power of FileMaker, and since they are a deep topic, we’ll be taking the next few columns to cover them. Try creating a few scripts of your own. For instance, see if you can edit the script to return the user to the original layout after the script finishes executing. (Hint: you don’t need to store the original layout in a variable.) Then see if you can make it so that if there are no records in the table, rather than printing, a dialog box appears alerting the user (see the Show Custom Dialog script step). Until next month, happy FileMaking!
![]() Copyright © 2006 Charles Ross, cross@atpm.com. Charles
Ross is a Certified FileMaker 7 Developer and the Chief Technology
Officer of Chivalry Software, LLC, a company specializing in
custom database, web and automation software and publisher of
Function Helper, a
FileMaker calculation debugging tool. He was a contributing writer
and the technical editor for The Book of FileMaker 6 and has
contributed to ISO FileMaker Magazine and Macworld in addition to his series on
AppleScript for ATPM.
Copyright © 2006 Charles Ross, cross@atpm.com. Charles
Ross is a Certified FileMaker 7 Developer and the Chief Technology
Officer of Chivalry Software, LLC, a company specializing in
custom database, web and automation software and publisher of
Function Helper, a
FileMaker calculation debugging tool. He was a contributing writer
and the technical editor for The Book of FileMaker 6 and has
contributed to ISO FileMaker Magazine and Macworld in addition to his series on
AppleScript for ATPM.
Also in This Series
- Incremental Progress · November 2008
- Getting Relational · April 2008
- FileMaker 9 · March 2008
- FileMaker 8.5 · September 2006
- Script Parameters and Results · July 2006
- “Real” Programming with FileMaker · June 2006
- Text Parsing With FileMaker · May 2006
- Welcome to FileMaker 8! · November 2005
- Common Functions · October 2005
- Complete Archive
Reader Comments (1)
Add A Comment