How To
Creating iTunes Content Presets
Remember the good old days when Audion_ and SoundJam MP were the Mac music playback programs of choice? Both programs did one thing and did it pretty well—they ripped and played audio.
I don’t know exactly when it happened, but sometime after its introduction in 2001 iTunes became the default media application for many Mac users. iTunes can now play and manage a variety of media: video clips, television shows, podcasts, Internet radio, and ringtones for your iPhone are all at your disposal. Oh yeah, did I mention it still plays your music collection too?
Sometimes iTunes Helps Too Much?
iTunes didn’t get in the way much when my entire library consisted of music ripped from my CD collection. A quick double-click usually produced a tune I wanted to hear. Then I made a fateful decision: I asked the ATPM staff which podcasts were worth investigating. Now I had unheard podcasts getting in the way. Shortly after that I added a few videos. Now a quick double-click and iTunes takes me to wherever I was when I last quit the program. That’s not a bad feature, but it often requires a few more mouse clicks to get to the music I want to hear.
I tolerated this inconvenience until I started listening to Internet radio more often. Even with the streams stored in a separate playlist, finding my favorite streams usually required several mouse clicks. What I needed was a one-click-and-done solution. If my ancient car stereo can have presets for different stations, why can’t my Mac?
There may be better solutions out there, but I quickly cooked something up in Automator that allows me to launch iTunes and move to the content I want with a single mouse click. It’s really a rather short project, so as a bonus I’ll take a moment to discuss adding new stations to your iTunes library. Before we add new content or build any Automator workflows let’s think about organizing iTunes a bit.
Organize That Library
I currently have well over 6,000 items in my iTunes library. iTunes tries to help me keep things organized by dividing the items into the categories in the source list. This is a good starting point, but it doesn’t get me to my music in one click. Here are a few tips that should help you, iTunes, and Automator work together to get to the music you want more efficiently. Let’s start within iTunes.
If you haven’t already done so, start adding appropriate tags to the content in your library. This not only makes it easier for you to sort content, but Automator also becomes more efficient. It’s capable of searching your library for specific content, but only if the items are properly tagged. Tagging your content is as simple as clicking an item, choosing Get Info from the File menu, clicking the Info pane, and filling in the relevant information.
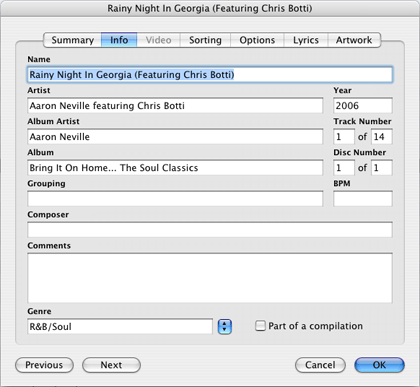
Tagging iTunes Content
Make Use of Playlists
As their name implies, playlists organize the content in your library. If, for example, you often search for all content that fits a specific genre, or all songs by a certain artist, playlists are one way to quickly get the same results. If you choose New Playlist from the File menu, you can create a playlist, name it, and drag items into it. This doesn’t actually move the music files; it simply creates a set of pointers that you and iTunes can use for organization.
You can also create new playlists by selecting some content and choosing “New Playlist From Selection” from the File menu. Create and name a new playlist to hold the Internet streams we’ll add in a moment. It’s empty now, but we’ll soon correct that.
Make Your Playlists Smarter
I have a few regular playlists in my library, but most of it is organized via Smart Playlists. With Smart Playlists, iTunes does the organization for you based upon a series of conditions that you specify. Choose New Smart Playlist from the File menu. In the dialog box that appears, fill in the conditions that will form the basis for this playlist. If you have ever created rules in Mail or Smart Groups in Address Book, this dialog will look very familiar to you. You can click the + symbol to make iTunes combine conditions to only select content that matches all of them.
Although you can limit the number of items in a Smart Playlist, my favorite feature is called “Live updating.” With this option checked, the playlist changes whenever you add or remove content that meets its conditions. I have, for example, several playlists based on musical genre. The condition “Genre contains Blues” shows me all the blues content in my library. Create several of these playlists, and you can select music based upon your mood. You could create playlists based on any of the tags used by iTunes.

Smart Playlists Dialog
The impetus for this article actually occurred in mid-July when I launched iTunes and was greeted by an Aaron Neville Christmas song. I had recently rearranged the order of my library, and Aaron Neville’s Soulful Christmas was at the top of the list. I corrected the problem by creating a smart playlist that excluded podcasts and holiday music. The Smart Playlist excludes music that matches all of the following conditions: “Genre does not contain Holiday” and “Genre does not contain Podcast”. A bit of experimentation will produce playlists that meet your viewing and listening habits. Now that we have things organized, let’s add a new stream to the collection of Internet radio stations.
Finding Your Favorite Radio Streams
Now that I have a broadband connection full time, I like listening to streams from Internet radio stations. Programs that aren’t broadcast in my area or aren’t broadcast at convenient times are suddenly available on my schedule.
There are quite a few good streams in the Radio section of iTunes, but they can get buried among the stations you don’t particularly like. Solve the problem by dragging your favorite streams into the playlist you created earlier. That helps organize the streams that are already in iTunes, but you can’t add new streams can you? Yes, you can. There are actually two ways to do this if you keep a few caveats in mind.
When adding streams to iTunes, remember that the streams must be in a format that the program understands. If your favorite station requires a proprietary player or a password to gain access, those streams usually will not work in iTunes.
You must know the correct URL for the stream that you want to add. Perhaps the easiest to add are .pls files that import into iTunes when double-clicked. We’ll discuss that more in a moment.
If you are looking for a source of streams, check out Shoutcast. Many local radio affiliates are also moving onto the Web, so check your favorite station’s Web site to see if there is a stream available.
You’ll probably prefer to use a regular playlist for the Internet radio content that you add to iTunes. If you used a Smart Playlist, any Internet stations that you play in iTunes would get added to the smart playlist. I often try a station for a few days and then decide I don’t like it. A Smart Playlist would become cluttered quickly. The stations that you don’t want would remain in the playlist until the “pointer” with the information for that stream is removed from the library.
Adding Stations to iTunes
Apple has some pretty good content in the Radio portion of iTunes. There is one problem though: unless someone in Cupertino is psychic, chances are they have left out a few of your favorite streams. Fortunately for us, it’s easy to create shortcuts to your favorites.
If your favorite station has a stream in the form of a .pls file, that is by far the easiest to add to your iTunes collection. A growing number of stations have this as one of their download options. Once you and your trusty Web browser have located a .pls file, download the file as you would any other and locate it. Double-click the .pls file and iTunes should launch and begin playing the stream (assuming you have an active Internet connection). Once the stream has started playing, you can drag the pointer from the main library to the playlist that you are using to organize your Internet radio content. From now on, you can go to that playlist and play a stream simply by double-clicking on the file.
This is great, but what do you do if the station you want to hear doesn’t provide a .pls file? With a little luck and the URL for the stream file, it may still work in iTunes. It takes a bit of work but can be worth it. Try the following steps:
- Drag one of the streams in the radio section of iTunes into the radio favorites playlist that you created.
- Go to the radio favorites playlist and click on the file that you just added to select it.
- Choose Get Info from the File menu. Near the bottom of the Summary tab is an option to “Edit URL.” Choose that option, paste the URL for your new stream into the dialog that appears, and click “OK.” While you are here, you might as well click the Info tab and add any relevant information to the tags. You’ll probably want to at least change the name and genre to reflect the new content.
- Close the dialog, find the stream in the playlist, and double-click it. With any luck, iTunes will take you to the new content.
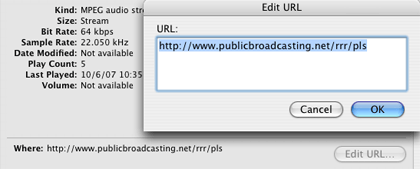
Adding a Station’s URL
Automating Content Selection
Until now, all we have really done is clean up your iTunes library and add pointers to a few new streams. You can do these things no matter which version of OS X or iTunes you’re using. In order to complete the actual automation phase, you will need Tiger and Automator. If you want Automator to close the iTunes window, you’ll also need to download and install the Type Keystroke action for Automator. It’s possible to accomplish this with AppleScript, but I’m not much of a scripter so I’ll leave that to someone else.
If you’ve never used Automator before, my previous article should explain the basics well enough to get you started. As a bonus, if you complete the project in the article you will have a couple of potentially useful workflows. Now that the preliminaries are finally out of the way, let’s launch Automator and put it to work.
Automator’s actions, which appear in the leftmost pane of the window, are grouped according to the application that makes use of that action. Drop the required action into the pane on the far right of the Automator window. Depending upon the action being used, there may be one or more options to consider configuring.
From now on I’ll follow the convention of listing the appropriate Automator application library followed by the action to be copied into the pane on the right. If any settings need to be adjusted for that action, I will include a description immediately below that step. Once you have completed the settings for an action, you may want to collapse the box by clicking the white triangle. This will save some screen real estate.
Push a Button…Play an Item
I initially developed this workflow to exclude holiday music from my normal musical rotation. It used a Smart Playlist that excluded the genres Holiday and Podcast. I could have used a separate library to do this, but I would have to remember to press the Option key when launching iTunes. I’d also have to select the library file that I want to use. This seems much easier to me.
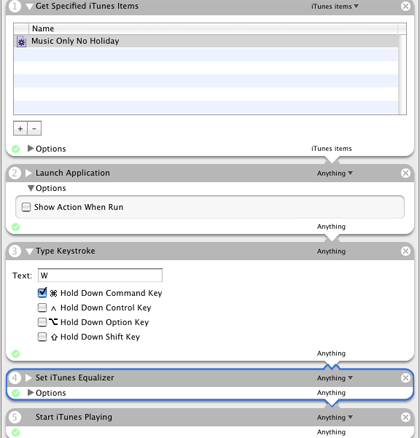
iTunes ‣ Get Specified iTunes Items
Click the + sign in this action to select the content you want this workflow to play. Clicking the Options triangle and selecting “Show Action When Run” would cause this action to be displayed every time the workflow runs. This would make it possible for one workflow to select any content, but it would require multiple mouse clicks. We don’t want that, so leave this option unchecked.
Finder ‣ Launch Application
In the pop-up menu for this action, select iTunes. There aren’t any other options that we need to configure, so let’s move on.
Automator ‣ Type Keystroke
We’ll need to type a “W” (without quotes) in the text area and select the check box marked “Hold Down Command Key”. This action mimics choosing the “Close Window” command from the File menu in iTunes. If you don’t want to close the window, it’s safe to omit this action.
In my testing, this action does not always work as expected. It doesn’t break anything; it simply doesn’t close the window as expected. I developed an Applescript that accomplished the same thing, but can’t locate the code at the moment. That version required other modifications to the workflow, so I’ll post the modifications as soon as I remember how I did it.
iTunes ‣ Set iTunes Equalizer
This action is the equivalent of modifying settings in the iTunes Equalizer window. Make sure you check the “On” box and make any other adjustments to suit your musical taste. If you don’t want to make equalizer adjustments you can omit this action.
iTunes ‣ Start iTunes Playing
This is the action that actually starts playing your music. Don’t omit this action or your music won’t play.
Launch Specific Content
Once the basic workflow is completed and saved as a template, modifications linking the workflow to different content can be made in moments. After all modifications are complete, save a copy of the workflow as an application. I have several copies saved as applications—each one linked to different iTunes content.
Turn on the Internet Radio
The previous workflow will select almost anything in your iTunes library, but it doesn’t play nice with your Internet radio streams. They don’t even appear in the selection dialog. Fortunately there is an easy solution. In step one of the workflow, replace “iTunes ‣ Get Specified iTunes Items” with “iTunes ‣ Find iTunes Items.”
In the first pop-up menu, change “Find” to “Songs.” This changes the title of the action to “Find Songs in iTunes.” That confused me for a bit the first time it happened. Under the “Whose” pop-up menu choose Playlist, followed by the name of the radio station playlist you created earlier. The workflow does not seem to work properly unless this condition is present.
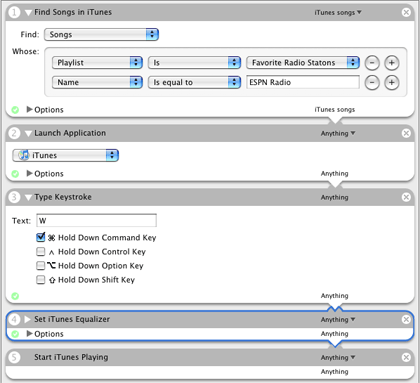
Radio Station Presets
Click the + sign to add a second condition. Using the pop-up menu, set the condition to “Name is equal to” and specify the name of the stream you want the workflow to tune to.
Test the workflow before saving it as an application. If iTunes cannot connect to the stream, you will usually hear nothing. If the last thing selected in iTunes was a song, you will hear that. First try opening the stream manually just to make sure they are broadcasting at the moment. Now quit iTunes and launch the workflow to see if it plays the appropriate feed.
Once you can successfully play the stream from within the workflow, save two copies of your work. The copy saved in workflow format becomes a template for adding new streams. Simply add the new stream to your playlist, then open the template in Automator and change the name of the target stream accordingly. Once the changes are complete, choose a descriptive name and save a copy as an application. The application should now launch iTunes and go to the target stream with a mere double-click.
That’s it for now. This took a few more words than I anticipated, but I hope you find it useful. I don’t know what’s coming next month, but for now I’m off to play with Spaces and the new Automator.
![]() Copyright © 2007 Sylvester Roque, sroque@atpm.com.
Copyright © 2007 Sylvester Roque, sroque@atpm.com.
Also in This Series
- Give Alert Sounds a Little Personality · March 2012
- Create Your Own iPhone Ringtones · February 2012
- Create Your Own Homemade Audio Book · December 2011
- Upgrade to Lion Painlessly · August 2011
- Make the Most of TextEdit · July 2011
- Using the Free Disk Utility on Your Mac · May 2011
- Making Use of QuickTime X · March 2011
- Making the Most of What’s Already on Your Mac · February 2011
- Making the Most of What’s Already on Your Mac · January 2011
- Complete Archive
Reader Comments (0)
Add A Comment