How To
How a Programmer Works With a Non-Programming Project
Most of the projects I work on fall into two categories: programming and iLife. The programming projects are usually those I do for a client, building software to the client’s specifications, although I often create software for myself, working in FileMaker, AppleScript, or PHP. The iLife projects are just my creations of movies using the digital media of my family collected with the cameras. But once in a while, I end up working on a project where the goal itself doesn’t require writing code and the end product has nothing to do with iLife.
I recently found myself working on such a project for personal reasons, and while doing so, noticed how often programming entered into the workflow. I created a number of small programs to help me do the job, I and thought it might be useful to share what I did and how I did it. Some of these programs automated the backups of the project, some automated repetitive tasks, but all were created to support the non-programming project I was working on, rather than being the project itself. Perhaps this will give a bit of insight into a programmer’s thought process, and hopefully demonstrate the utility of knowing how to program even if one isn’t a full-time programmer.
LearnAboutLiberty.com
A bit of personal history. 1996 was the first year I really began to take notice of politics. I began listening to AM talk radio, which led me to Larry Elder (who has since disappointed me by supporting President Bush and the war in Iraq), which led me to the Libertarian Party’s candidate Harry Browne. I read his book, Why Government Doesn’t Work, and was convinced by its arguments, and eventually joined the Libertarian Party. I was somewhat involved, and ran for a local office when they asked me to in 2002. I didn’t gain office, and eventually, like many, verged away from politics to handle life.
Then Ron Paul entered the presidential race. I had been familiar with Ron Paul from when I originally studied libertarianism (he ran for President on the Libertarian ticket in 1988). My wife became quite involved with the grassroots campaign, becoming the leader of the local meetup group, canvasing the neighborhood before the California primaries. While I didn’t become nearly as involved in the campaign, I was returning to my studies of the ideas and implications of liberty. But my research was taking me all over the place, to books, Web sites, videos, and I was lamenting that I didn’t seem to be able to find a single repository of information about the history and state of liberty ideas.
So I decided to build one. What you’ll find here is the story of how I created the site and the tools I used as a programmer to help me.
Creating the Site
Choosing where to host the site wasn’t difficult, as I already run a number of Web sites for myself, my wife, and my church using DreamHost, a Web service provider located in Brea, CA. I’ve been using them for all of my Web service needs for about four years, and have been extremely satisfied with the level of service and support I receive from them. If you’re a novice at working with a Web server, they offer features that make it quite easy to administer all aspects. If, on the other hand, you’re familiar with the server technologies, they offer the ability to manually customize the operation of the Web server. In fact, they are very Mac-like in their philosophy (although everything is currently served on Linux, I believe). Everything is very easy for the novice, but available for the advanced user (I’m somewhere in the middle regarding Web servers).
DreamHost’s services offer many supporting technologies, but of interest here is the fact that they offer MySQL database serving and PHP access. This opens up the possibility of running hundreds of open-source Web solutions based on these two technologies (often called LAMP for Linux, Apache, MySQL, and PHP). I anticipated that my Web site would be edited by multiple people, so I chose a wonderful solution called Joomla!, which allows users with accounts to create articles that are published within sections and categories on the site. DreamHost offers a feature called One-Click installations, where with very little configuration, they will set up many of the most popular open-source Web solutions, including Joomla.
The first step was to register the domain, which my wife and I chose as learnaboutliberty.com after some brainstorming. Then I used the One-Click installation option to install Joomla at the domain, and spent a few minutes configuring it using Joomla’s installation scripts (run from within the Web browser). All of this took about 15 minutes, after which time, I had a working site. No programming so far.
How the Web Site Works
I’ll pause here in the story to give those of you unfamiliar with Web applications a bit of technical background. Web applications like Joomla (or WordPress, a blogging application my wife uses), have two components: the files that the user requests and the database that stores most of the information for the Web site. In this case, the files are written in PHP, a scripting language with features for querying databases. The PHP files can be thought of as dynamic HTML files. Whereas an HTML file simply displays the contents of itself in a Web browser, when a PHP file is requested, it runs code within the file. This may do any number of tasks, but usually it will send a search query to the database, get the results back, format the query results as HTML, and finally pass this to the original Web browser. Whenever you see a Web page that ends in .php, as in:
http://www.learnaboutliberty.com/index.php?option=com_content&
view=section&id=14&Itemid=68
this is what is happening behinds the scenes. A document called index.php has PHP code that will run and find the information needed to display that page using the extra information included in the URL (such as that the option should be com_content).
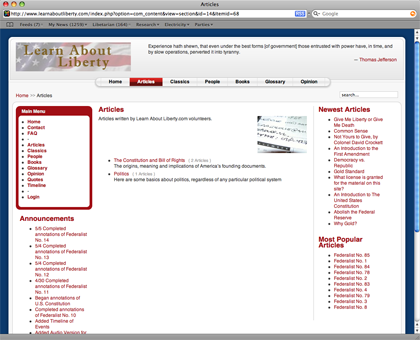
Everything you see when you load the above URL is retrieved from the database. The PHP page makes queries to the database to know which quote to show at the top, which items appear in the Main Menu, even which colors to use for the background and links.
This allows the Web site to be dynamic. I can use the Web application to create content, such as a new article on the history of the United States Constitution, and the home page knows to add a link to that article under the Newest Articles portion of the Web page by filling that section with the results of a search for the ten most recent entries. Anyone with publishing access to the site is able to change the site without having to edit any HTML or PHP code. Creating an article adds a record to the database, which immediately shows up the next time someone loads a page that queries that database.
Backing Up
The first programming I did myself was to create backup scripts. DreamHost offers full SSH access to their servers. SSH stands for “secure shell,” allows me to log into DreamHost’s server in Terminal and enter commands as if I were sitting at their actual computer. Unix systems, such as Linux and Mac OS X, offer a facility called cron for automatically executing commands periodically, which makes perfect sense for a backup system.
Backing up a database driven Web site run by a program like Joomla involves backing up not only the PHP files, but also the database files. DreamHost offers backup services by default, but I wanted a bit more for this site. I wanted a script on the server to make copies of the databases for all of the Web sites with backend MySQL systems. Then I wanted my computer to get these database backups (called database dumps) as well as the PHP and HTML files stored for each Web site.
First I needed a place to store my backups. I logged in to the Web server with ssh.
ssh user name@domain.com
mkdir backups
cd backups
mkdir mysql
The above commands, when I typed them into Terminal and provided my password after the first command, logged me into the Web server and created two directories, one inside the other. The next step was to create a script that would backup the MySQL databases.
cd ~
mkdir bin
cd bin
vi backup.sh
Here I’m returning to my home directory, creating a bin directory to store my script (bin is a common name for a Unix directory with executable programs), and then running a text editor called vi to create a new text file called backup.sh (the .sh extension indicates that the file is a shell script, meaning it contains commands that could be entered manually at a shell prompt). Knowing vi is very useful when working with general Unix systems, as it’s included on every one of them. If you know vi, you can always be sure that you’ll be able to create and edit text files on whatever Unix system you happen to find yourself using.
The backup.sh script is very straight forward once you understand the mysqldump command.
mysqldump --opt -umyusername -pmypassword -h db.learnaboutliberty.com lal_db \
    > ~/backups/mysql/lal_db.sql
mysqldump --opt -umyusername -pmypassword -h db.generationscc.org gcc_db \
    > ~/backups/mysql/gcc_db.sql
mysqldump --opt -umyusername -pmypassword -h db.gollybloghowdy.com gbh_db \
    > ~/backups/mysql/gbh_wordpress_db.gbh_db
Each line here performs the same operation on a different database. The mysqldump command is part of MySQL, and outputs the SQL commands that would be necessary to recreate the database. My user name and password are included followed by the domain name of each database and the name of each database. The > character says to take the output of the mysqldump command and write it to the named file in the path provided.
Next, I need this program to run every hour, which I use cron for by typing crontab -e at the command prompt on the remote system and editing the file that command brings up.
# minute (0-59),
# | hour (0-23),
# | | day of the month (1-31),
# | | | month of the year (1-12),
# | | | | day of the week (0-6 with 0=Sunday).
# | | | | | commands
  0 * * * * /home/chivalry/bin/backup.sh > /dev/null
The first six lines are comments to help me remember how to use crontab. The final line is the one that does all the actual work. The 0 says that this command should run when the minute is zero (at the top of the hour). The asterisks for each of the other entries can be interpreted as “all,” so the command runs at all hours, all days, all months, all days of the week. In other words, the command will run every hour. The command I provide is simply the path to the backup script above. Here we’re redirecting any output to the null file, which simply throws it away. After saving this file, my databases are going to be backed up every hour, and the configuration for backing up is finished on the server, so I return to my own computer to complete the backup process.
Now that the databases are going to be backed up every hour, I want to copy them and the Web site files to my local drive periodically, creating a local backup of the Web sites. This time I use BBEdit to create a different backup.sh file in ~/Applications/Scripts/Shell, which shows a different directory structure I use on my own system for storing applications and scripts.
for site in chivalrysoftware.com generationscc.org learnaboutliberty.com \
    backups/mysql
do
    rsync -e ssh -av user name@domain.com:$site ~/Web sites
done
The first thing this script does is create an array of values for each of the remote folders I’ll be backing up. It then loops through them using the rsync command, which synchronizes the remote folders with local folders in a directly called Web sites. Once this script executes, the Web sites folder will contain four folders, one for each of the remote folders backed up. rsync gets only those files that have changed on the remote system, so each backup after the first one is very quick. The crontab for executing this is very similar to the one on the remote server.
0 * * * * /Users/chuck/Applications/Scripts/Shell/backup.sh > /dev/null
Once this has executed with cron and my Time Machine backup has run, in addition to the original files, I should have three full backups of the Web sites (DreamHost’s, the one in my home folder, and Time Machine’s).
Text Automation
Writing programs is often a matter of solving a simple problem in software that wasn’t anticipated by the original developer. In this case, Joomla installs an article editor that allows the formatting of the article with buttons so that formatted text can be included without having to hand-code the HTML, although the manual coding of HTML is still allowed. One feature it doesn’t include, however, is the use of small caps. Some of the historical material I was including on the site (specifically, The Federalist Papers), included small caps often, which meant that I often need to change HTML code of the form SMALL CAPS to <span style="font-size: smaller">SMALL CAPS</span>. Doing this with AppleScript in BBEdit would be simple, but then I would have to copy the text from the Web browser into BBEdit, perform the AppleScript, and copy the result back into Safari.
The solution I chose instead was to use Butler, although there are any number of other utilities that would have facilitated the solution. Butler is my file launcher. I use it to launch applications, look up information in Google or Wikipedia, as well as phone numbers in my Address Book, and to control iTunes. With it, I can press a key combination (in my case, Control-Space), type a few letters (such as “fm9"), and get a result (in this case, FileMaker Pro 9 Advanced). Pressing the Return key then launches the program. However, Butler can also execute AppleScripts and automate general key presses.
If you take a look at the two forms of the HTML code above, you can see that if the text SMALL CAPS is selected, one could copy the text, type out the opening HTML tag, paste the text and type the closing HTML tag. This is what I want to automate.
I began by opening Butler and creating a new keystroke smart item. I then performed exactly the keystrokes I just described and assigned this to a key combination. Now, when I have text selected, I can press Control-Space, “esc” (for “Enclose in Small Caps”), and the selected text is enclosed as described. I also found myself needing to perform a similar action to create italic text (italic text becomes <span style="font-style: italic">italics text</span>), and so I created a similar keystroke smart item tied to the abbreviation “ei”.
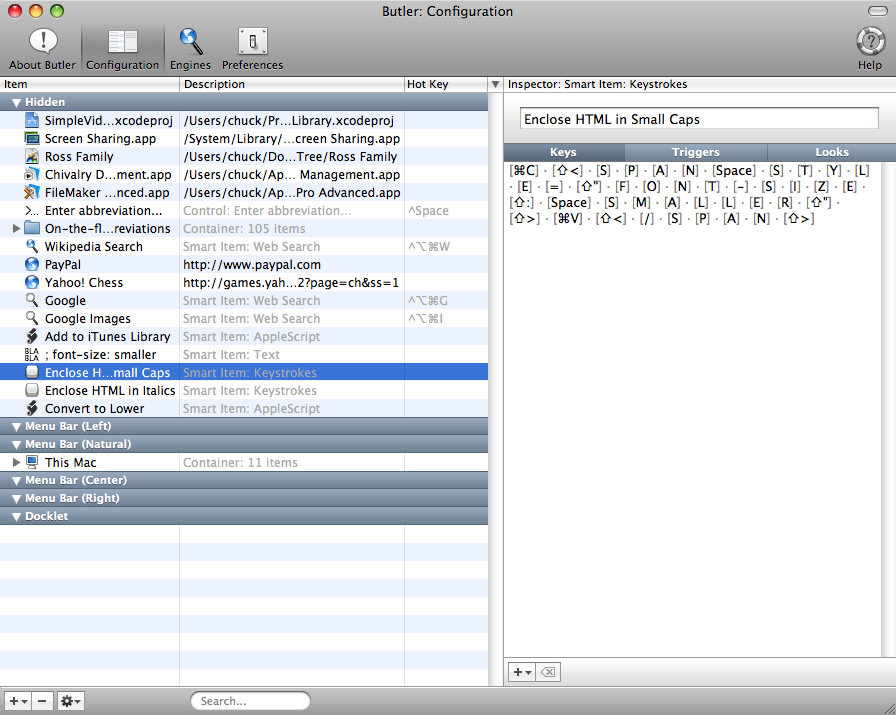
A different, but similar, problem occurred when the text that should be in small caps was already enclosed in a <span> tag for some reason. In this case, I didn’t want to use another <span> tag, but rather edit the existing one. This was sometimes the case when the small caps appeared in a footnote, which was displayed in a different font than the main text. In this case, I wanted to add the text ; font-size: smaller to the existing <span>, and to do so, I created a text smart item in Butler that tied the typing of this text to the “fs” abbreviation.
Butler proved useful in one more instance. The Federalist Papers are public domain documents and exist in many places on the Internet. Although I have a physical book that I could have typed in, I would much rather copy and paste than type in the entire book. However, the particular Web site I used to get the text of these articles placed all emphasized text in all caps, while the original papers used small caps for some emphasis and italics for others. So I ended up needing to change many of the instances of all caps to lower case. For this, I used a combination of AppleScript with a bit of JavaScript (to get Safari’s selected text).
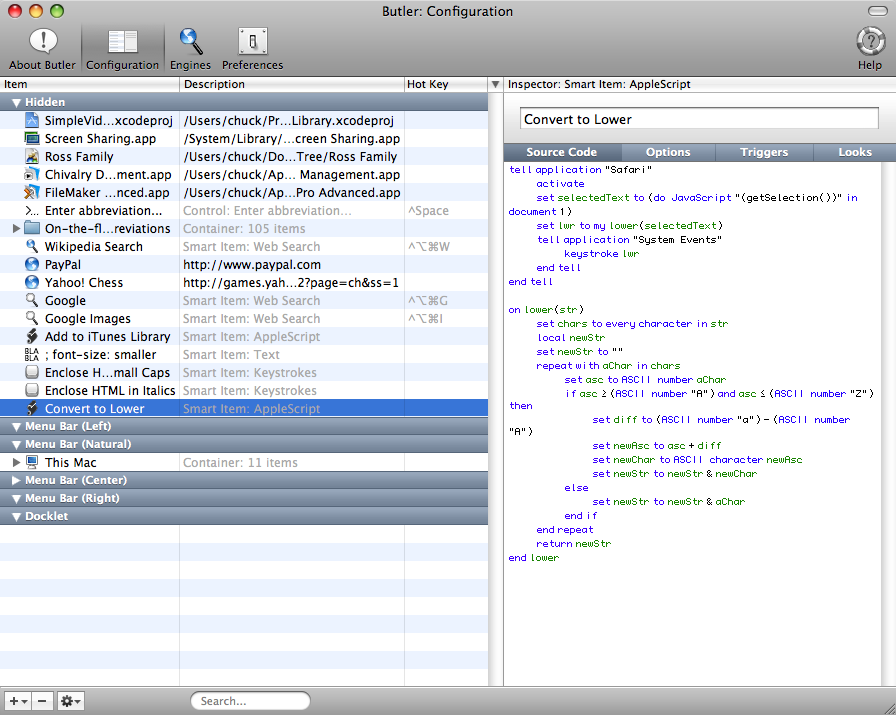
The lower subroutine accepts a string as a parameter and returns a string with each uppercase letter in it converted to lowercase. The main handler uses JavaScript to get whatever text is selected in Safari and passes this to the lower handler, using the System Events application to overwrite the selected text with the results of the lower handler. Using Butler to link this to the abbreviation “conv” allows for very quick execution of this code.
Conclusion
I’m honestly not sure how a non-programmer would handle the tasks I’ve outlined. I’d actually be interested in hearing some feedback in that regard. When each of these problems manifested themselves, my first thought was to solve them by writing some quick code. Each of the solutions I used took about five minutes to create, and each saved me time whenever they were used. There aren’t many technologies used here (ssh, vi, cron, mysqldump, Butler, AppleScript, JavaScript, HTML), but the fact that I had a basic knowledge of each of them made the solutions possible. What I didn’t know I was able to look up (cron, because I use it so seldom, has always been a weak spot for me). I did use other programs to work with the project (GraphicConverter to create a simple logo; iTunes to resample audio files to a lower bitrate; Nvu, an open source replacement for Dreamweaver to perform some more advanced CSS editing of the site’s general look). But most of the work was done with only Safari and the scripts outlined here.
![]() Copyright © 2008 Charles Ross, cross@atpm.com. Charles Ross is a
Certified FileMaker Developer and the Chief Technology Officer of
Chivalry Software, LLC, a
company specializing in custom database, Web and automation software
and publisher of Function Helper, a
FileMaker calculation debugging tool. He was
a contributing writer and the technical editor for The Book of
FileMaker 6 and has
contributed to ISO FileMaker Magazine and Macworld in addition to his series on
AppleScript and FileMaker for ATPM.
Copyright © 2008 Charles Ross, cross@atpm.com. Charles Ross is a
Certified FileMaker Developer and the Chief Technology Officer of
Chivalry Software, LLC, a
company specializing in custom database, Web and automation software
and publisher of Function Helper, a
FileMaker calculation debugging tool. He was
a contributing writer and the technical editor for The Book of
FileMaker 6 and has
contributed to ISO FileMaker Magazine and Macworld in addition to his series on
AppleScript and FileMaker for ATPM.
Also in This Series
- Give Alert Sounds a Little Personality · March 2012
- Create Your Own iPhone Ringtones · February 2012
- Create Your Own Homemade Audio Book · December 2011
- Upgrade to Lion Painlessly · August 2011
- Make the Most of TextEdit · July 2011
- Using the Free Disk Utility on Your Mac · May 2011
- Making Use of QuickTime X · March 2011
- Making the Most of What’s Already on Your Mac · February 2011
- Making the Most of What’s Already on Your Mac · January 2011
- Complete Archive
Reader Comments (0)
Add A Comment