How To
Sending Automated Birthday Greetings Via Automator
In this month’s Segments column, I described my experiences with Automator for the last month. In short, ATPM reader Willis Nash posted a comment lamenting the fact that neither Address Book nor iCal provided advance notification of a contact’s approaching birthday. While this may be possible with third-party software, the question was whether it could be done with Automator.
After a few e-mails for clarification, I realized that Willis wanted to send automated birthday greetings via e-mail to anyone in his address book. As usual, I went a little overboard and expanded the idea a bit. The result is three Automator workflows and an AppleScript. Let’s take a brief look at the role of each component.
- One workflow looks two months ahead for anyone with an upcoming birthday. This gives you time to plan a party if you like. Although it only runs once each month, this workflow always looks two months ahead. If it looked less far ahead, sometimes you wouldn’t receive much notice.
- The second workflow runs each week and looks two weeks ahead, providing time to send greetings via regular mail. The logic is the same as with the first workflow. Running weekly and looking two weeks ahead means you should always get more than a week’s advance notice of someone’s birthday.
- The third workflow, inspired by Willis’s idea, checks your address book daily for anyone with a birthday on that day and sends them an e-mail greeting. Each of the workflows sends you a confirmation e-mail if any birthdays are found.
- The included AppleScript is the “brains” of this entire project. It decides which of the workflows to run on any given day. Left to its own devices, Automator does not provide this decision making capability. All the AppleScript that you need to know is included in this article, but if you really don’t like the idea of experimenting with AppleScript, the workflows could also be run as separate events triggered by different iCal alarms.
What You Need to Get Started
This project does not require extensive Automator knowledge, nor does it require extensive knowledge of AppleScript. If you have never used Automator before, my column from last month should cover everything you need to know to finish the project. You will also need to install an action called Stop If Input Is Empty. Download the action, double-click the Zip file, and run the installer. Automator must not be running or else the action will not install properly.
As you drop the various actions into place, pay attention to the textual information on the top and bottom right of each action. Text at the top alerts you to the type of data the action is expecting (text, mail message, etc.). Text at the bottom alerts you to the type of information that will be passed to the next action. If the text turns red, there is a possible mismatch that needs to be resolved. Perhaps it was looking for the body of an e-mail message and got something completely different.
Automator attempts to resolve these issues on its own but will need your assistance occasionally. In these cases, check the logic of the workflow. If it appears to be correct, test-running the workflow may resolve the problem. When the workflow is run during testing, a circle will appear on the left side of each action. A red circle indicates that a problem occurred at that step. Green circles are used to indicate steps completed successfully.
In addition to a rudimentary understanding of Automator, this project assumes you are using Apple’s Address Book to manage your contacts and a properly configured Mail to handle your e-mail. We will also use iCal to schedule execution of our little program at a convenient time.
Left entirely on its own, Automator proceeds step-by-step until something completely breaks down or it completes the process. In order to adapt to changes, Automator needs to turn over most of the “logic” for decision-making to another language. In this case I chose AppleScript because it’s the only one of the scripting languages that the OS understands that I have any experience with—and I have very little of that. This project could probably be accomplished with other languages, but I have not tried it that way yet.
It’s important to proceed with this project in an orderly fashion. We will start by creating three smart groups in Address Book. We need the names of those groups to complete the workflows. Once the workflows are completed and saved as applications, we will complete the AppleScript code that glues everything together. AppleScript needs to know where the three workflow applications are in order to compile.
Preparing Your Address Book
For purposes of this project I will assume that you have already added some contacts to your address book. Be sure to enter some birthdays and e-mail addresses. If you haven’t added any contacts yet, add two or three to provide some test data; this will make sure the workflows are behaving properly. Don’t worry: adding new contacts later is as simple as entering them in your address book. We are going to make Automator smart enough to adapt by creating smart groups in Address Book. Smart groups are similar to smart playlists in iTunes. The groups are rule-based—as new contacts are added, Address Book places them in the relevant groups. With the right rules in place, these groups adapt dynamically. Automator uses these groups to do its work so it remains current without the user having to re-enter existing data. Now that we have a few contacts to work with, let’s create the smart groups at the heart of this project.
From Address Book’s File menu choose New Smart Group. In the sheet that appears, give the group a descriptive name. I named my group “Birthdays Today.” Jot that name down for later use. We will need it to double-check the workflows later. Set the group to meet all of our conditions. Working from left to right, the first condition should say, “Birthday is in the next 1 day.” Click the + symbol to add a second condition. This one should say “Email contains @.” Together these two conditions will create a group containing every contact with a birthday today who also has an e-mail address. Based on limited testing, it appears that this condition may be unnecessary. Mail seems to only attempt to send messages to members of the group with valid e-mail addresses. I put the condition in as an additional error check until I have time to fully verify Mail’s behavior. If you click the check box at the bottom of the screen, Address Book will highlight this group when its content changes. Click OK to close the sheet.
Follow the process described above to create a second smart group. Just as before, give the new group a descriptive name. I chose “Two Week Birthdays.” The first condition should say “Birthdays in the next 2 weeks.” Click the + sign to add a second condition. This one should say “Email does not contain @.” This smart group contains the people with birthdays in the next two weeks who don’t have an e-mail address in your address book. People who do have valid e-mail addresses will eventally be handled by the workflow that sends daily greetings. I chose two weeks to provide time to send a card by regular mail. Decide whether you want changes highlighted and close the sheet.
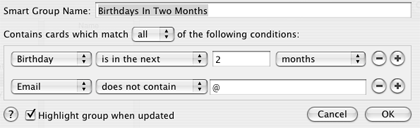
With that smart group completed, we are almost finished with our work in Address Book. Repeat the process described to create a third smart group. I named this group “Birthdays In Two Months.” For this group, the first condition says “Birthday is in the next 2 months.” Condition two says “Email does not contain @.” Close the sheet when you have finished creating the smart group. Before we leave Address Book, make sure that you have some contacts entered and have written down the names of your smart groups.
Building the Automatons
Now that we are through with Address Book, it’s time to build the workflows that are at the heart of this project. I recommend creating a folder to hold all of the workflows in a single place. Keep in mind that if you store this project inside your home folder no one else will be able to access it. I suggest putting it in a folder inside your Applications folder or in the Shared folder. Let’s start with the workflow that looks two months ahead.
Launch Automator. As you know from last month’s column, Automator’s actions are grouped according to the application that makes use of the action. Throughout the rest of this section, I will list the steps in the order they must be added. Drop each action into the pane on the right. If any settings need to be adjusted for that action, I will include a description immediately below that step. Once you have completed the settings for an action, you may want to collapse the box by clicking the white triangle. This will save some screen real estate.
Name the workflow “Birthdays In Two Months Final” and remember where you saved it. You can add the actions by either double-clicking the action or by dragging it into the pane on the right. Here are the actions for this workflow:
Address Book ‣ Find People In Address Book
Expand this action by clicking the white triangle. The options here are similar to the smart group sheet in Address Book. Working top to bottom and left to right, use the pop-up menus to create the condition “Find People Whose Group is ‘Birthdays In Two Months’.” Automator tries to assist by showing all of the groups it can find. You don’t have to type the names.
Automator ‣ Stop If Input Is Empty
Address Book ‣ Get Contact Information
Expand this box to choose what contact information you want the confirmation e-mail to send you. You will receive one e-mail with the combined list of all relevant contacts.
Mail ‣ New Mail Message
Expand the box to add your e-mail address as the recipient. Add any text you would like to the body of the message. If you have more than one e-mail account, choose the account that you would like to use to send the message. Contact information for each person in the group will appear below your message.
Mail ‣ Send Outgoing Messages
That’s it for this workflow. Double-check the settings and make any necessary corrections. Save this as a workflow in case we need to edit it later. Now choose Save As from Automator’s File menu and save the workflow as an application instead of a workflow. Calll it “Birthdays In Two Months Final.” AppleScript will rely on the application version to do its work.
The Second Workflow—Finding Birthdays in Two Weeks
The second workflow finds birthdays in the next two weeks and follows the same logic. The steps are identical and require only minor changes from the workflow we just created. If necessary, re-open the workflow version of “Birthdays In Two Months Final.” From the File menu choose Save As and save the workflow as a workflow with the name “Birthdays In Two Weeks.”
Now that we have saved the workflow with a different name, let’s make a few minor changes. In step 1, expand the action and use the pop-up menus to modify the condition. When you are finished, it should read, “People Whose Group is ‘Two Week Birthdays’.” In step 5, you may want to modify the body text to reflect that the birthdays are coming up in two weeks. If you need to change the e-mail account that will send this message, change that as well.
That’s all the changes that we need to make to this workflow. Save it once as a workflow for future editing. Once that is complete, choose Save As from the File menu. Save this copy as an application named “Birthdays In Two Weeks Final.”
The Third Workflow—Daily Birthday E-mails
This workflow is a little different from the first two. There are two Send Outgoing Messages actions. The first sends birthday greetings to everyone with a birthday today. The second sends you a confirmation e-mail. The steps and settings are as follows:
Address Book ‣ Find People In Address Book
Use the pop-up menus to set the condition to find “People Whose Group is ‘Birthdays Today’.”
Mail ‣ Send Birthday Greetings
Type in an appropriate greeting. The same greeting will go to each recipient. Choosing “Random Image For Each Recipient” will assure that each person gets a different picture.
Mail ‣ Send Outgoing Messages
Automator ‣ Stop If Input Is Empty
Address Book ‣ Find People In Address Book
This is the same action as in step one. If you do not want the confirmation e-mail to contain contact information, this step is unnecessary,
Address Book ‣ Get Contact Information
Choose the contact information that will go into the confirmation e-mail that will be sent to you. If you do not want the recipients’ contact information in this e-mail, omit this step.
Mail ‣ New Mail Message
Enter your e-mail address and the body text. If you want to send the message from anything other than the default account, change this setting as well.
Mail ‣ Send Outgoing Messages
That’s the last change for this workflow. When you are sure that everything is correct, save it as a workflow in case future editing is needed. Now use the Save As command to save a copy of the workflow as an application called “Daily Birthday Emails Final.” By now you should have three different workflows saved as applications. We don’t need Automator any longer. It’s safe to quit the program.
Tying Everything Together
Earlier I said that Automator was not very good at deciding when to deviate from a path. We are going to turn that task over to AppleScript. Fortunately, AppleScript is already installed. Don’t be afraid; I knew almost no AppleScript when I started this. I did get stuck at one or two points and had to ask for assistance on the Apple Discussion board.
We could build this script using the Run AppleScript Command in Automator, but it is a little larger. It will be much more efficient to use Script Editor. Navigate to Applications/AppleScript and double-click Script Editor. When the script window opens, copy the following code and paste it into the window. If your window is divided into an upper and a lower pane, paste the code into the upper pane.
-- Sets variable TargetDate to today’s date
set TargetDate to day of (current date)

-- Sets variable TargetDate to day of the week
set TargetDay to (current date) as string

-- On 1st of the month check birthdays for the next two months
if TargetDate = 1 then
    -- Verbal notification of progress
    say "Checking Birthdays In the next two months"

    -- Runs the workflow that checks dates/sends email
    tell application "Birthdays In Two Months Final" to launch
else
    -- Each Saturday check birthdays for next two weeks
    if TargetDay contains "Saturday" then
        -- Verbal progress notification
        say "Checking Birthdays in the next two weeks"

        -- Launch Automator Workflow
        tell application "Birthdays In Two Weeks Final" to launch
    end if
end if

-- Verbal progress Notification
say "checking Todays Birthdays"

-- Sends e-mails daily if needed
tell application "Daily Birthday Emails Final" to launch

-- Waits two minutes for messages to be sent
delay 120

-- Close Address Book
tell application "Address Book" to quit

-- Close Mail
tell application "Mail" to quit
I won’t go through the code line by line, but there are a few things that you need to know.
The two lines of code beginning with the word set are loosely based upon the “Current Date And Time” script included with Mac OS X. If you want to modify when the weekly and monthly workflows run, adjust the date or day in the if statements to suit your preferences. I also had a little assistance from members at the Apple Discussion Board. Michael Henley was nice enough to point out that I needed to use launch rather than open to get the workflows running from within AppleScript. Neil helped me to work out the procedure to quit mail. If your workflows are named something different from mine, change the relevant names to match the names of your workflows. If you do not want verbal feedback each time the script executes, delete the lines beginning with say. Click Compile in the Script Editor window to check for any errors.
During the process of compiling the script, AppleScript will likely indent some of the lines of text. This is normal behavior and improves readability of the code. Script Editor may ask you to locate the Automator components that do most of the work. Use the dialog box that appears to locate each of the Automator workflows we built earlier. Make sure that you link to the application version of each workflow. If no errors are found, use Save As to save this code as a script. Give it any descriptive name that you like. For test purposes you may want to create a fictitious person in Address Book with a birthday set for today. Set the e-mail address to yours and run the script. You should receive a birthday greeting for that person as well as a confirmation e-mail that the message was sent.
Setting the Trigger
If you wanted to manually run this project each day, save the AppleScript as an application. It could also be run as a login item. The first option means you have to remember to run it. The second option would run each time you log in. You probably don’t want either of those options. The solution is to let iCal handle this for you. Let’s run the script as a recurring iCal alarm, making use of its ability to run scripts. When you are trying to decide the time for this to run, realize that the screen blinks briefly as the e-mails are created so you may want to set the alarm to execute when you are away from the computer. This may also be nice if you have a large number of contacts.
Now that you know when you want this project to run, launch iCal. Click on a date to create a new event, and name that event. In the Info drawer, set the time for the action to occur. Set the repeat to “every day.” In the “alarm” section, choose “Run script” and locate the AppleScript that you saved as an application. It’s now safe to quite iCal. That does it. You have successfully completed this project. Give yourself a pat on the back.
Final Thoughts
This project still has a few rough edges. It is possible for Mail to quit before all of the e-mails are sent. This is not a major issue since sending seems to complete the next time Mail is opened. I am sure someone more familiar with AppleScript could solve this problem. I think it would be possible to use AppleScript to read Mail’s activity monitor and only quit when the process is finished. It should also be possible to eliminate the “blink” which occurs as the messages are sent-perhaps by hiding Mail. I have yet to get this to work reliably. When I do I will post the code in the comments at the end of this article.
This project could easily be adapted to announce anniversaries. Create an appropriate smart group based on the anniversary field and adapt the workflows with appropriate rules. Change the names of the AppleScript and the Automator actions, and you have a new program. This could be triggered by a different alarm.
That’s it for now. I’ll see you next month. I have no idea what the next column will be about, but I’ll think of something. I’m considering other projects that leverage interaction among common built-in applications to solve a problem. By the way: thanks Willis, for the idea. Also thanks to everyone else who provided assistance.
![]() Copyright © 2006 Sylvester Roque, sroque@atpm.com.
Copyright © 2006 Sylvester Roque, sroque@atpm.com.
Also in This Series
- Give Alert Sounds a Little Personality · March 2012
- Create Your Own iPhone Ringtones · February 2012
- Create Your Own Homemade Audio Book · December 2011
- Upgrade to Lion Painlessly · August 2011
- Make the Most of TextEdit · July 2011
- Using the Free Disk Utility on Your Mac · May 2011
- Making Use of QuickTime X · March 2011
- Making the Most of What’s Already on Your Mac · February 2011
- Making the Most of What’s Already on Your Mac · January 2011
- Complete Archive
Reader Comments (1)
Add A Comment