Review: Z-Write 1.0

Developer: Stone Table Software
Web: http://www.designwrite.com/sts/
Price: $20 (shareware)
Requirements: Power Mac with Mac OS 7.5 or later, QuickTime, 5.6 MB of application RAM.
Recommended: 9 MB of application RAM or more.
Overview
Stone Table Software calls Z-Write a “non-linear word processor.” Z-Write, currently in version 1.1, is a $20 shareware application written in REALbasic. Z-Write was specifically designed for creative writers who need to keep track of chapters or scenes, characters, plot lines, locations, research notes, etc. It allows writers to organize all information within a single document.
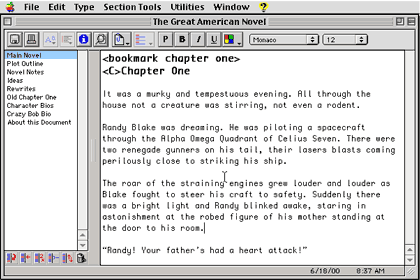
Z-Write uses a split-window design (Figure 1), displaying a list of document sections on the left and a contents window on the right. You can resize the main window and adjust the width of the section list area. The section list cannot be hidden, and its minimum width is that of the row of button icons at the bottom. The top of the main window is a “Buttonbar” comprised of buttons and pull-down menus. The Buttonbar can be hidden using the Hide Buttonbar command in the Edit menu. The bottom of the main window has a Hot Help section and a date and time display. Hot Help displays information about buttons, pull-down menus, and sections as your cursor moves into their active areas. Z-Write wisely uses Hot Help instead of Balloon Help. Clicking on the date or time pastes them at the insertion point in the document.
 |
|
Figure 1 |
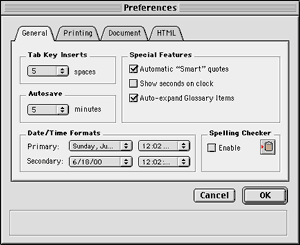
Z-Write preferences are accessed from the File menu or by typing Command-K. A movable modal window appears (Figure 2) with tabs for General, Printing, Document, and HTML. The various options will be discussed below.
 |
|
Figure 2 |
Sections
Z-Write organizes a document into sections. A section can contain any textual content you wish: a book chapter, table of contents, notes, random ideas, etc. You add, rename, copy, merge, rearrange, or delete sections by clicking on the icons below the section list area, activating contextual menus within the section list area (control-click-hold), or using the Section Tools menu. You can also choose to display a section in a View Window. The resizable View Window (Figure 3) will display your contents in a plain window. No editing can be done in this window.
 |
|
Figure 3 |
A section can be as long or as short as you wish. You navigate within a section by using the vertical scroll bar. You navigate between sections clicking on a section name in the section list area to the left.
Z-Write remembers cursor position and selected text (if any) within each section. It also remembers the window size and the position of each saved document.
Buttonbar
I like the utility of the slightly misnamed Buttonbar (it includes pull-down menus) but I don’t like its layout (Figure 4). The Save button saves the active document. The Print button displays a dialog window for printing the current section or (with an option-click) multiple sections. The Case and Bullets buttons are for changing case and adding bullets or numbers. These text-formatting features should be adjacent to the font-formatting buttons and menus on the right.
 |
|
Figure 4 |
The Info button displays document statistics (Figure 5). The Find button pops up a find-and-replace window that works within the current section or across all sections. The Bookmark pull-down menu lists the document’s bookmarks. Selecting a bookmark jumps to that section and position. The Glossary pull-down menu lists glossary items (see below). The remaining buttons and pull-down menus apply formatting to text selections and work as expected.
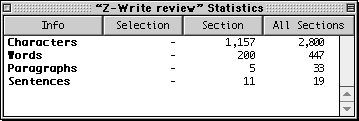
Figure 5
Formatting and Type
Z-Write lets you use any installed font. Formatting choices include text style (plain, bold, italic, and underlined), text color, and font size. You can use multiple fonts, styles, colors, and sizes within a section, paragraph, or word. You can also copy and paste formatting attributes. Unfortunately, Z-Write does not support style sheets. One workaround is to create a “styles” section that includes samples of the formats you wish to use. You can then use the Edit menu to copy formats and apply them to other sections.
The default font for Z-Write is 12-point Monaco. You can change the default font and size by bringing up the Preferences window and clicking the Document tab.
Z-Write can change the case of selected text by using the pull-down menu on the button bar or the cascading Utilities: Case: Case List menu. Choices include lowercase, uppercase, “Wordcase” (first letter of each word capitalized), and “Sentencecase” (first letter of each sentence capitalized).
Z-Write can also insert bullets or numbers before selected paragraphs via the pull-down menu. This feature has problems. All paragraphs selected for bullets or numbering acquire the formatting of the first paragraph (you can repair this later). If you apply numbering or bullets to a selection that already includes these features, you get duplicate numbers as shown below:
1 1 First line and
2 2 Second line get numbered.
3 Third line is added later, then all three lines get numbered. Oops!
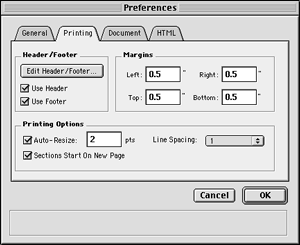
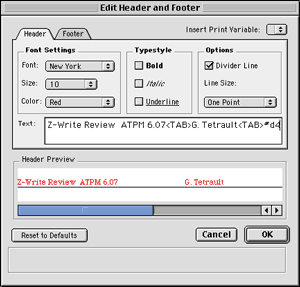
Z-Write can generate headers and footers for printing. The default header is: “A Z-Write Document Section: Help 6/18/00 at 11:53 AM.” The default footer is “Page 1 of 5” with right justification. Header and footer options are chosen by selecting Preferences in the Edit menu, clicking on the Printing tab, then clicking on the Edit Header/Footer button (see Figure 6).
 |
|
Figure 6 |
You can enter header and footer contents, select font attributes for the entire header or footer, include codes for positioning header or footer elements, and use special codes to insert print date, print time, page number, total pages, and section name (Figure 7). I dislike this method of creating and editing headers and footers (it reminds me of Excel) and would prefer a WYSIWYG method.
 |
|
Figure 7 |
Bookmarks
The bookmarks feature makes it easy to jump from one place to another. Since you can jump to a section by clicking its name, bookmarks are most useful for navigating lengthy sections. Z-Write doesn’t support footnotes, so bookmarks can be used as a substitute. A bookmark can be inserted anywhere by typing Command-B or using the Insert Bookmark command from the Utilities menu. You can jump to a specific bookmark via the cascading Utilities: Bookmarks: Bookmark List menu or by using contextual menus (control-click-hold) within the main window. Other bookmark-related menu commands include Jump to Next Bookmark (command-J), a Clear Bookmarks cascading menu, and Rescan for Bookmarks (for putting newly created bookmarks into the cascading menu lists).
Glossary
Z-Write supports glossary entries, which expand automatically as you type them. (Note: This feature is new to version 1.1 and is not described in the online help file). For this review, I used “zw” for “Z-Write” and “sts” for “Stone Table Software.” You can also insert glossary entries using contextual menus or the cascading Utilities: Glossary Items: Glossary Listing menu. My only quibble with the glossary feature is that glossary items are not unique to a specific document. I would like to see global and document-based glossary items.
Importing, Exporting, and Printing
Z-Write can import text and HTML files using the cascading File: Import: Folder/File menu. You can import individual files or an entire folder of files. Each file becomes a separate section in your active document, and the name of the file becomes the section title. Surprisingly, no information appears in the online help file about importing. Although Z-Write supports RTF (Rich Text Format) for export, it will not import RTF files.
You can export Z-Write files in text, RTF, or HTML formats. When you select a format from the cascading menu, a window pops up for selecting sections for export (Figure 8). You choose which sections will be exported, then click the misnamed Done button. (You aren’t done yet.) A Save dialog appears that lets you name the exported file and designate where it will be placed. All chosen sections are exported in a single file. In the exported file, each section is preceded by the label Section: Section Name.
 |
|
Figure 8 |
Printing choices in the File menu include Print Section (command-P), Print All Sections (command-shift-P), and Print Preview (command-option-P). Typing command-P immediately displays the printing dialog box for your printer. Print All Sections brings up a dialog box identical to that in Figure 8. You select which sections you wish to print, then click the Done button to go to the print dialog box. The document’s layout depends on the choices you make in the Printing section of the Preferences window. You can adjust margins, choose whether headers and footers will print, resize the fonts for printing, choose whether a page break will precede each section, and select line spacing (single, 1.5, double, or triple).
Help
Online help appears when you press the Help key, option-click on the Hot Help bar, or choose Instructions from the Apple menu. The help window (Figure 9) design parallels that of the main window; a list of help sections appears in a scrollable list on the left, and help information appears in the main window to the right. The help window can be resized, repositioned, and left in the background. Online help uses the Monaco monospaced font. You can change the font size in 2-point increments using the buttons on the lower left, but you cannot change fonts.
 |
|
Figure 9 |
Online help cannot be searched and does not have an index. These limitations do not significantly detract from the usefulness of online help.
Comparison to Microsoft Word
I wrote this review with Z-Write. I then launched Microsoft Word 98 and tried to make it perform like Z-Write. This required the use of Word’s outlining features and its Online view (which creates a split window with outline headings on the left and the body of the document on the right). I found that it is possible to replicate most of Z-Write’s functionality within Word (including bookmarks and glossary items), but this required significant time, experience, and constant switching between outline and online views.
Microsoft Word has numerous advantages over Z-Write: style sheets, collapsible outline sections, table of contents and index creation, HTML coding, support for graphics and movies, sound and text annotations, built-in spelling and grammar checking, better numbering and bullet options, full text formatting, and document comparisons.
Z-Write’s advantages include ease of use (by a huge margin), very low cost, functionality and design tailored for creative writing, and the ability to print or export specified sections in one batch.
Z-Write’s closest direct competition is Final Draft 5 from Final Draft, Inc. At a street price of $210, Final Draft is “professional screenwriting software” (according to its packaging). It is not designed for other creative writing tasks. I did not find other commercial or shareware Macintosh applications designed for creative writing. The closest program I know of is an old outlining application, MORE 3.1, from Symantec. It isn’t quite as easy to use as Z-Write, but you can get similar functionality. (MORE is available at no cost.)
Z-Write’s Pluses and Minuses
Pluses
- Low cost
- Quick and responsive
- Easy to add and rearrange document sections
- Good online help
- Can create templates or use included templates
- Good use of contextual menus
- Supports Navigation Services
- Glossary with automatic expansion
- Bookmarks for long sections
- Works with freeware spelling checker Excalibur (but formatting may be lost)
- Works with Spell Checker and Grammarian from Casady and Greene, Inc.
Minuses
- No style sheets
- Awkward bullet and number feature
- Awkward header and footer feature
- Glossary terms are always global
- Unable to link to other files or applications
- Uses relatively large amount of application RAM (9 MB)
- No recent files menu
- No indexing of sections
- Online help file not fully updated for version 1.1
Summary
Z-Write exceeded my expectations for a shareware writing tool. Its important features work well and are easy to use. Z-Write gains simplicity by omitting features not absolutely necessary to creative writers. Since documents can be exported for further editing in a word processor or page layout program, the omitted features are not a major concern.
Copyright © 2000 Gregory Tetrault, ![]() gtetrault@atpm.com. Reviewing in ATPM is open to anyone. If you’re interested, write to us at reviews@atpm.com.
gtetrault@atpm.com. Reviewing in ATPM is open to anyone. If you’re interested, write to us at reviews@atpm.com.
Reader Comments (1)
Add A Comment