Software Review
Iris 1.0.4

Developer: MildMannered Industries
Price: $30
Requirements: Mac OS X 10.4. Mac with PowerPC G4, iSight camera (many other USB and FireWire cameras also work). Universal.
Recommended: Quartz Extreme–capable video card.
Trial: Feature-limited (motion detection limited to 10 minutes).
Anyone who enjoys finding new things to do with an iSight camera is sure to find MildMannered Industries’ Iris to be a welcome addition to any collection of applications. The number of people who like playing with an iSight camera is almost certainly growing since every Macintosh laptop now has one built-in, and there are plenty rumored guesses that the next round of updates to Apple’s Cinema Displays will likely gain built-in iSight cameras.
Were it not for a few small features that are part of Apple’s Photo Booth application, Iris could very nearly be a replacement for Photo Booth. There are only two Photo Booth features I found noticeably missing from Iris: the white-screen flash, which provides a bit of extra light when taking still photos; and the background replacement capability. A workaround for the screen flash is simply to open a blank white window (such as a text editor or Web browser) and then to maximize it so it fills the screen. As for Photo Booth’s background replacement feature, I’ve never had much use for it because I’m seldom in front of a background that fosters acceptable results. As such, I may never have use for Photo Booth again.
But enough comparison against Photo Booth. Looking at Iris’ core functions, one can start thinking of it as six different applications instead of just one. Each of these modes is easily accessed by a menu that appears when the mouse pointer hovers the image.
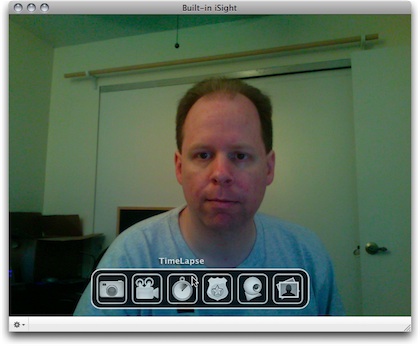
Ignore the man behind the curtain! Look, instead, at the easy-to-understand icon menu that appears when the mouse hovers over the camera preview screen.
Snapshot
The first mode, Snapshot, is the part of Iris that functions much the same as Photo Booth. It’s a quick means to snap a picture of what an iSight sees. I would have said it’s a no-frills means, but there actually is one “frill.” Iris includes a filter gallery to apply effects to Snapshots, and there are considerably more filters available than Photo Booth offers. Not counting Photo Booth’s background replacements, Iris has 10 more filters than Photo Booth.

Previews of the first eight filter selections.
This filter gallery is the only part of Snapshot mode that could use a little improvement. For one, it isn’t immediately apparent that a filter is activated by double-clicking it, especially considering I was used to the single-click activation in Photo Booth. Maybe I simply needed to do a better job of reading the manual!
The one other problem I encountered is that navigation through the filter previews can be difficult because Iris became very sluggish while the preview mode was active. Since I’m using a less-than-one-year-old MacBook Pro, and since I perceive no sluggish behavior in Photo Booth, I can only conclude that Iris’ code for displaying the previews could be streamlined.
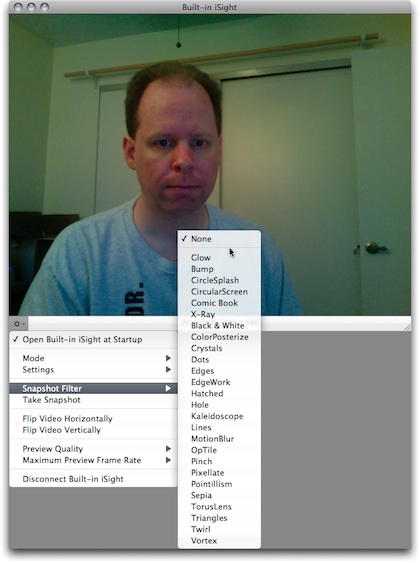
As long as I can remember the appearance of an effect just by reading its name instead of seeing previews, I can avoid the sluggishness I observed while choosing filters by instead selecting the desired filter from the menu in the lower left corner of the preview window.
Movie
Like Snapshot mode, Movie mode is similarly light on frills. Probably the best aspect is that it can record directly to any format already supported via QuickTime on a given computer. Once again, I found two small areas in which this mode could improve. First, it would be nice to be able to choose other movie sizes than just 640×480 or 320×240. Second, there should be a means to select a different audio source without having to jump over to the Sound preference pane—or at least a button to quickly access the Sound preference pane.
TimeLapse
The next three modes are likely to be the reason anyone would want to use Iris instead of Photo Booth. TimeLapse mode, like Movie mode, records movies in any format supported by QuickTime on a given machine. Also like Movie mode, sizes of 640×480 or 320×240 are offered. But rather than recording a standard video, there are options to set up Iris to capture one frame every x-number of seconds over any duration specified. There is also a setting to specify the frames per second rate of the final video.

Capturing one frame every second for five minutes results in a 10-second video when played at 30 frames per second. (The video sample is 320×240, H.264 codec, and 670 kilobytes in size.)
The settings for TimeLapse mode are such that there is no way to capture any more than one frame per second. This means that if a finished video is to play at a smooth 30 frames per second, it will be at least 30 times faster than normal speed. To make it 10 times faster than normal speed, its playback frame rate must be set at 10 frames per second. But, by this time, the video will start to stutter from the low frame rate.
Ideally, the setup menu would allow a definable number of frames to be captured within one second. This way, I could specify 15 frames captured each second which, played back at 30 frames per second, would produce a double-speed video.
Security
Not to suggest that Iris, at just $30, could rival a dedicated security camera system, but combined with a supported external camera positioned in the right location, Iris is, by no means, the worst solution for a security camera, either. The Security mode configuration allows setting the sensitivity of motion detection and whether to simply log the detection, play a sound, or record a Snapshot, Movie, or TimeLapse file. In addition, an e-mail notification can be sent, which becomes very useful when receiving pager-style e-mails on a mobile device.
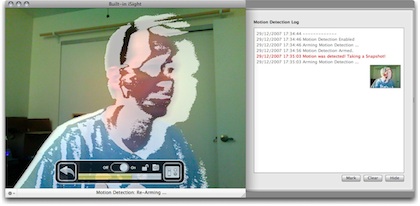
Intruder alert!
It seems the small caveats I find in each mode keep coming in pairs. Once again, I found two concerns with Security mode. The first involves the on-screen indicator of motion. I like having it on, but I also like saving a Snapshot when motion is detected. Unfortunately, as shown in the image above, the motion indication is visible in the Snapshot which could effectively hide the “intruder’s” identity. The motion indicator does not, however, show up if a Movie is recorded instead. Also, there is a good reason to use a Movie recording instead of Snapshot—Iris can be set up to buffer video for a definable number of seconds prior to the motion detection.
The second issue with Security mode is with the Snapshot or Movie thumbnail in the log. Full-size versions from those thumbnails are accessible, but it’s difficult to return to the log screen. The only ways I found to do so were to either click the Mark button, which records a timestamp marker within the log, or to exit then return to Security mode.
WebCam
WebCam mode is the reason Iris got my attention in the first place. This mode is exactly what its name suggests—taking video from a camera and publishing it as a Web page via an old-school Meta Refresh method, as a Java Applet, or as a Server Push which is the best method if the Web browser being used supports it (and Safari does support it).
Like Movie and TimeLapse mode, there are two sizes from which to choose. There is a setting for the desired frame rate, whether or not to advertise the WebCam via Apple’s Bonjour, and whether to require a password to connect. If the WebCam needs to be accessible from outside a local network (LAN), the matching port number must be opened on a router and directed to the computer’s IP address that is running Iris.
Gallery
The Gallery mode might seem like more of a tool to be used with the other five modes than a mode all to itself, but the easy access to various means of export has let me think of it as a useful tool in its own right.
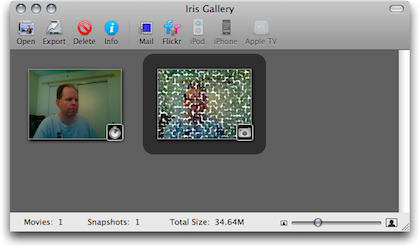
Iris’ Gallery mode.
From here, Snapshots can be exported as one of five different file formats, though there is still the 640×480 or 320×240 size limit. There’s also Flickr integration, allowing Snapshots to be published directly to a Flickr stream.
Movies (including TimeLapse recordings) can be converted to the same variety of codecs found in the Movie mode settings. There are also presets for quickly exporting videos to formats suitable for an iPod, iPhone, and Apple TV.
Surprise Feature
While giving Iris a run-through, I remembered I still have my old external iSight, and I found myself wondering whether Iris could handle both at the same time. I was quite pleased to find that it does.
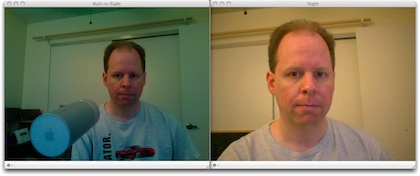
Looking at preview images for both iSight cameras really shows off the differences of the imaging sensor used in the old iSight versus the new built-in iSights.
Even more surprising to me was that WebCam mode can broadcast both cameras simultaneously. Unique port numbers were automatically assigned to each and I could connect to both with separate Web browser windows.
Wish For a Seventh Mode
I mentioned earlier that the WebCam mode was the original reason I gave Iris a try. This was because I was looking for a replacement for another application which I found to be buggy and that has shown no signs of being fixed by the developer.
However, while the WebCam mode in Iris is very nifty, it wasn’t exactly what I had in mind. WebCam mode is akin to Movie mode, whereby it attempts to provide, as much as possible, a real-time view through the camera via the Web.
What I would love to see as an additional mode is a SnapShot-style WebCam where still images are snapped at a defined interval and automatically saved into a specified folder and/or uploaded to a Web server (via FTP/SFTP, a shared folder, .Mac, etc.). I’d also like to see Iris manage a Web page to display the most current SnapShot as well as provide an archive for prior images.
For those, like me, who are interested in programming their own Web interface, Iris would manage the filenames of the saved SnapShots such that the current one always had a common filename, and the previous current image would get renamed with a timestamp.
The Verdict
Keep in mind that Iris is still a 1.0.x product. I’ve read other opinions that claim Iris does not provide an adequate amount of control. But, with the exception of the limited choices of image size, I felt Iris provided all the control most anyone would need, and I found access to configuration and setup was very intuitive. In fact, except for when I was activating the second iSight, I really didn’t even need to use Iris’s menu bar items. Essentially every control is accessible via the mouse-hover menu or by the window menu in the lower left corner. Even the IP and port number Web address needed to view the WebCam output are provided in the bottom portion of the preview window, and simply clicking it opens the URL in a Web browser.
Iris is already a great version 1.0 product and is sure to become a solid tool by the time the next significant update is released.
![]() Copyright © 2008 Lee Bennett, lbennett@atpm.com. Reviewing in
ATPM is open to anyone. If you’re interested, write to us at
reviews@atpm.com.
Copyright © 2008 Lee Bennett, lbennett@atpm.com. Reviewing in
ATPM is open to anyone. If you’re interested, write to us at
reviews@atpm.com.
Reader Comments (0)
Add A Comment