How To
Share Content Between Web Sites: Creating a Dynamic Hypernetwork Using PSS
In early years of Web development, a common type of hypernetwork seen on many sites was a webring. Webrings were usually created by people with Web sites that shared common subjects and themes, and allowed for visitors to one site to easily move onto other sites in the webring presenting similar material.
There are a few drawbacks to the webring system. Many webrings are not regularly updated, meaning there is little to no guarantee that the other sites in the webring still exist. There is also no preview of the next site’s content, so while one site can be recently updated others may not have modified for years.
A dynamic hypernetwork resolves these problems by previewing and including some material from the other sites in the network. The hypernetwork is a group of mutually syndicating sites. It is essentially a shared site, a super-site getting the best information and news from other nodes in the network. News published on one of the sites is perfectly integrated into the others. When one network node updates its homepage, all the other nodes are updated automatically.
Take a look at the homepages for dedalo-3d.com or blender3d.it. You can see this super-site at the first page of each URL, but the home pages are never an exact copy of each other—each site has its own logo, side bar contents, and specific news not shared that are always on top. The user can navigate from one site to another without leaving the network.
A hypernetwork can be used by anyone, and it is perfectly suited for clubs, associations, and affiliations of all kinds. Some examples include sports clubs, development teams, academic interests, school systems…the possibilities are limitless.
One easy method for creating a hypernetwork is to use the open source PSS scripts. PSS stands for PHP Shared System. It uses a combination of PHP scripts and CSS style sheets.
Each PSS Web site administrator has his own independent Web site in the hypernetwork, but at the same time all resources are perfectly shared and integrated. You are working on your personal pages but also adding to the super-site—all resources go into one professional layout, with advantages for the surfer (great accessibility) and for the administrators (seeing their visibility multiplied). Your site exposure and visitation increase because your integrated content appears on the other network nodes.
If one or more nodes have low activity (no recent updates), this is not a problem because the other nodes cover the latency and the super-site is always updated. New content will automatically appear on your homepage even if you have not changed your Web site.
PSS is open source and licensed under GPL, and installation is very simple and should take only a few minutes. Because PSS is made with PHP, your Web server must have PHP capability. Check with your Web hosting company if you have questions about your server’s abilities.
As a minimum, you will need a text editor to edit the HTML and PHP files, but these files can also be edited in a Web design application. FTP software is required to upload the files to your Web server.
Installing PSS
Download PSS and expand the Zip archive. The following files must be uploaded to your Web server:, class.html, images (folder), networkstyle.css, public (folder), tools (folder), uptodate.php, url_list.txt.
One of the most important files in a PSS Web site is presentation.html. This file is the content shared over the hypernetwork. The first step is to create a new file titled presentation.html. Because this file will be shared over the network, it is important that it contains the standard PSS stylesheet tags to display properly on other Web sites. If you omit these tags, your news will not display properly on the other sites in the hypernetwork.
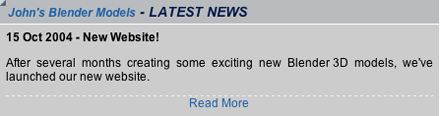
The first line contains the title of your Web site and a link to your Web site, all contained in the <div class="littletitleDiv"></div> tags. For example, if your Web site was named John’s Blender Models at the domain johnsmodels.com, your first lines of HTML would look like this:
<div class="littletitleDiv">
   <a href="http://www.johnsmodels.com" >John's Blender
   Models</a> - LATEST NEWS
</div>
Below your title we will add your Web site news. All of this content is enclosed by the tags <div class="newsBody"></div>. The news might appear as seen below:
<div class="newsBody">
<b>15 Oct 2004 - New Web site!</b><br />
   <p>After several months creating some exciting new Blender 3D
   models, we've launched our new Web site.</p>
<div class="footer"></div>
</div>
Be sure to include the final <div class="footer"></div> CSS tags in your news.
Because the presentation.html file is shared over the hypernetwork, it is important to keep images in your presentation.html as small as possible so that users will not be forced to endure long page-loads while visiting other sites on the network.
Make sure that all linked files and images use absolute links, meaning the links include your domain name in the link source. A hyperlink should always start with your domain, for example http://www.yourdomain.com/images/myimage.jpg is correct but images/myimage.jpg will not load properly when your news is displayed on other sites in the network.
If your news describes a specific page to visit, you might consider adding a link to that page to the footer. Add your text and link in-between the <div class="footer"> and </div> CSS tags. Following the example above, a customized footer might look like this:
<div class="footer"><a href="http://www.johnsmodels.com">Read More</a></div>
This is how the completed presentation.html code might look, followed by how the same code would be displayed on the network:
<div class="littletitleDiv">
   <a href="http://www.johnsmodels.com" >John's Blender
   Models</a> - LATEST NEWS
</div>
<div class="newsBody">
<b>15 Oct 2004 - New Web site!</b><br />
   <p>After several months creating some exciting new Blender 3D
   models, we've launched our new Web site.</p>
<div class="footer"><a href="http://www.johnsmodels.com">
Read More</a></div>
</div>
Of course, the code will be different for your site. This example is shown as an idea of how you might customize your presentation file.
Once you have finished your new presentation.html, save the file and upload it to your Web server.
The text file url_list.txt contains the other Web sites on the hypernetwork that will be displayed on your Web site.
Open the file and add the address of the other sites. Each address should only include the domain, for example www.psbsite.com. If there is more than one site, each additional site must be on its own line so there is only one domain per line in the text file.
As an example, there are currently four Web sites on the GNOS Network. If you want your site to join that network, you would add the following addresses to url_list.txt.
www.blender3d.it
www.dedalo-3d.com
www.katorlegaz.com
perso.wanadoo.fr/blenderic
PSS doesn’t have to be used with GNOS. It can be used to create an entirely new network as long as the other Web sites on the new network use either PSS or PSB.
Upload your saved changes to url_list.txt to your Web server.
Because the network uses PHP, it is important that your homepage be PHP as well. Your homepage should be named index.php. If it is currently named index.html or index.htm, change the file extension to .php.
Add the following lines of code to the <head> of your homepage:
<link rel="stylesheet" href="networkstyle.css" type="text/css" />
And place this in the body of your homepage where you want your network news to appear:
<php include ('class.html'); ?>
For example, if you want the network news to appear at the bottom of your homepage add the code at the bottom.
Save the changes to index.php and upload to your Web server.
By default the network is automatically updated every six hours. If you would like to manually update your homepage to display the latest news now, enter the following address in your Web browser:
http://www.yoursitedomain.com/tools/force.php
You may also have to use this script to force an update to your homepage after first installing PSS.
The following CSS classes are used by PSS to display the news.
-
littletitleDiv—Banner title for Web site news, increases font size, and makes text bold. -
newsBody—General news content. -
illustration—Aligns images to the left of news content with padding so text is not flush. against image. -
newsBody—Formatting for lists in news content, including a document image and padding. -
footer—Creates a dashed line, reduces text size, clears all formatting so additional content displays properly.
By using PSS and following the steps covered in this article, you and your friends can easily create a hypernetwork to share similar information and news between your Web sites.
![]() Copyright © 2004 Andrew Kator,
akator@atpm.com.
Copyright © 2004 Andrew Kator,
akator@atpm.com.
Also in This Series
- Give Alert Sounds a Little Personality · March 2012
- Create Your Own iPhone Ringtones · February 2012
- Create Your Own Homemade Audio Book · December 2011
- Upgrade to Lion Painlessly · August 2011
- Make the Most of TextEdit · July 2011
- Using the Free Disk Utility on Your Mac · May 2011
- Making Use of QuickTime X · March 2011
- Making the Most of What’s Already on Your Mac · February 2011
- Making the Most of What’s Already on Your Mac · January 2011
- Complete Archive
Reader Comments (0)