Review: Optipix 3.0

Developer: Reindeer Graphics
Price: $150; $75 (upgrades)
Requirements: Mac OS 9 or Mac OS X 10.2,128 MB RAM, Adobe Photoshop 5.5.
Trial: Time-limited (one week)
As increasing numbers of professional photographers have turned to entirely digital solutions, those photographers encounter the problems inherent with digital photography and need professional solutions. Reindeer Graphics offers tools to solve those problems—tools that even operate in 16-bit mode.
There are at least 15 tools available in Optipix 3—far too many to completely detail in this space, considering the user manual is a 78-page PDF with step-by-step examples and screen captures to help you learn how to use each tool. Reindeer Graphics offers an online guide that showcases each tool and gives examples of its use. Since the examples utilize pictures that specifically benefit from each tool, perusing this guide is the best way to see how the tools can improve a digital photo. The available tools are: Auto Contrast, Blending Exposures, Interactive Interpolation, Layer Modes, Image Averaging, Edge Enhancer, Photoshop Actions, Detail Sharpener, Grain Maker, JPEG Cleaner, Safe Sharpen, Safe Median, Power Median, Refocus, and Selection Tools.
I have a small confession to make. When I requested to be the one to review this product, I had only been exposed to a few of the Optipix tools and did not understand it to be the professional workflow utility that it is. Admittedly, there are some tools or specific controls inside some of the tools that are above my skill level. Since the online guide provides excellent descriptions and examples of each tool, I’ll simply show examples of how a few of the tools helped even an experienced amateur photographer such as myself. (I’m not yet willing to call myself an advanced photographer!) These are my favorite Optipix tools.
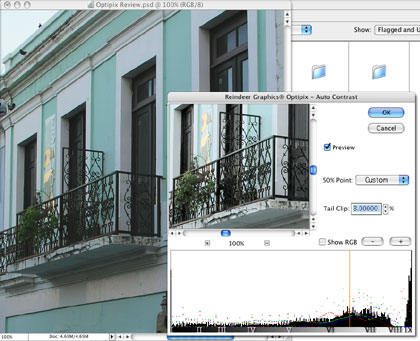
Auto Contrast
Auto Contrast is what Reindeer Graphics calls a “mini-enhancer,” letting you improve exposure in a photo. Since the tool contains an interactive histogram, it affords a degree of feedback that you don’t get from Photoshop’s Levels and Curves tools.
Blend Exposures and Layer Modes
The tools I’ve probably benefitted from most are the Blend Exposures and Layer Modes tools. I often find myself shooting the exact same photo with two different exposures with the intent of later combining the images in Photoshop. A common example of this is a photo with a bright sky and a shadowed foreground.
Because these two tools are my most favorite, I’m going to depict the process of using them. Besides demonstrating how to use these tools, this should adequately describe the overall process and simplicity of all the tools.

In this first image, we see two shots of the Luxor hotel in Las Vegas at night.
One photo was exposed for the pyramid against the night sky at the expense of blowing out the sphinx in the foreground. A second photo was exposed for the sphinx, making the pyramid nearly indistinguishable against the sky.
After combining the two shots into the same document on separate layers, it was apparent that, even though I recomposed the second shot fairly accurately, there was an inevitable misalignment. Normally, this would be corrected by changing the upper layer’s blending mode to Difference or perhaps dropping the upper layer’s opacity, then nudging the upper layer around until it matched the bottom layer. The downside of this was that earlier versions of Photoshop could not do this in 16-bit mode. But even now that Photoshop CS has greater functionality in 16-bit operation, Optipix’s Layer Modes is still the better choice. First, it allows for subpixel nudging—important if you’re trying to align extremely fine detail. In addition, Optipix has included six additional blending modes to compare the two images: Highlight, Shadow, Subtract, Remove, Ratio, and Compare.
To perform the Layer Modes operation, the bottom layer is selected and Optipix’s Setup 2nd Image command is run. This buffers the first image. Next, the upper layer is selected and the Layer Modes panel is accessed.
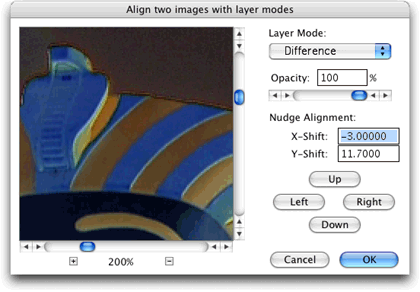
While I still like using the Difference blending mode for comparison, I found that toggling though other modes helps make my final choice for alignment. You can see above that I nudged the upper layer three pixels horizontally and 11.7 pixels vertically.
Once the images are aligned, be sure to change the mode back to Normal. When you click OK to act on your adjustment, whichever mode was selected in this window is applied to the newly aligned image.
With the upper layer still selected, the final step is to simply run the Blend Exposure command. Normally, you would first set up the second image as described above, but since the second image was already buffered for the Layer Modes operation, you do not need to repeat this step.

Safe Sharpen
For the final exposure blended image, above, I also increased the color saturation slightly and adjusted the color balance since the image was a little reddish, then applied Optipix’s Safe Sharpen. Safe Sharpen is a single-punch command with no settings interface.
Generally, I’ve always applied an Unsharp Mask of 50%, a radius of 1 pixel, and zero levels of threshold to my final images if I felt they were a bit soft. These days, I’m using Safe Sharpen. Besides yielding pleasing sharpness, it tries to maintain color information around contrasted edges—areas that often suffer after being sharpened. Safe Sharpen can, in some cases, even repair previously damaged edges.
Like any other sharpening filter, Safe sharpen will also enhance noise in a photo. Unlike other filters, however, color noise is usually not affected. According to the online guide, “The ‘blue noise’ that is so typical in a digital image is reduced while the edges in the images are enhanced.”
JPEG Cleaner
Since professional digital photographers generally only deal with maximum quality JPEGs, uncompressed TIFFs, and RAW format images, it may be desktop publishers such as myself who will most benefit from Optipix’s JPEG Cleaner—people who often receive digital images from other photographers who don’t know better than to set their cameras at a higher quality. Like Safe Sharpen, there is no user interface needed. It’s a directly applied filter.
As most people know, the more highly compressed a JPEG image is, the more visible the 8x8 pixel block boundaries inherent in JPEGs become.

Before JPEG Cleaner. Click to enlarge.

After JPEG Cleaner, applied twice. Click to enlarge.
In the first image above—a 400% zoom on the stripes of an American flag—the characteristic JPEG block artifacts are plainly visible. On the right, the same image has had JPEG Cleaner applied. In severe cases of block artifacts, applying the JPEG Cleaner two or three times in succession can make a big difference.
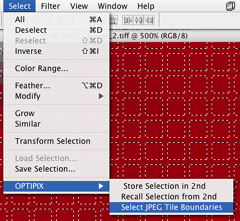
If JPEG Cleaner’s effects aren’t exactly what you’re looking for, Optipix also comes with a tool that simply selects the 8x8 pixel boundaries without performing any action on the image. You can then perform your own steps on the artifacts.
Actions
Optipix also comes with several actions you can optionally install. These include 1/3-pixel nudge commands (most helpful if a keyboard shortcut is assigned to them), an action to automate blending exposures, one that reduces the dynamic range of a photo to a state that is better for commercial printing, and two different actions for image optimization—one for general use and another designed to enhance portraits.

Before Optimize Image action. Click to enlarge. |

After Optimize Image action. Click to enlarge. |
The Optipix manual says that the Optimize Image action makes marked improvements to well-exposed original digital images, so don’t assume that this action will fix sloppy exposure. In the example above, the first photo represents a shot straight from my digital camera with absolutely no adjustment. Other than having a slight red cast, I was very happy with how it came out. After applying the optimization action and making a slight color adjustment to remove the red cast, I could see detail I didn’t even realize existed in the photo. Note the upper tip of the fresnel lens inside the lighthouse. This tip is virtually invisible in the unadjusted photo. The action also brought out detail in the bricks of the lighthouse and in the shadows of the tree bark on the extreme right edge of the photo.
Bundled Perks
Those who are serious about digital photography will be pleased to find two PDFs on the Optipix CD. Photoshop for Digital Photographers by John Ross is a 217-page guide for using Photoshop to work with digital images. The Digital Fine Print Workshop by George DeWolfe is a 76-page guide to producing the highest possible quality in a final print and was updated this year to include techniques that utilize Optipix’s tools.
Final Thoughts
Optipix’s control windows could use the handiwork of a user interface expert. Some controls seem haphazardly positioned with lots of wasted space. Also, whenever an image is larger than a tool’s preview window, the only way to move around the image is to use the scroll bars. Adding a hand tool to slide the image around in the preview window would be extremely helpful. This should occur whenever the pointer is positioned over the preview. It should not be necessary to have to hold a key down while sliding.
Experienced Photoshop users should find Optipix’s tools well-suited for their needs. Novice users may, at first, be a bit intimidated by the controls for some tools, but some experimentation should wean them rather quickly. Novices may also be intimidated by Optipix’s price tag, but should realize this is a professional tool, not an off-the-shelf wannabe.
![]() Copyright © 2004 Lee Bennett,
lbennett@atpm.com. Reviewing in ATPM is open to anyone. If you’re interested, write to us at reviews@atpm.com.
Copyright © 2004 Lee Bennett,
lbennett@atpm.com. Reviewing in ATPM is open to anyone. If you’re interested, write to us at reviews@atpm.com.
Reader Comments (0)
Add A Comment