Hardware Review
Hard Drives as Floppies
BlacX N0028USU

Developer: Thermaltake
Price: $60 (list); $40 (street)
Requirements: USB 2, bare 2.5″ or 3.5″ SATA hard drive.
Trial: None
RTX100-Q

Developer: WiebeTech
Price: $200
Requirements: USB 2, FireWire (400 or 800), or eSATA; bare 3.5″ SATA hard drive.
Recommended: FireWire.
Trial: None
RTX100-SJ

Developer: WiebeTech
Price: $100
Requirements: USB 2 or eSATA, bare 3.5″ SATA hard drive.
Trial: None
It seems like I can never have too much storage. Between current documents, music, and photos, my working set of data doesn’t fit on the hard drive that’s built into my MacBook Pro. The music and master photos I put on an external drive. Other drives, cataloged with CDFinder, hold old projects and software that I’ve downloaded or purchased on CD. DVD-Rs are great for historical archives of certain folders, but I also maintain several SuperDuper clones that I can switch to at a moment’s notice if there’s a problem with one of my main drives. In order to test the software that I develop, I keep installations of various versions of Mac OS X. Lastly, I keep off-site copies of important data so that the backups are protected from environmental damage and theft. All told, it’s a surprising number of drives for a small business. I can only imagine how much more storage I’d need if I worked with digital video.
The obvious solution to increasing storage needs is to buy more hard drives, but how should they be connected to the Mac? For users who want to access the files from multiple Macs, Network Attached Storage devices and Apple’s Time Capsule are good choices. An increasingly popular option is Data Robotics’ Drobo, which holds up to four drives, lets you treat them as one big drive, and makes it easy to replace the drives with larger ones as your storage needs grow. However, I prefer traditional hard drives, connected individually via FireWire or USB 2, as this provides more flexibility to move the drives around.
Combined Enclosures
The most common form of traditional hard drives is what I call a combined enclosure. The hard drive mechanism is packaged inside an enclosure that provides power and USB or FireWire ports. Companies such as Iomega, LaCie, Maxtor, and Western Digital produce combined enclosures, you can buy them at any computer store, and they’re easy to use: just open the box, plug it in, and you’re good to go. Prices are decent, and sales and rebates are common.
There are, however, some problems. In my experience, combined enclosures are not very reliable. After several years of use, the enclosures or power supplies tend to fail, although the drives inside are almost always fine.
It’s easy to find combined enclosures that support USB 2, but there are fewer choices for FireWire 400, and support for FireWire 800 is rare. I prefer FireWire because it’s faster, but FireWire enclosures tend to be more expensive.
With the drive and enclosure packaged together, and sold mostly by capacity and price, it can be hard to find what you want. Over the years, I’ve bought combined enclosures one at a time as I needed more space. Some were larger or louder than I wanted. Others didn’t stack well, didn’t let the drive go to sleep, or had inconvenient power adapters. Whenever it was time to buy a drive, the previous models had been discontinued, so I couldn’t get the same enclosure again even if I liked it.
I ended up with a variety of enclosures. Each had a different power adapter that had to stay with the enclosure as it moved between Macs or between my office and off-site. As enclosures failed, their drives were orphaned. It seemed like a waste of time and money to research and buy all these different enclosures. I didn’t need to use them all simultaneously. I just needed to add additional storage now and then.
Separate Drives and Enclosures
For me at least, it makes more sense to buy the drive and the enclosure separately. I can find a high-quality enclosure that I like and stick with it. As I need more storage, I can buy more and larger drives to put in it. There are more choices and better prices when buying bare hard drives at places like Newegg. And I don’t need to buy an enclosure for each drive, only for the ones that I want to access simultaneously. The archives and off-site backups can be stored without enclosures, either in their original plastic cases or in DriveBoxes.

Bare SATA Drives
My main enclosure of choice is WiebeTech’s ToughTech XE. It’s pricey, but it’s quiet and compact, and it provides speedy FireWire 800 performance. The build quality is excellent, and the enclosure is well designed, both to protect the drive and to make it easy to swap it out for a different one. I think it’s a great choice for drives that will be connected more or less all the time.
Hard Drives as Floppies
The remaining question—and the purpose of this review—is to decide how to connect the other drives, the ones that I want to access occasionally but that don’t need to be connected all the time. In essence, I want to treat hard drives like floppy disks: find the one I want to use, connect it to the Mac, and put it away when I’m done. I want to have multiple “floppy drive” enclosures so that I can copy from one floppy to another and move data between Macs.
The first option I considered for my “floppy drive” is the ToughTech. It’s easy to open, but even so I don’t want to keep unscrewing it to exchange drives. Nor do I want to turn it off, unplug it, and disrupt my FireWire chain.
Another option is a cable adapter such as WiebeTech’s USB DriveDock or NewerTech’s Universal Drive Adapter. These make it easy to connect and disconnect drives, but I prefer an enclosure that the drive can sit in, so that it isn’t directly on the desk. That cuts down on noise and vibration.
Recently, a much better option has become available: enclosures that work much more like the floppy drive that I desire. Below I examine three different models from Thermaltake and WiebeTech. (I’ve recently learned of another option from Addonics.) All of these enclosures make it easy to swap drives, and they’re even easier than the cable adapters. Instead of having to connect the power and SATA cables, you can just slide the drive itself. They’re also fully Mac-compatible: you can boot from them, there are no drivers to install, and they can spin down the drive after it’s been idle for while. As with floppies on the Mac, you need to unmount the drive (e.g. by dragging it to the Trash) before ejecting it.
BlacX
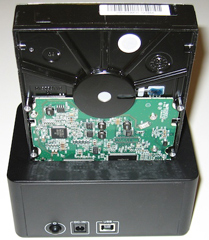
The BlacX looks more like a big, black iPod dock than a typical hard drive enclosure. It accepts both 2.5″ and 3.5″ drives, which is handy because I ended up with an extra 2.5″ drive when upgrading the drive in my notebook. To use the BlacX, insert the drive into the slot on the top, press down a bit to make sure it’s connected, and press the power button in the back. Also on the back is a full-size USB 2 connector.

BlacX
On the front there’s an activity light and an eject button. Ejecting disconnects the drive so that you can pull it out without lifting the BlacX off the desk along with it. Thermaltake says to power off the BlacX before ejecting. I didn’t have to do that with my floppy or Zip drives, and it’s easy to forget. I wish the eject button powered it off automatically.

BlacX (With 3.5″ Drive)
The BlacX is fanless, so the only sound you hear is the drive itself. It’s slightly louder than the ToughTech or the RTX100-SJ, though, because the drive is exposed. If you’re working in a dirty environment, you might prefer an enclosure that doesn’t expose the drive (and the dock connectors, when no drive is inserted), but otherwise I think it’s fine.

BlacX (With 3.5″ Drive)
I appreciated the short power cable with a small power brick at the end. (Both the RTX100-SJ and the RTX100-Q include a larger power adapter that consists of a brick in the middle, with cords going to the enclosure and the power source.) Unfortunately, the BlacX isn’t as portable as it looks. It’s an odd shape that wouldn’t fit well in a slim computer bag, and it’s weighted in order to provide a steady base for the drive.
RTX100-Q
The RTX100-Q supports USB 2 (full-size), eSATA, FireWire 800 (2 ports), and FireWire 400 (adapter cable included). It uses the same Oxford 924 chip as the ToughTech. In the front is a little door that opens (left-to-right) so that you can insert the drive. Closing the door pushes the drive in and connects it. Opening the door disconnects it and pulls it out so that you can grab onto it. I liked this horizontal system better than the BlacX, although both are quite easy to use.

RTX100-Q (Front)
Unlike the BlacX, there’s no need to power off the RTX100-Q before ejecting or inserting a drive. You can hot-swap drives in the middle of a FireWire chain. The bay can be locked with a key, to prevent accidentally opening the door while the drive is in use. (The enclosure has no security slot, so this doesn’t prevent anyone from stealing the drive.)

RTX100-Q (Back)
The RTX100-Q is solidly built and stacks well. Unfortunately, it’s more than twice the size of the ToughTech, and it has a fan that’s active even when the drive isn’t in use. I’m sensitive to noise, and the fan is loud enough that it makes me not want to use the RTX100-Q in a room where I’ll be working.
RTX100-SJ
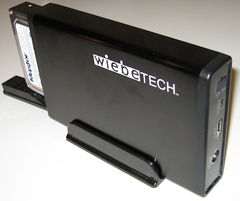
The RTX100-SJ is a newer, cheaper version of the RTX100-Q. It’s slightly larger than the ToughTech and supports USB 2 (mini) and eSATA. The door and bay are similar to those on the RTX100-Q, but more compact. There’s a little safety tab, instead of a key, to lock the door closed. You can hot-swap drives without powering it off.

RTX100-SJ (Front)
The enclosure is designed to hold the drive on its side, with the door opening downwards. A flat configuration is also possible, although there are no feet for it to rest on. Although the specifications say that the RTX100-SJ includes a “4cm Ball Bearing Fan” like the RTX100-Q, I didn’t see a fan. I found that it ran quietly.

RTX100-SJ (Side and Back)
Speed Tests
As processors and memory get faster, performance is increasing limited by hard drive speed. My MacBook Pro can feel like an old iBook when using its internal 4,200 RPM drive, but using an external FireWire drive it’s more like a modern iMac. In order to compare their performance, I tested the three enclosures using the same 500 GB Maxtor drive. In real-world use via USB 2, I found that the BlacX and RTX100-Q performed adequately, about the same speed as other USB 2 enclosures. When connected via FireWire, the RTX100-Q was noticeably faster during periods of heavy disk use. The RTX100-SJ was adequate for accessing archived files, but it felt too slow to use as a main drive.
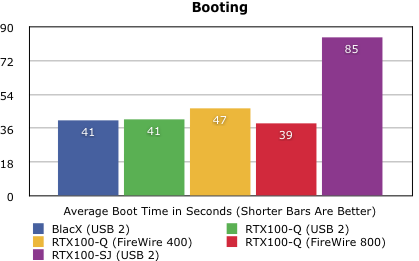
In order to try to quantify the differences, I chose two simple tests and timed the three enclosures. The first test was booting my MacBook Pro. This tested the read performance in a typical use situation.

The BlacX and RTX100-Q are about the same speed, each about twice as fast as the RTX100-SJ. FireWire 800 is a little bit faster than USB 2, and (surprisingly) FireWire 400 is a little slower.
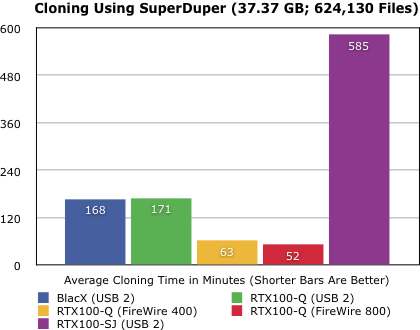
The second test used SuperDuper to clone a Mac OS X installation (containing a mix of documents, mail, photos, and music files) from one partition on the drive to another. Normally, I would use SuperDuper to clone between two different drives. Cloning between two partitions on the same drive is less typical, but it’s more interesting for testing purposes because it measures the reading and writing performance without introducing a second enclosure.

The BlacX and RTX100-Q were about the same speed when using USB 2, but with FireWire 400 the RTX100-Q was between two and three times faster. With FireWire 800 it was more than three times faster. Again, the RTX100-SJ was several times slower.
The cloning test makes all the enclosures look slower than they actually are. It involves reading and writing a large number of small files to different parts of the drive, and drive head has to move back and forth between the two partitions. Copying a small number of large files from one drive to another would yield a much higher number of megabytes per second, but I believe the cloning is a better stress test for measuring the relative performance of the enclosures.
The main surprise from these tests was how much slower the RTX100-SJ was than the other enclosures. Additionally, its performance was far less consistent. I performed each test three times, and with the other two enclosures there was little difference between the fastest time and the slowest. The three times for the RTX100-SJ, however, varied by 18 seconds on the booting test (a large percentage) and by nearly 7 hours on the cloning test.
I asked WiebeTech about this, and they replied:
The reason for this is the difference in controller boards. The RTX100-SJ is a simple pass through unit (has no controller board) so the speed varies depending on CPU usage and what other processes or programs you are running at the time you are doing your testing. This explains your varied times.
The [RTX100-Q] has a 924 Oxford chipset on the bridge it uses which gives the unit stability while transferring data thus allowing for faster transfer rates and constant transfer times.
The lack of a controller board is a good explanation for the overall slow speed of the RTX100-SJ. However, since the tests were conducted under controlled conditions—with no other processes using CPU time as far as I know—it does not make sense to me that the times should vary so much.
eSATA
Thus far I haven’t discussed eSATA, which theoretically provides much better performance than USB 2 or even FireWire 400. Both RTX enclosures have eSATA connectors, as does Thermaltake’s higher-end BlacX, the SE N0029USU. Macworld found that the RTX100-SJ was much faster using eSATA than using USB 2. The main problem with eSATA is that no Macs currently have it built-in, although you can buy expansion cards to add it to a Mac Pro or MacBook Pro. Some such cards support booting; others do not. Additionally, it’s not as convenient for connecting multiple drives because it supports neither chains (like FireWire) nor hubs (like USB).
Conclusion
All three enclosures worked well, but I did not find an ideal “floppy drive.” The BlacX is the best value. The RTX100-Q is much faster, but it’s five times the price and noisy. The RTX100-SJ is my favorite design, but it’s more than twice the price of the BlacX and by far the slowest of the three. Overall, I think the BlacX is the best choice for most users. If speed is the most important consideration, get the RTX100-Q or look into an eSATA solution.
Reader Comments (5)
As for speed ... I ran a round of tests on a Western Digital WD5001ABYS drive using QuickBench. For small files (under 1 MB), eSATA beat Firewire 800 by about 2x for reads and 3x for writes. For large files (20-100 MB), by about 40% for reads and by roughly 3x for writes.
I see from the screen shots I saved that "write cache purging" was not enabled for these tests, so that may explain the odd write disparity, though why it should only speed up SATA access is puzzling.
Regarding the RTX100H-Q (a "hardened" version of the RTX100-Q) - I've been using a pair of these for a couple months now, and am quite happy with them. My entire universe - boot partition and data partitions - are on a 500 GB SATA drive I plug into one RTX100H-Q at home, and into a second at work. I boot from the RTX100H-Q at work (via FW800); at home I boot from an internal 10,000 rpm drive (a Western Digital Raptor) that's automatically cloned to the external drive's boot partition each night. And I do my system updates when I'm at home...:-).
WiebeTech also sells plastic cases in which to store bare drives while in transit for about $6.
-jcb
I saw one listed at the Other World computing site.
I am wondering if anyone has tried one out.
Add A Comment