Software Review
SuperDuper! 2.1

Developer: Shirt Pocket
Price: $28
Requirements: Mac OS X 10.3.9. Universal.
Trial: Feature-limited (missing Smart Update, etc.)
Once upon a time, there was a tape backup drive. It held a few gigabytes per tape and connected via FireWire. It was a great little tape drive, and it came with backup software called Retrospect. Retrospect was greatly respected within the Macintosh backup community, and it integrated the aforementioned tape backup drive nicely.
At the same time the tape backup drive began to show its age in the amount of data it could store, Retrospect began its slide into unreliable oblivion, at least for this user. The tape backup drive is now on a shelf, and Retrospect no longer resides on the hard drive as a means of backup administration. This user has spent the past couple of years with an imperfect and just as unreliable backup system: whenever I think about it.
After a bad crash that lost me a month’s worth of e-mail, I began to think about it a lot more often. You’ll note this is when most people tend to think about backing up their data: after they’ve already lost some or all of it. Many have said it before me, and many will continue to say it after me: setting up a backup system that works for you is not something you should put off for another day.
As for me, most of the time I would simply copy data to an external drive. Other times, I would perform a full cloning of the drive in question to an external one. I’ve looked at and used off and on numerous backup and syncing utilities, and just hadn’t found one I felt I could count on for all of my backup needs. I may have finally found that utility in Dave Nanian’s SuperDuper.
Full Backup
From the outset, the philosophy behind SuperDuper was that it be as easy as possible for the new user, while not skimping on features of worth to the power user. To this end, the main interface for the application is very basic, while still allowing access to advanced features.

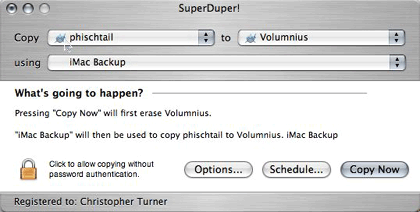
As you can see in the above screen shot, it’s a very simple interface. It asks you to choose what you are copying, and where you are copying it to. SuperDuper comes with four default backup scripts, but you can choose to create as many as your needs dictate.
I created my own backup script to fill my most pressing backup need: seeing that my new iMac Core Duo’s hard drive is cloned. I ordered my new iMac with the upgraded hard drive, which weighs in at 500 GB. Not having any external drives that even come close to 500 GB, I ordered an external of that capacity from LaCie. Once Volumnius arrived, it was time to give SuperDuper its first workout. The aforementioned backup script was very simple: back up everything. I will note that one of the four default scripts in SuperDuper is “Backup—all files,” so one could make the argument that I was reinventing the wheel with my own script that does the same thing. Rather, I thought it important to look into the script creation process, which we’ll get to later.
A quick aside on the other three default scripts: one is “Backup—user files,” which backs up just the files in the current user’ home folder. The other two are related to what Shirt Pocket calls the Sandbox, which we’ll discuss later.
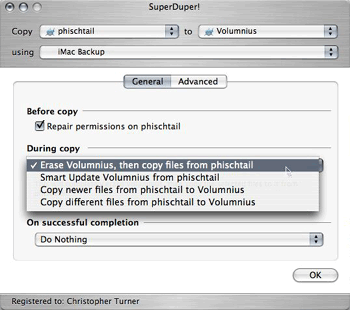
After selecting your script, you’ll need to set your options for this particular backup. As you can see from the screenshot below, you can have SuperDuper repair your drive’s permissions (I recommend this), tell it what to do to the target drive and what sort of backup you’re looking to perform, and then you can have SuperDuper perform several actions after the backup is complete. These range from doing nothing, the default, to restarting from the target drive or shutting down your computer.

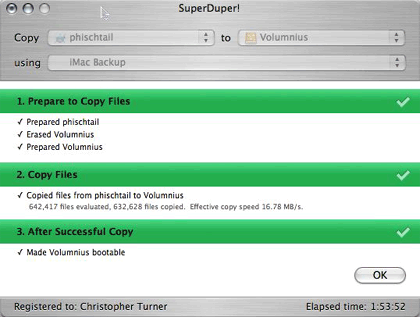
So, a little under two hours later, the entire contents of my iMac’s disk was copied to the external drive. Not only that, but SuperDuper had also made the external drive bootable, just in case the need arose to boot from it to restore to the iMac.

“So what?” you may ask. There are other utilities that do that, some of which are free or donationware. True, but then we haven’t tapped all of SuperDuper’s power yet.
Increment Me, Schedule Me, Just Don’t Bore Me
After performing the initial backup, the next step is to use SuperDuper’s Smart Update feature to incrementally back up the iMac. Only those files that have been changed will be updated on the external drive.
To do this, simply select “Smart Update [target drive] from [original drive]” in the During copy options, as shown above in the second graphic. This won’t take nearly as long as the original full backup; when I ran my first Smart Update, a couple of days after the first Full Backup, it took just under 15 minutes.
This is all well and good, you might say, except that I still have to tell the system to do all of this. Can’t I just schedule a backup and forget about it? Yes, dear reader, you can do precisely that.
You may also be thinking that things have been pretty easy up to this point, right? So the whole scheduling thing must be the part where we’ll have to slog through. Not so. Scheduling your backups with SuperDuper is as easy as everything else.
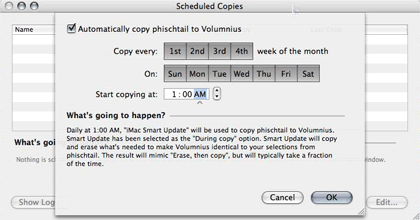
Going back to the main screen, you’ll note the Schedule button. Clicking on this will allow you to set up the dates and times for your scheduled backup.

As you can see, I’ve set up a daily incremental backup that kicks off at 1:00 in the morning each day of the week. I’m a night owl, but by and large I’m done on the computer between midnight and 12:30, so 1:00 is a safe bet for me. Only those changes made to the iMac, whether they be modifications, additions, or deletions, will be made to the external drive.
You have lots of options in your scheduling. You may want to do a full backup once a week, and Smart Updates the rest of the week. Or a full backup once a month, etc. SuperDuper gives you the flexibility you want in determining what sort of backups will take place when.
Another nice feature of SuperDuper is that the application does not have to be running to begin a scheduled backup. According to the PDF manual, the only requirements are that the user who created the scheduled backup be logged in, and that the screen be unlocked. Your Mac must also not be asleep; SuperDuper won’t wake it up.
Please, Dear God, Let Me Have That File Backed Up
So in a sleep-deprived stupor, you killed the company’s latest financials spreadsheet, or your doctoral thesis. Or a lightning storm knocked out the power, and The Great American Novel you were working on happens to be the only file missing from your hard drive. Fear not, for if you have been persistent and consistent in your backups, it’s really easy to get those files back. Or at least the most recently backed up version, which will still save you a lot of recreation time. Unfortunately, if another full backup or Smart Update runs before you notice that your file has been deleted or corrupted, you won’t be able to recover it from the backup at all.
Fire up your external drive, navigate to where the files are located—somewhere in your home folder, no doubt—and drag them over. That’s it. SuperDuper performs a file-for-file, folder-for-folder cloning when it backs up. This approach can have its weaknesses, as opposed to a proprietary backup format such as what Retrospect uses. For example, the backups take more disk space, and you can’t tell whether the files they contain are intact. But for a majority of users out there looking for easy backup and recovery, Shirt Pocket’s method works great. The above-mentioned, easy-to-read manual also discusses restoring from a bootable backup, as well as restoring when you are unable to boot from your backup.
Playing in the Sandbox
The SuperDuper Sandbox is designed to give you a bootable copy of your system, sharing your user files from the original drive. The difference is that you can use the Sandbox to experiment. See some new haxie or kernel hack you want to try, but are afraid of how it might affect your critical apps? Leery of the latest system update, because you’re running some legacy or third-party-upgraded hardware? Install them on the Sandbox. If it blows up, your original is still intact, safe and sound.
In the OS 9 and earlier days, I lived on the bleeding edge, installing whatever came down the pipe to play around with. With OS X, I’ve become much more cautious. You won’t find any—OK, you won’t find many—hacks or haxies installed on my systems. The Sandbox could very well change that, as soon as I get some more external drives into operation.
This feature can be a boon to administrators who may want to test a new update or system configuration, but who may be limited in having extra hardware to test on. With SuperDuper’s Sandbox, you don’t need an extra Mac, just an extra hard drive.
It’s noted in the SuperDuper manual, and worth repeating here: the Sandbox is not designed as a replacement for the regular backup features of SuperDuper. It is offered as an additional feature. The Sandbox is, as its name implies, for playing around, not for serious backup duties.
The only caveat I see in using the Sandbox is that some software may install something in the Library folder that resides in your user folder, and this could potentially cause problems when you switched back to your original drive.
Miscellany
SuperDuper can back up to a network volume. Kind of. It cannot write to a network volume directly, but you can use the application to create a disk image that contains your files, and SuperDuper will save that image to the network volume. I do not have access to any network drives of the size that even my smallest backup sets would be able to handle, so I am unable to test this feature. This could be a feature systems administrators not anxious to dive in to the command-line world of rsync would welcome.
Using the Copy Scripts function, you can tell SuperDuper which files or folders you want it to ignore during the backup process. For most users, this won’t be something you’ll care too much about; you’ll want to backup everything. I fall in to that camp. Advanced users or systems administrators may have valid reasons for ignoring certain files or folders, and again, the application is flexible in this regard.
SuperDuper Is, Well, Super
Diehard Retrospect fans won’t be converting to SuperDuper. Neither will systems administrators with heavy command-line backgrounds, or those requiring industrial-strength solutions for industrial-size…er, industries. Then again, SuperDuper isn’t designed for those sorts of folks. It’s designed for the everyday Mac user who just wants to make sure the digital photos of Junior’s first Little League game are backed up. It’s designed for the small business owner who needs a decent backup solution that she doesn’t have to think much about.
The Macintosh was designed to be “the computer for the rest of us,” and Dave Nanian and company began with the goal to make SuperDuper the backup solution “for the rest of us.” I believe they have succeeded.
Reader Comments (12)
It has great features especially the incremental backup
I am using 400 gig drives so it does take a loooong time.
I seems to have permission problems as well.Would be a good idea to run it as root, or maybe that should be a prefrence feature.
http://www.econtechnologies.com/site/Pages/ChronoSync/chrono_overview.html
Of course that was written before version 2 was available.
Maybe they exist, but I've never seen convincing arguments why CCC is superior to SD!.
Smartupdate with CCC took 50 min in two almost full 80 GB harddrives
The same Smartupdate with SD! 2.13 took 7 minutes and the first Smartupdate was made with SD! that means, SD! had to copy more data than CCC had to do the second time.
In other words, SD! is about 7 times faster than CCC. And for a full backup SD! is around twice faster than CCC and many times faster than other applications like Clone X, Tri-Edre 4.1, Intego's Personal Backup 4X, etc... not only is faster but also more releable than them, any issue until now. By the way, I have also done several 500 GB backups with literally 0 issues.
Yes it is around $30 and IMHO is worth every penny
It has save my bacon more than once and is very easy to use. I just upgraded my powerbook to an 80 gb hard drive from a 40gb wiith SD and today I downloaded the newest version for my new macbook pro. I would not be without it!
Add A Comment