How To
Making a Silent Movie with iMovie
FrankenMac Makes a Movie
Regular readers of How To columns in other Mac magazines might get the impression that the author’s projects always work the first time, with no serious snags or detours. Let me assure you that, at least for me, this is not true.
My initial idea was to capture video from some old videotapes, edit the video in iMovie, and burn the resulting video to a new disc. Since I had recently purchased a Pioneer Tivo device with a built-in DVD burner, this should have been easy. Well, let’s just say that it was not as easy as I expected and save that article for another day.
In the midst of that failed project, my brother called wondering about video editing software for his new video camera. He had misplaced the disk and wasn’t too interested in having to purchase a new one without first finding out whether there was something better out there. With my usual confidence in the superiority of our chosen platform, I informed him that if he were a Mac user chances are iMovie would recognize the camera without any additional software. He could simply plug the camera into the FireWire port. Anyway, I made him promise to bring the camera the next time he was in Louisiana.
After I hung up the phone, it occurred to me that being the family computer geek I was likely to be the one asked to edit his future cinematic masterpieces. The last video editing I did was five years ago on a PC. I’d better start sharpening my skills.
I had heard and read many times that iMovie was easy to use. Somewhere along the way, I decided to put this to the test by making a short movie. Thinking back to my previous PC-based video editing experiences, I remembered that it was relatively easy to mess up the timing between the audio and video tracks. I decided to avoid that problem altogether by making a silent movie. We may tackle solutions to that problem in a future article. For now, silent is the way to go. To make the project a little more challenging, I decided to consult the iMovie Help file as little as possible. It’s a great resource but I wanted to see what I could do without it.
Getting Prepared
Macs that have shipped over the last few years will work well with iMovie. This is especially true for the short video clip used for this project. There are some things to keep in mind, though, as you are preparing for any video project.
I used iMovie 3 because it’s what I had available. Video clips in iMovie 3 must be less than two GB in size. Although this sounds like a lot, remember that digital video takes up about 210 MB of disk space per minute. That alone is worth the upgrade to iMovie 4 if your Mac meets the system requirements.
The Master Plan
No self-respecting filmmaker would start without a plan of action. This plan (storyboard) describes each scene of a movie in detail. Information about dialog, lighting, and special effects is included in this storyboard. It is, in essence, a blueprint for each scene of the film. I didn’t go into that level of detail for this project, but I did have a general plan of action.
Prepare the work area by setting some basic iMovie preferences. Throughout the article, I will be using terms that are well described in the iMovie Help file. These terms, including the names of various controls, are explained in the overview section. You may find it helpful to print this portion of the Help file.
Import and Preview the Footage. Use this step to get an overall impression of your video footage. Take notes about which segments you would like to keep or remove, the length of the video, and any special effects that seem like a good idea. Don’t worry about any editing at this point.
Edit the video based upon the notes that we took in the previous stage. This is where the real work and fun will occur.
Get to Work
Now that we have an idea what is going to happen, let’s get to work.
Prepare your work area by launching iMovie and selecting Preferences from the iMovie menu. I will not go through each option here because some of them have no bearing on our particular project. They are also located in slightly different places in iMovie 4.
There are three preferences that we will be interested in setting. In the area labeled General, decide whether new projects are opened as NTSC or PAL. NTSC is the standard used for video in the US and Japan. PAL is the video standard commonly used in Europe.
Set the Import option to Automatically Start a New Clip at scene breaks. With this preference set iMovie attempts to detect periods in the video where the camera was turned off and then on again. Each of these occurrences is treated as a scene and imported as a different video clip. This setting also forces iMovie to create a new clip before the size of the current clip reaches iMovie’s file size limit. Before we leave iMovie’s preferences, look at the Import section and decide whether you want movie clips to appear in the clip panes to the right of the iMovie monitor or in the movie timeline at the bottom of the screen. This setting has no effect on the final movie, so experiment and choose the one that you prefer.
The next step is to import and preview the files. Importing video from an iMovie supported video camera is well documented in iMovie’s Help files. I could not test this aspect of iMovie without access to a video camera. Instead, I used a video file on my hard drive and saved it as a QuickTime movie using QuickTime Pro. If you have a video clip that you intend to convert from one video format to a format iMovie can use, QuickTime Pro is a good option.
Before we actually import any video footage, you may find it helpful to disable any screensavers that are running. Importing video seems to slow down considerably when screensavers are running.
While we are discussing the potential pitfalls of importing video, be aware of changes in file sizes. I started this project with a one-GB MPEG clip that iMovie would stop reading three-fourths of the way through the import process. After some investigation, I noticed that this clip was expanding to more than five GB during import. This is well beyond the two GB file size limit imposed by iMovie 3. My test clip for this project ended up being a 783 MB QuickTime movie that became a 1.65 GB movie once it was opened as an iMovie project. The clip imported in about 30 minutes using the Import command from the File menu. Although iMovie gives you an estimate of the time needed to complete an import operation, the estimate may not be accurate. In my case, iMovie reported that the import would take 38 minutes. If you have used iMovie’s default import settings the right side of your iMovie screen will look something like this.
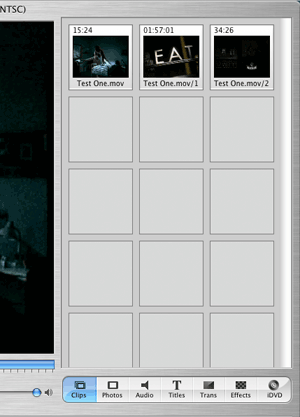
Completed Video Import
Now that you have imported your video, take the opportunity to preview it. At this point, we are not doing any editing. Just look at the footage that you have to work with. You might find it helpful to make notes about such things as what parts of the clip you want to crop (delete), where you want transitions between scenes, and where you want title screens with dialog. Remember, my example is a silent movie. Also note whether the changes affect one or two scenes or the entire movie.
At this point, that general working plan outlined earlier needs some refinement. We have a better idea of what needs to be done and can build a better plan. With a little thought, you will probably see a logical sequence of events that need to be completed. My plan of action involved organizing the movie scenes (clips), removing the audio, converting the movie to black and white, and finally adding some scratches, dust, and jitter to simulate an old film.
Getting Down to Work
Knowing how to select things is as important in iMovie as in any other program. Many of iMovie’s effects are applied by selecting the clip to be modified, choosing an option, adjusting the settings, and applying the changes. With that in mind, here are a few selection tips:
Select an individual clip by clicking on it. In many ways, this is like selecting options in a dialog box. It is how you let the program know where you want it to work.
Select multiple clips by clicking on the first clip and Shift-clicking to select additional clips. If the clips are contiguous, you can simply click on the first clip and Shift-click on the last clip to be selected.
If you are selecting the entire movie, simply click on one clip and then press Command-A. Once you have one clip selected, it’s also possible to either Shift-click on the last clip or choose Select All from the Edit Menu.
It is possible to apply some effects to only a few frames of video in a clip. To get this fine a selection you will need to select a clip and then use the scrubber bar. This blue area under the iMovie monitor window shows where you are currently working in your movie. Select a clip and then click on the triangle at the bottom of the scrubber bar. Drag the triangle where you want the selection to start. Now go back to the left corner of the scrubber bar, grab another triangle from the bottom of the bar, and drag it to where you want the selection to end. The area in the scrubber bar corresponding to the frames that have been selected will turn yellow.
Finally, the Real Work
Clips
Start by organizing your video clips. Clips (scenes) are imported into iMovie in the order in which they were shot. This is fine for most movies. Maybe you want to change the order of the clips? Go right ahead. It’s your movie. You get to decide where things belong. If your scenes are in the clips panes, simply drag them to the timeline at the bottom of the screen in the order that you want them to appear in your movie. You can rearrange the clips later if you like.
Let’s start by clicking the clock at the left side of the screen just above the timeline. This shifts us from clip view mode to a mode more resembling a timeline. The single row of clips at the bottom of the screen becomes three rows. The first row contains your movie clips. The other two rows are blank. Switching to this mode allows us some freedom in manipulating the audio as well as the playback speed of the clip.
Removing the Audio
Now that we have things in order, let’s remove this audio. This is a silent movie, remember. If you look to the far right of the timeline, you will see a very small speaker icon. Each of the three boxes has check marks. You could silence the movie by clearing these check marks. The audio would still be there for future use.
This method is fine if you want to retain the audio. Getting rid of the audio entirely is a simple two-step process. First, select the clips with audio that you want to extract. Now type Command—J or go to the Advanced menu and choose Extract Audio. The audio track appears as a dark purple strip in the timeline just beneath your movie clips. The dark purple color means that the track has already been selected, while a lighter purple strip indicates that the track has not been selected. Since the track is already selected, press Delete. Now that we have taken care of the audio, it’s time to begin the video work
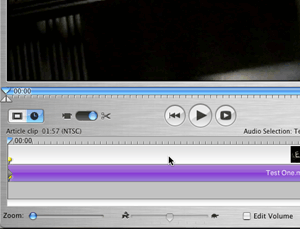
Ready for Audio Extraction
Have You Ever Seen a Color Silent Movie?
We have the sound of a silent movie now let’s make this look like a silent movie. In order to get that look we will remove the color and age the film by adding scratches and jitter. For most of the effects we are going to apply, I can give you the steps but not precise numerical values. That’s because many of the effects rely on slider controls rather than numerical values. Use iMovie’s preview window to see what the effect will look like. You can judge iMovie’s progress by the red line it places under the clips being rendered. When the render is complete, these lines disappear.
Cropping
Applying effects to your movie can take anywhere from a few seconds to several minutes so let’s get rid of footage we don’t need. Why waste time applying effects to footage that’s only going to get deleted later? Do you remember the triangles I mentioned in the scrubber bar? They are also crop markers. Use them to select the portions of the video you want to keep. Once you have done that, press Command-K or Select Crop from the Edit menu. This behavior is different from, say, word processors where you would select the things to throw away. That was my first trip to the Help files.
Credits
Now it’s time for the dialog screens and adding some credits. By doing these now, when we age the film later, these screens will age as well. For this we need to click on the Titles pane just above the timeline. Click one of the options and watch the Preview window. If you don’t like that title, select a different one. You can type text into the box where your name appears as well as adjust the font, size, and color of the text.
At the top of many of these effects are sliders for Speed and Pause. The speed setting controls how long it takes the text to appear on screen, while the pause setting determines how long text will stay on screen. If the selected title uses scrolling text, the four arrows determine which direction the text is going. Clicking the left arrow, for example, scrolls text left. On some effects, only one or two of the arrows are available for use. Once you have an effect you like, drop it into the timeline at an appropriate place.
You can add more title screens as needed. This is not only a great way to represent the dialog in a silent movie, but it gives you a way to add credits to your movie. How else is everyone going to know who the next Hitchcock is if you don’t tell them?
Black and White
Now we are ready to shift our movie from color to black and white. Removing the color before aging the clip means iMovie does not have to waste time applying effects to color data that will be removed. Since I am applying this effect to the entire movie I will click on a clip and then press Command -A to select the entire movie. Click on Effects in the pane buttons just above the right side of the timeline. An alphabetical list of effects appears. Click on the Black & White effect. The Effect In value should be zero since we want the beginning of the clip to be black and white.
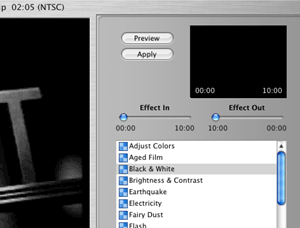
The Black-and-White Movie
Setting the Effect Out slider to either 0:00 or 10:00 produces the same result. About ten seconds from the end of the clip it gradually starts changing to color again. After some experimentation, I solved the problem by moving the playhead (vertical bar in the timeline) near the end of the clip. As you scroll the playhead, watch carefully and stop about nine seconds from the end of the clip. The shift to color wont be noticeable yet, so watch the time. Stop the playhead and choose Split Clip at Playhead from the Edit menu or Press Command-T. Since the new clip is less than ten seconds long, the effect will be applied to the entire clip. Choose Preview and look at the clip. When you have a look you like, click Apply.
I suppose that workaround for making the movie black-and-white should count as needing help. I got the idea based upon the discussion of this effect by Bob Levitus and Dennis Cohen in the iTunes, iPhoto, iMovie and iDVD Bible. Although the edition that I have covers version 2, the technique still works in iMovie 3.
Aging
Now that we have a black-and-white film, it’s time to make it look older. The clips are already selected, so click on the Aged Film effect. In addition to the Effect In and Effect Out sliders, this effect has sliders for Exposure, Jitter, and Scratches. As a starting point, set the Exposure control about two thirds of the way across the slider. Moving the slider left under exposes (darkens) the image. Moving the slider right exposes (lightens) the image. Set Jitter and Scratches near their minimum values and adjust them gradually. Put the preview pane to extensive use if necessary. When you have a look you like choose Apply. This effect may take a few minutes to render.
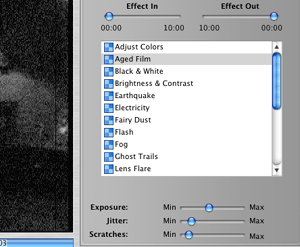
Aging the Film
Depending upon what settings you use to age the film, your footage may look fine now or it may be just a little too sharp for an old silent movie. The first movie I made for this project needed some additional work. The second one did not. If your movie is too sharp, there are probably better methods for fixing this, but I chose Soft Focus. This effect has the same Effect In and Effect Out sliders we encountered earlier. I left Effect In at 0:00 and Effect Out at 10:00. There are also sliders for Softness, Amount, and Glow. The values for these sliders all say None for the minimum value and either Lots or High for the Maximum values. Start with the sliders set close to None, and gradually adjust them. Once again, the Preview window is helpful for deciding when you have the look you want.
There is one more useful effect for this project. At the bottom of the timeline are icons of a tortoise and a hare. If you select a clip, or series of clips, and then move the slider, the playback speed for the clip changes. That’s a good start toward simulating some of the speed changes noticed in silent movies due to the use of hand-cranked cameras.
Closing Comments
I realize that iMovie is capable of a lot more than I explored here. Many of you probably have ideas for how this project could be improved. If I have given you some ideas or encouraged you to start using iMovie, then the three hours and three trips to the Help files was worth it. There’s a lot of unexplored territory in iMovie, but let’s save that for another day. I plan to revisit iMovie periodically. I’ve been doing some pretty boring stuff with my Mac. It’s time to really explore the digital lifestyle. Until next time, FrankenMac’s lab is open.
![]() Copyright © 2004 Sylvester Roque,
sroque@atpm.com.
Copyright © 2004 Sylvester Roque,
sroque@atpm.com.
Also in This Series
- Give Alert Sounds a Little Personality · March 2012
- Create Your Own iPhone Ringtones · February 2012
- Create Your Own Homemade Audio Book · December 2011
- Upgrade to Lion Painlessly · August 2011
- Make the Most of TextEdit · July 2011
- Using the Free Disk Utility on Your Mac · May 2011
- Making Use of QuickTime X · March 2011
- Making the Most of What’s Already on Your Mac · February 2011
- Making the Most of What’s Already on Your Mac · January 2011
- Complete Archive
Reader Comments (10)
Add A Comment