Review: ZephIR! 1.02b1

Developer: studioZee, Inc.
Price: $49.95 (direct from studioZee)
Requirements: ADB port, 11 MB application RAM, AppleScript
Trial: None
Overview
The ZephIR! ADB (Apple Desktop Bus) device can interact with most audio and video components that use infrared remote controls. You use the ZephIR! software to create virtual remote controls on your Macintosh. These virtual remotes can be programmed with AppleScript to perform simple or complex tasks. For example, one button click can turn on your audio receiver, turn on your CD jukebox player, load a playlist of songs and CDs, and start playing your music. Or you can use ZephIR! to turn on your cable TV box at a pre-set time, tune to a selected channel, turn on your VCR, set a recording time, and start recording.
 |
|
Figure 1 |
Hardware and Software Installation
The ZephIR! device (Figure 1) plugs into an ADB port. It has a piggyback plug so you can reconnect your keyboard, monitor, or pointing device. The ZephIR! CD contains 68K and PowerPC versions of the ZephIR! application. You can run the ZephIR Installer, or you can copy the files to your hard drive. I recommend using the Easy Install option. If you want to use the included HyperCard stacks, you must manually copy them from the CD.
Getting Started
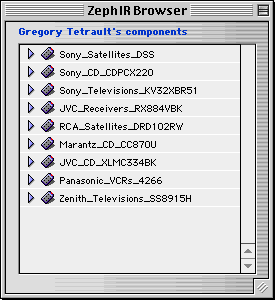
When you launch ZephIR!, a splash screen appears and then the ZephIR Browser window opens (Figure 2). The browser window contains a list of components that can be controlled by ZephIR!. Only a few components are installed from the CD, so the odds are low that your equipment will be among those listed.
Each component consists of buttons that represent those on a remote control. You position the ZephIR! device so that it points toward the equipment you wish to control. When you click a button, the appropriate infrared signal is beamed to your equipment.
 |
|
Figure 2 |
Long Distance Runaround
What can you do if your Macintosh is not in the same room as your audio and video equipment? StudioZee recommends using the POWERMID wireless infrared remote control extender (Model PM5900 from X-10 Inc.). You plug in the POWERMID transmitter and place it in front of the ZephIR! device. You place the POWERMID receiver (Figure 3) where its infrared beam can control your equipment. I had no difficulty using the ZephIR!/POWERMID combination except for finding a convenient place for the receiver.
 |
|
Figure 3 |
Downloading Components (Quick Remotes)
ZephIR!’s Browser menu has an “Import component” command. If you have an Internet connection, choosing this menu selection opens a “WebztIR” window. This window contains a list of manufacturers with sublists for types of devices (e.g., TVs, CD players, VCRs). You may be able to find a ZephIR! component for your equipment. Double-clicking the component adds it to your list. It will also appear in the Quick Remotes submenu of the Remote menu. The Quick Remote is immediately ready for use.
Creating Your Own Components
My home audio/video equipment includes a TV, VCR, digital cable box, DVD player, CD jukebox, receiver/tuner, and cassette tape player. None of them had a prebuilt ZephIR! component! I tried using similar components (e.g., SONY CDPCX300 for my CDPCX350) but had no success. I do recommend downloading similar components; even if they do not work, they can help you create your own Quick Remotes.
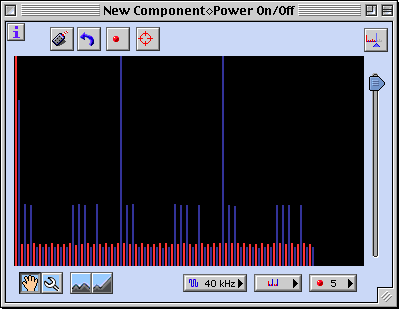
To create a new component, you choose “New” from the File menu and select the Component submenu. Two windows appear at the far right of your screen. Enter the name of your component in the Properties window, then close the window. The Component window has an “I” (information) button in the upper left, a comment window at the top, and a larger tabbed window below. The Commands tab window allows you to create buttons that will send infrared signals identical to those sent by your remote control. To create a command button, double-click on “UntitledCommand1.” A command programming window will appear (Figure 4).
 |
|
Figure 4 |
Click the “I” button in the corner to show the command Properties window. Rename the command appropriately (Power On/Off in my example). Now the real fun begins. You have to figure out what infrared frequency your remote control uses (40 or 56 kHz), how many pulses or repetitions it sends (1 to 5), and how many remote control button presses it will take for ZephIR! to learn how to duplicate your remote’s signal (1 to 7). How can you know these facts? If you have downloaded a similar component, look at its commands and try using the same settings. If your equipment is unique, you will have to use trial and error to arrive at the best settings. To teach ZephIR! the new command, you click the “red dot” button near the top of the command programming window. You then point your remote control at the ZephIR! device and press and hold the appropriate remote control button until the red light on the ZephIR! device goes out. You repeat this for the number of times shown on the “red button” pop-up menu in the lower right corner of the command programming window. Your command programming window will now have a pattern of red and blue vertical lines (Figure 5).
 |
|
Figure 5 |
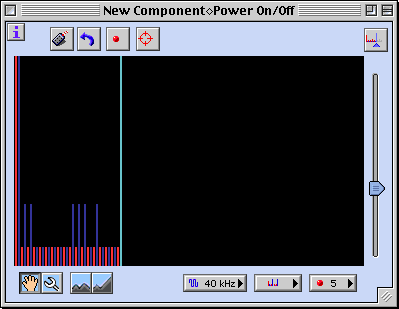
You now have to truncate the signal (my example is too long). You do this by pressing the truncate button in the upper right corner of the command programming window. A light blue vertical line demarcates the recommended truncation point (Figure 6).
 |
|
Figure 6 |
You still aren’t done! The signal intensities (indicated by the heights of the blue and red lines) need to be equalized. You do this by moving the slider control on the right downward until there are only a few different line heights (Figure 7).
 |
|
Figure 7 |
I found that moving the slider down by half to two-thirds usually worked. Now you need to test the command. Point the ZephIR! device at your equipment (or your POWERMID transmitter) and click the “remote control” button at the top of the command programming window. If it worked, click the close window button and save. Voila! You have created your first command. Now do this for every relevant button on your remote control. Wasn’t that fun?
Adding a Channel Guide
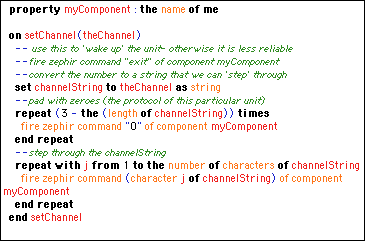
You can greatly increase the usefulness of a ZephIR! virtual remote by adding a channel guide that lists specific channels (for TVs, cable boxes, VCRs, and other equipment). To do this you need a setChannel handler script for your component. If you are lucky, your downloaded component (or a close cousin) includes a setChannel handler script. Otherwise, open any TV component, click on the Script tab, and copy the setChannel handler script (Figure 8).
 |
|
Figure 8 |
Open your new component, click on the Script tab, and paste the handler. You must click the small AppleScript button in the lower left corner to save the script! Now click on the Channel Guide tab. Double-click on UntitledChannel1 and change the channel name. Then double-click “00" to edit the channel number. To add another channel, click the Channel Guide button in the lower left corner of the Component window. The ZephIR! Channel Guide always displays channels in the order you enter them (you cannot sort by channel name or number).
Using NetCD to Create a CD Magazine
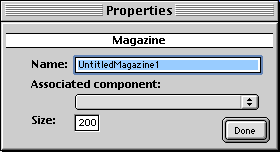
You can combine ZephIR! with a CD database to enable you to play specific CDs and tracks. NetCD, a free utility created by Toby W. Rush, can catalog your CD collection by comparing CDs placed in your Macintosh with an extensive audio CD database (CDDB) on the Internet. After you have catalogued CDs with NetCD, you can create a CD Magazines in ZephIR!. After doing so, click the “I” button to show the Properties window (Figure 9).
 |
|
Figure 9 |
Give the magazine a name, use the pull-down menu to choose an associated component, and type in the maximum number of entries for the magazine. (The latter would be the entire capacity of a jukebox or the number of CDs in an exchangeable magazine.) Now click the Done button. You now have a blank CD magazine window. To add entries you must open the CD Library (in the Manager menu). You then drag an audio CD title from the CD Library window to the appropriately numbered row of the CD Magazine window. This process becomes very tedious for a 300-CD jukebox.
Using the CD Magazine
Once you have created one or more CD Magazines, you can use them to instantly select a CD or an individual track to play. Open the CD Magazine of interest. To play an entire CD just double-click the title. ZephIR! will send commands that tell your CD player to load and play the chosen CD. To play a particular track, highlight the CD title and click on the track button (the two eighth notes in the lower left corner). The CD Magazine window splits into two parts. The lower part lists the individual tracks. Double-click the track you wish to play. ZephIR! will send commands that tell your player to load the chosen CD, jump to the selected track, and play it.
Creating Playlists
If your audio/video equipment supports programmed playlists, you may be able to create and control them with ZephIR! Choose CD Playlist from the “New” menu item of the File menu. Open your CD Library. Drag either disk titles or individual track names to the Playlist window (Figure 10). You can rearrange titles by dragging them up or down. When you are ready to start, click the Play button at the bottom center of the Playlist window. I could not test this feature, since I received script error messages that I could not resolve.
 |
|
Figure 10 |
Creating Custom Remotes and Scripts
To experience the full power of ZephIR! you need to create custom remotes and scripts (Figure 11). Creating custom remotes is a complex task. You open a blank Custom Remote window, create and name buttons, and insert one or more AppleScript commands for each button.
 |
|
Figure 11 |
The most common AppleScript command is to activate a button on a Quick Remote component (Figure 12). A Custom Remote can combine buttons from multiple components and can have unique buttons with complex AppleScripts (e.g., turn on cable box, pop-up a channel list, tune to the channel I select, turn on VCR, activate “one-touch recording”). You need a solid background in programming with AppleScript to achieve this degree of sophistication.
 |
|
Figure 12 |
ZephIR! and Other Applications
You can use all of ZephIR!’s features within any application that can send Apple events. Instead of creating Custom Remotes and Playlists with the ZephIR! software, you can work entirely within HyperCard, SuperCard, or FileMaker Pro.
Strengths of ZephIR!
- Can control nearly any device that responds to infrared signals.
- Online Web browser tutorials can guide you through some tasks.
- Channel Guide feature makes it easy to jump to a desired channel.
- Works with NetCD to create listings of CD magazine or jukebox contents.
- Works with some equipment to create customized playlists of audio CDs or tracks.
- Can create sophisticated custom remotes with AppleScript.
- New lower price (was $74.95).
Weaknesses of ZephIR!
- Requires ADB port (USB version is planned).
- Too few prebuilt components.
- Difficult and time-consuming to program virtual remote controls.
- Cannot import entire listing of CDs or channels, must enter them individually.
- No layout or design tools for building Custom Remotes.
- No manual or help files.
Summary and Recommendations
When I read about ZephIR! I got excited. The idea that I could control all my audio/video equipment with my Macintosh had great appeal. I ordered and installed both ZephIR! and X-10’s POWERMID. However, my excitement waned after spending hours trying to create virtual remote controls. It diminished further when I couldn’t overcome Playlist and Custom Remote problems even though I am a proficient AppleScript programmer. ZephIR! needs a thorough manual, active help features, extensive offline tutorials, and a larger library of prebuilt components.
If you are in need of a way to control infrared-responsive equipment with your Macintosh, ZephIR! is your only choice. ZephIR! would also be a good choice for geeks who love to play with AppleScript and audio/video equipment. If you would like an easy way to control audio/video equipment with your Macintosh, wait for a more sophisticated future version of ZephIR! (or for someone to make something better than ZephIR!).
![]() Copyright © 2000 Gregory Tetrault,
gtetrault@atpm.com. Reviewing in ATPM is open to anyone. If you’re interested, write to us at reviews@atpm.com.
Copyright © 2000 Gregory Tetrault,
gtetrault@atpm.com. Reviewing in ATPM is open to anyone. If you’re interested, write to us at reviews@atpm.com.
Reader Comments (1)
Add A Comment